


95
04
| Getting Started and Connecting Peripherals
Interface to Peripheral Devices
In addition to use of tools, robots need to be electrically connected to various peripheral devices
to interact with each other by receiving or transmitting various signals in order to perform more
various tasks. Interactions with peripherals are made by electrical signals, such as digital or analog
I/O, and communication methods such as EtherCAT, Ethernet or RS232 and RS485.
Warning
Be sure to turn off the robot and disconnect the power plug from the power
socket before proceeding with any electrical work. Wiring while powered on can
cause I/O board fuses to break or damage the product itself. Failure due to
incorrect connection and misuse is not the manufacturer’s responsibility.
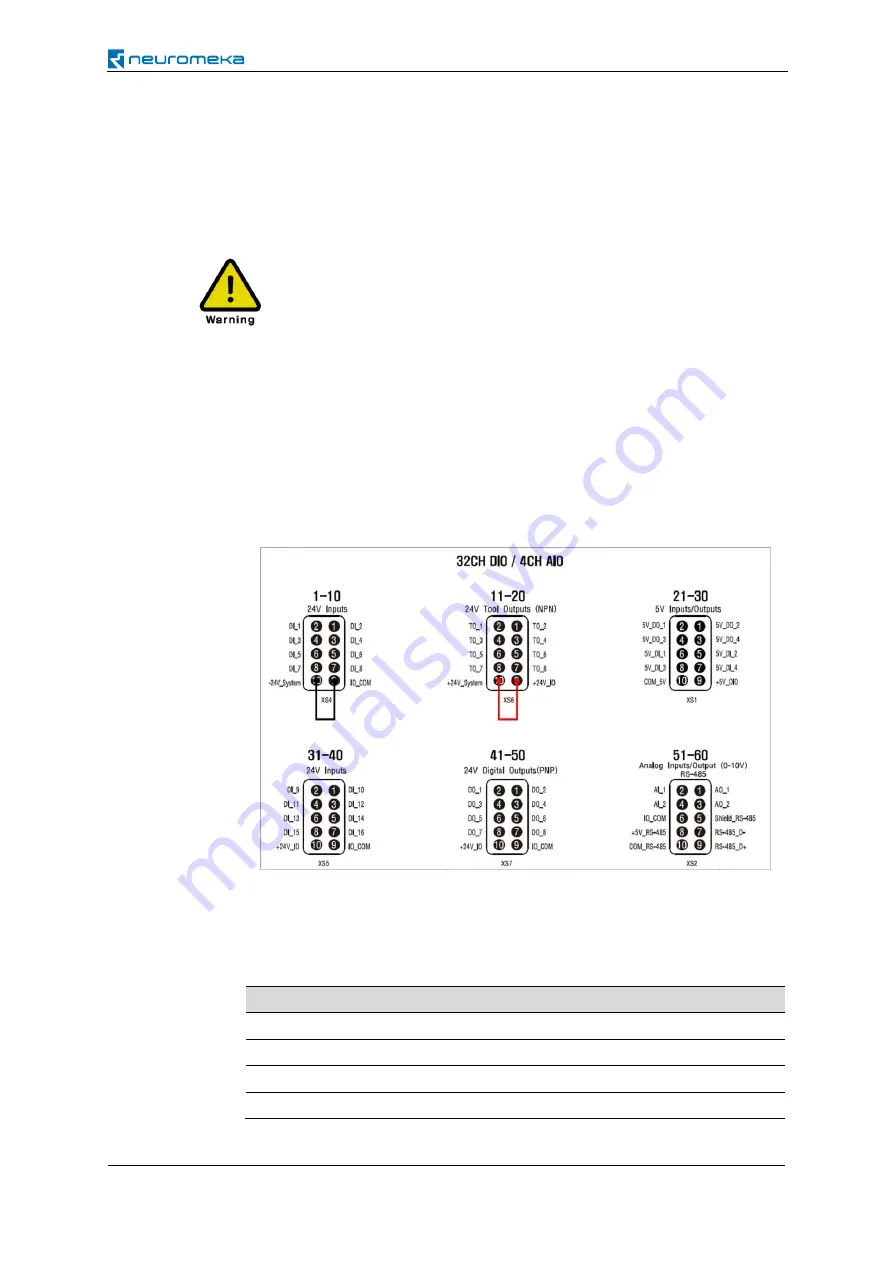
Power supply to I/O board
To use the 24V input/output si
gnal on the control box’s I/O board, you must first supply
24V power supply to the I/O board. The I/O board power supply can be provided by
connecting the internal 24V power source or an external 24V power supply. No separate
supply is required for the 5V input/output signal. The default way of power supply is to
connect and use the internal 24V, which is wired as follows:
Connect the GND of the internal power supply and the common GND of the I/O board
by connecting two pins of number 10 and 9 of the DIO 1-10 terminal block located on
the back panel of the control box. If you connect two pins of number 10 and 9 of the
DIO 11-20 terminal block, the +24V of the internal power is supplied to the I/O board.
pin location
name
description
Terminal 11-20 (pin 10)
+
24V_System internal 24V power (+24V)
Terminal 1-10 (pin 10)
−
24V_System internal 24V power (GND)
Terminal 11-20 (pin 9)
+
24V_IO
power to the I/O board (I/O board 24V)
Terminal 1-10 (pin 9)
IO_COM
power to the I/O board (I/O board common GND)
Содержание INDY7
Страница 1: ...Version 2 3 0 2019 08 16...
Страница 2: ......
Страница 3: ......
Страница 5: ...5...
Страница 8: ......
Страница 12: ......
Страница 15: ......
Страница 128: ...128 05 Programming Now your jointMove setup is complete...
Страница 136: ...136 05 Programming Finally enter the motion name and touch OK Now the frameMove setting is complete...
Страница 144: ...144 05 Programming Now the setting for the blending of frameMove is completed...
Страница 152: ...152 05 Programming Now your home movement setup is complete...
Страница 162: ...162 05 Programming stop It stops program execution No setup is required...
Страница 257: ...257 The commands that can be executed by the digital input signals are listed as follows...
Страница 259: ...259 When the message Do you want to renew it appears touch Yes The message Renewal is complete is displayed Touch OK...
Страница 264: ...264 Robot statuses that can be associated with the digital output signals are listed as follows...
Страница 266: ...266 When the message Do you want to renew it appears touch Yes The message Renewal is complete is displayed Touch OK...
Страница 279: ...279 If you run Conty again the language is changed and shown as follows...
Страница 319: ...319 08 Maintenance and Repair On the next Maintenance Service screen touch Log Touch Sending Log...
Страница 321: ...321 09 Certification 9 Certification 9 1 Machinery Directive...
Страница 322: ...322 09 Certification 9 2 Electromagnetic Compatibility Directive...
Страница 325: ...325 10 Warranty Neuromeka Official Channal Copyright 2016 2022 Neuromeka All rights reserved www neuromeka com...


