background image

Scanner Appliance Tour

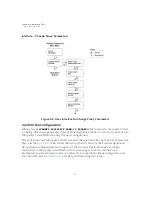
Network Settings in IPv6-only Mode

47

Configure the scanner with manual IPv6

If automatic IPv6 address assignment is not available on your network, you must enable 
the Scanner Appliance with a manual IPv6 address using the 

ENABLE STATIC IPv6 ON 

LAN?

 menu option. One of these configurations is required. Note: For a valid network 

configuration, you should configure at least one IPv6 DNS resolver. 

Tell me the steps

When enabling a manual IPv6 address on the LAN interface, you must enter network 
configuration settings for the Scanner Appliance so that the Appliance can communicate 
with the Qualys Cloud Platform. Note: Anytime you enter an IPv6 address, both expanded 
and compressed formats are supported. 

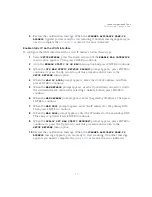
Follow these steps to enable a manual IPv6 address on the LAN interface:

1

Go to the 

SETUP NETWORK

 menu option and press ENTER


to continue.

2

Press the Down arrow until the 

ENABLE STATIC IPv6 ON LAN?

 menu option 

appears. Then press ENTER


to continue. 

3

When the 

IPv6 ADDR

 prompt appears, enter the IPv6 IP address, and then press 

ENTER to continue. 

4

When the 

IPv6 PREFLEN

 prompt appears, use the Up and Down arrows to scroll 

to the desired prefix length value. After selecting a prefix length, press ENTER to 
continue.

5

When the 

IPv6 GW

 prompt appears, enter the gateway IPv6 address, and then 

press ENTER


to continue. 

6

When the 

IPv6 DNS1

 prompt appears, enter the IPv6 address for the primary DNS 

server, and then press ENTER


to continue. 

7

When the 

IPv6 DNS2

 prompt appears, enter the IPv6 address for the secondary 

DNS server. This entry is optional. Press ENTER


to continue.

8

When the 

REALLY SETUP STATIC LAN IPV6?

 prompt appears, press ENTER


to 

continue. Or press the Up arrow to quit this procedure and return to the 

SETUP


NETWORK

 menu option.

9

Review the confirmation messages. The Scanner Appliance attempts to make a 
connection to the Qualys Cloud Platform using the new configuration. Upon 
success the 

SCANNER APPLIANCE NAME–IP ADDRESS

 message appears and the 

manual IPv6 address is enabled.

Содержание QGSA-5120-A1

Страница 1: ...Scanner Appliance User Guide December 20 2021 ...

Страница 2: ... Rights Reserved Qualys the Qualys logo and QualysGuard are registered trademarks of Qualys Inc All other trademarks are the property of their respective owners Qualys Inc 919 E Hillsdale Blvd 4th Floor Foster City CA 94404 1 650 801 6100 ...

Страница 3: ... UI 20 System Reboot and Shutdown 26 Configure VLANs and Static Routes 28 Configure Static IP Address 29 Configure IPv6 Address for Scanning 33 Proxy Configuration 34 Split Network Configuration 39 Ethernet Port Configuration 43 Changing the Network Configuration 45 Enable IPv6 only Mode 46 Network Settings in IPv6 only Mode 46 Renew Auto IPv6 on LAN 48 Switch Between Modes 48 Reset All Network Se...

Страница 4: ...Contents 4 Appendix A Product Specifications Appendix B Software Credits Appendix C Safety Notices ...

Страница 5: ...d and automating the full spectrum of auditing compliance and protection for IT systems and web applications Founded in 1999 Qualys has established strategic partnerships with leading managed service providers and consulting organizations including Accenture BT Cognizant Technology Solutions Deutsche Telekom Fujitsu HCL HP Enterprise IBM Infosys NTT Optiv SecureWorks Tata Communications Verizon an...

Страница 6: ...Preface 6 ...

Страница 7: ... started Before you begin Best Practices for internal scanning Quick Start Interested in Virtual Appliances Qualys Virtual Scanner Appliance is packaged and qualified for deployment on a variety of virtualization and cloud platforms Please contact your TAM or Qualys Support if you re interested in adding Virtual Appliances to your license Desktop Laptop VMware Workstation Player Fusion Oracle Virt...

Страница 8: ...ault when you deploy a Scanner Appliance it will be in IPv4 v6 network mode If your network is configured in a way that only IPv6 addresses can be used then you ll need to switch to IPv6 only mode See Enable IPv6 only Mode Appliance Access to Qualys Cloud Platform The Scanner Appliance must be able to reach certain infrastructure located at the Qualys Cloud Platform where your Qualys account is lo...

Страница 9: ... DHCP or Static IP By default the Scanner Appliance is pre configured with DHCP If configured with a static IP address be sure you have the IP address netmask default gateway primary DNS and WINS server if appropriate Proxy Support The Scanner Appliance includes Proxy support with or without authentication Basic or NTLM Proxy level termination as implemented in SSL bridging for example is not supp...

Страница 10: ...sult in degraded performance so you may consider using our VLAN tagging feature VLAN trunking to circumvent layer 3 devices to avoid potential performance issues Quick Start Once you complete the Quick Start you re ready to start scanning It takes just a couple of minutes It s important that you complete the steps in the order shown Step 1 Connect the Scanner Appliance to the Network Qualys strong...

Страница 11: ...e Console interface is not intended for uploading the whole scanner configuration by means of a pre defined keystroke file Uploading such a file will result in lost characters and incorrect configuration To set up the Remote Console interface follow these steps 1 Be sure the terminal server is up and running Also check the terminal server settings The following settings are required Note Stop Bits...

Страница 12: ...manned or high security areas 2 Press the power button on the back panel Be sure that the power button has a green backlight 3 Welcome to Qualys appears in the Scanner Appliance interface followed by other informational messages during the boot process which takes approximately two minutes These messages appear in the order shown Welcome to Qualys Qualys Scanner is starting up Filesystem check in ...

Страница 13: ...ting you to make another configuration Complete the Network Configuration IPv6 only mode If your network is configured to only allow IPv6 addresses then you ll need to switch to IPv6 only network mode and make network configuration settings See Enable IPv6 only Mode for details on how to reset the Scanner Appliance to IPv6 only mode then configure your network VLANs and proxy before continuing to ...

Страница 14: ...enu select an asset group that you want to add the Scanner Appliance to This will make the Appliance available to users in your business unit 6 Click Activate Then the Scanner Appliance attempts to log in to the Qualys Cloud Platform Note It may take a few minutes for the Scanner Appliance activation to occur If you prefer not to wait complete the activation manually by restarting the Scanner Appl...

Страница 15: ... allow incoming logins or connections from the network If split network configuration is enabled the IP address for the LAN interface is displayed The Qualys Cloud Platform indicator for your account appears in the lower right corner Proper Shutdown Just go to the LCD display on the front panel Press the down arrow until SYSTEM SHUTDOWN appears and then press ENTER When you see REALLY SHUTDOWN SYS...

Страница 16: ...can start internal scans Next to the status you ll see the busy icon is greyed out until you launch a scan then it looks like this You might also check out 2 tells you that your Scanner Appliance is a Physical Appliance and means it s a Virtual Appliance 3 Latest software versions these are installed automatically as part of the activation 4 The available capacity will be 100 until you launch a sc...

Страница 17: ... the Appliance Navigating the Appliance UI System Reboot and Shutdown Configure VLANs and Static Routes Configure Static IP Address Configure IPv6 Address for Scanning Proxy Configuration Split Network Configuration Ethernet Port Configuration Changing the Network Configuration Enable IPv6 only Mode Network Settings in IPv6 only Mode Switch Between Modes Reset All Network Settings ...

Страница 18: ...d to prompts Left and Right arrow buttons move the cursor to left right in an entry field Up and Down arrow buttons scroll through menu options and scroll through characters in an entry field ENTER button in the center is used to confirm entries and move to the next screen Tell me about the LEDs S1 tells you a Qualys scan is in progress on the Scanner Appliance S2 tells you a software update to th...

Страница 19: ... USB to RS232 converter cable to a USB port if you want to use the optional Remote Console interface any port may be used Appliance UI The Scanner Appliance has a user interface for configuration and management You can choose to use the LCD display and keypad on the front panel or the optional Remote Console interface Both the LCD display and Remote Console offer the same functionality and share t...

Страница 20: ...me and IP address are displayed The first menu option displayed is SETUP NETWORK Figure 2 1 Scanner Appliance Main Menu To move up through the menu options press the Up arrow To move down through the menu options press the Down arrow To select an option press ENTER To exit the main menu press the down arrow button until the EXIT THIS MENU option appears and then press ENTER ...

Страница 21: ...and the Up and Down arrows are used to scroll through characters Some fields allow certain characters to be entered The character restrictions are described below Up and Down Arrows Using the LCD user interface use the Up and Down arrows to enter characters in a field Using the Remote Console interface you have the option to use the Up and Down arrows or to use your keyboard to enter characters In...

Страница 22: ...o select characters Press the Up arrow to scroll through characters in ascending order Starting from the space character the characters appear in this order lowercase letters a to z space numbers 0 to 9 underscore special characters for Proxy user name and password only uppercase letters A to Z Figure 2 2 Scrolling characters in ascending order Press the Down arrow to scroll through characters in ...

Страница 23: ...eld entry and space characters may be included in a text field entry Embedded spaces are not permitted in text field entries The space character may be used to remove characters when editing text fields except the Proxy password To remove a character in an entry field using the LCD user interface move the cursor on the character using the Left and Right arrows select the space character using the ...

Страница 24: ...cut for clearing a domain name entry Just press the Left arrow and Right arrow at the same time Proxy User Name For the Proxy user name in the PROXY USER field you may enter a maximum of 32 characters including lower case letters upper case letters numbers and underscore These special characters can be used underscore _ dash backslash period at sign Figure 2 5 Special characters in the Proxy user ...

Страница 25: ... 30 press the Up arrow To scroll through characters in descending order press the Down arrow Special Characters in the PROXY PASSW field Order ascending Character Name Order ascending Character Name 1 _ underscore 16 plus 2 hyphen 17 equal 3 backslash 18 parenthesis left 4 slash 19 parenthesis right 5 bar 20 brace left 6 tilda 21 brace right 7 exclamation 22 bracket left 8 question 23 bracket righ...

Страница 26: ...er Appliance makes a successful connection to the Qualys Cloud Platform This message indicates the Scanner Appliance is ready for scanning If another message appears you need to activate the Scanner Appliance or troubleshoot the issue before scanning See Troubleshooting for help with resolving any errors How to shutdown the system You can power off the system using the shutdown button or using the...

Страница 27: ...this phase these messages appear in the order shown below CONTACTING QUALYS Filesystem check in progress CONTACTING QUALYS 3 The SCANNER APPLIANCE NAME IP ADDRESS is displayed after the Scanner Appliance makes a successful connection to the Qualys Cloud Platform This means your the Scanner Appliance is ready to start scanning If another message appears you need to take some action before you can s...

Страница 28: ... so that your Scanner Appliance makes a successful connection to the Qualys Cloud Platform Configure VLAN To configure the Scanner Appliance with a default VLAN interface on the LAN interface follow these steps 1 Go to the SETUP NETWORK menu option and press ENTER to continue 2 Press the Down arrow one time When the ENABLE VLAN ON LAN menu option appears press ENTER to continue 3 When the prompt V...

Страница 29: ...uired Using IPv6 only mode Please see Network Settings in IPv6 only Mode for instructions Entry fields for IP addresses used in the static IP address configuration are pre filled with three digits for all octets and you must enter a value for each digit For example to specify the IP address 176 34 20 5 you input the IP address as 176 034 020 005 See IPv4 Addresses for details Tell me the steps Whe...

Страница 30: ...NTER to continue 5 When the LAN DNS2 prompt appears enter the IP address for the secondary DNS server This entry is optional Press ENTER to continue 6 Next are three optional network settings used for informational purposes only These Appliance settings are not used to access the internal network for scanning or the Qualys Cloud Platform for software updates To skip these settings press ENTER thre...

Страница 31: ...255 000 appears Use the Up and Down arrows to scroll through valid netmasks When the appropriate netmask value appears press ENTER to confirm Possible netmask values are listed below If you press the Down arrow the values appear in this order 255 255 255 000 255 255 254 000 255 255 252 000 If you press the Up arrow the values appear in this order 255 255 255 000 255 255 255 128 255 255 255 192 Scr...

Страница 32: ... one option is enabled the other option disappears from the SETUP NETWORK menu Figure 2 6 User Interface for Enable Static IP on LAN We ll update menu options once you configure settings Once you configure ENABLE STATIC IP ON LAN the option will change to CHANGE STATIC IP ON LAN Once you configure ENABLE DHCP ON LAN the option will appear as RENEW DHCP ON LAN ...

Страница 33: ... go to the Appliance UI and complete the Quick Start You must configure an IPv4 address on the LAN interface using DHCP or a static IP Be sure your Scanner Appliance has successfully connected to the Qualys Cloud Platform The IPv6 Scanning feature must be enabled for your subscription Tell me the steps 1 Log in to the Qualys UI 2 Go to Scans Appliances and edit your Scanner Appliance You ll see th...

Страница 34: ...n This ensures a secured end to end connection SSL bridging or tunnel termination must not be configured in your Proxy server when supporting the Scanner Appliance Tell me the steps To configure the Scanner Appliance with Proxy support follow these steps 1 Go to the SETUP NETWORK menu option 2 Press the Down arrow until the ENABLE PROXY menu option appears Then press ENTER to continue 3 When the C...

Страница 35: ...s _ including dot 4 When the PROXY PASSW prompt appears enter the password for Proxy authentication If authentication is not enabled at the Proxy level leave the entry field blank Press ENTER to continue Supported Characters Lower case letters upper case letters numbers and these special characters _ including dot 5 When the REALLY ENABLE PROXY prompt appears press ENTER to continue Or press the U...

Страница 36: ...r Enable Proxy Want to update proxy setting Once a Proxy configuration is enabled the Proxy settings are stored on the Scanner Appliance You can change or disable these settings at any time To change Proxy parameters follow these steps 1 Go to the SETUP NETWORK menu option 2 Press the Down arrow until the CHANGE PROXY PARAMS menu option appears Then press ENTER to continue ...

Страница 37: ...r press the Up arrow two times to quit this procedure and return to the SETUP NETWORK menu option 5 Review the confirmation messages The ENABLING PROXY SUPPORT message appears followed by others To disable Proxy parameters follow these steps 1 Go to the SETUP NETWORK menu option 2 Press the Down arrow until the DISABLE PROXY menu option appears Then press ENTER to continue 3 When the REALLY DISABL...

Страница 38: ...lys Cloud Platform using the new configuration The activation code will appear on the screen if the Appliance has not been activated See Step 3 in the Quick Start and follow the instructions to activate the Scanner Appliance An appliance configuration error appears if the Scanner Appliance failed to make a connection to the Qualys Cloud Platform An error may occur because the Proxy parameters you ...

Страница 39: ...o the Qualys Cloud Platform over the Internet Figure 2 9 Standard network traffic configuration default The Split network configuration allows users to split the scanning traffic from the management traffic The WAN interface by default is only used to communicate with the Qualys Cloud Platform for Scanner Appliance management traffic like scan map job pickup scan map data upload software updates a...

Страница 40: ...you configure Split network configuration Check to be sure that network connection to both the LAN and WAN interfaces have been set up properly The Scanner Appliance must be configured with DHCP or a static IP address on the LAN interface first Do not configure the LAN and WAN interfaces on the same subnet This type of configuration is not supported Tell me the steps Enable DHCP on the WAN Interfa...

Страница 41: ...AN IP ADDR prompt appears enter the static IP address and then press ENTER to continue 5 When the WAN NETMASK prompt appears use the Up and Down arrows to scroll to the desired netmask value After selecting a netmask value press ENTER to continue 6 When the WAN GATEWAY prompt appears enter the gateway IP address Then press ENTER to continue 7 When the WAN DNS1 prompt appears enter the IP address f...

Страница 42: ...WAN Figure 2 11 Enable Static IP Address on WAN Interface We ll update menu options once you configure settings Once you configure ENABLE STATIC IP ON WAN the option will change to CHANGE STATIC IP ON WAN Once you configure ENABLE DHCP ON WAN the option will appear as RENEW DHCP ON WAN ...

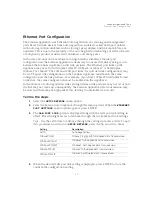
Страница 43: ...l duplex forced on devices the same configuration must be enabled on the Appliance In the absence of auto negotiation link syncing between link partners may not occur and the link may not come up Consequently the Scanner Appliance data transmission may be slow and there may be high packet loss leading to unreliable scan results Tell me the steps 1 Select the SETUP NETWORK menu option 2 Press the D...

Страница 44: ...he available port link settings Tips Use the Left arrow to advance through the settings in reverse order To quit this procedure and return to SETUP NETWORK press the Up arrow two times 8 When the desired WAN port link setting is displayed press ENTER to confirm the configuration setting 9 When the REALLY SET WAN TO value prompt appears press ENTER to store the configuration setting 10 Return to SE...

Страница 45: ...gs at these prompts For example if you are updating from DHCP on the LAN interface to a static IP on the LAN interface enter the appropriate configuration settings following the prompts At the REALLY SET LAN STATIC NETWORK prompt press ENTER to confirm the change Want to reset the network configuration to the factory default See Reset All Network Settings When a scan is in progress at the time of ...

Страница 46: ...SETUP NETWORK menu Step 2 Configure network and proxy settings optional In IPv6 only mode you have the option to configure the scanner network interface with either a manual or automatic IPv6 configuration IPv6 only mode supports proxy and VLAN configurations Proxy and VLAN configurations work the same whether you re in IPv4 v6 mode or IPv6 only mode See the following sections for details Network ...

Страница 47: ...STATIC IPv6 ON LAN menu option appears Then press ENTER to continue 3 When the IPv6 ADDR prompt appears enter the IPv6 IP address and then press ENTER to continue 4 When the IPv6 PREFLEN prompt appears use the Up and Down arrows to scroll to the desired prefix length value After selecting a prefix length press ENTER to continue 5 When the IPv6 GW prompt appears enter the gateway IPv6 address and t...

Страница 48: ...ss ENTER to continue Or press the Up arrow to quit this procedure and return to the SETUP NETWORK menu option 7 When the Manual DNS2 prompt appears enter the IPv6 address for the secondary DNS server and then press ENTER to continue 8 When the REALLY SETUP AUTO LAN IPV6 prompt appears press ENTER to continue Or press the Up arrow to quit this procedure and return to the SETUP NETWORK menu option S...

Страница 49: ...ettings that were customized by the user are removed These include settings entered using the Scanner Appliance interface such as static IP address Proxy support the WAN interface configuration Ethernet port configuration and user password store After the reset you must manually re enter any required network configuration settings using the Scanner Appliance interface and ensure that the Scanner A...

Страница 50: ...no VLAN configuration In a case where the Scanner Appliance network configuration was customized not identical to the default configuration provided by Qualys before the reset further network configuration is necessary in order for the Scanner Appliance to connect to the Qualys Cloud Platform and perform scans Need help See the Quick Start ...

Страница 51: ...ques you can use to respond to errors and performance conditions when using the Scanner Appliance How can I test network connectivity Communication Failure message Appliance Network Errors Network Errors using older appliance model Where can I find the model number and serial number ...

Страница 52: ...S name resolution is working properly server information is returned including the server name and IP address Note that nslookup is not available on all systems Communication Failure message You ll see a COMMUNICATION FAILURE message if there is a network communications breakdown between the Scanner Appliance and the Qualys Cloud Platform Why does it happen The communication failure may be due to ...

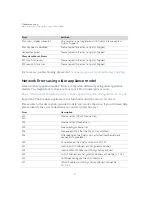
Страница 53: ...or is resolved Make sure to resolve the error Error Solution LAN WAN Errors no CARRIER on LAN interface This error appears when attempting to configure proxy or personalization while the LAN network cable port is disconnected Check that the LAN port is connected no CARRIER on WAN interface This error appears when attempting to configure proxy or personalization while the WAN network cable port is ...

Страница 54: ...st be on different subnets LAN DNS server not reachable Ensure LAN interface has network connectivity to its configured DNS servers WAN DNS server not reachable Ensure WAN interface has network connectivity to its configured DNS servers LAN and WAN same gateway LAN and WAN must be configured with different subnets and gateway addresses Duplicate IP detected Ensure LAN WAN is configured with an IP ...

Страница 55: ...ommunicate with the configured proxy server Without Proxy Configuration Failure while sending network data Ensure the scanner s LAN single network or WAN split network interface can connect to the Qualys Platform and is not blocked by any firewall rules or network access control devices Failed receiving peer data 56 With Proxy Configuration Failure while receiving network data from proxy Ensure th...

Страница 56: ...t registered with Qualys Please contact Qualys Support This Scanner is disabled Please report this error to Qualys Support Account expired Please report this error to Qualys Support Filesystem Mount Errors EFS fsck fatal errors Please report this error to Qualys Support EFS mount fatal error Please report this error to Qualys Support Error Description E00 E01 Internal error NTLM Proxy error E02 In...

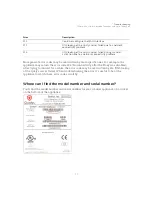
Страница 57: ...lys server failed When troubleshooting the error it s useful to be at the appliance to watch these error codes scroll by Where can I find the model number and serial number You ll find the model number and serial number for your scanner appliance on a sticker on the bottom of the appliance E12 Could not configure the WAN interface E13 DNS lookup of the Qualys server failed due to a network connect...

Страница 58: ...Troubleshooting Where can I find the model number and serial number 58 ...

Страница 59: ...mension 1 73 H x 17 W x 14 D inches Weight 11 40 lbs Environment Acoustic Noise 45 dBA acoustic noise level at 23 C Operating Conditions 0 C to 35 C from 0 to 5 000 feet 20 to 90 RH Storage Conditions 10 C to 70 C 10 to 85 R H non condensing Operating Vibration 0 3 Grms 10 to 500 Hz 5 minutes per axis In Package Shock In accordance with ISTA 2A Regulatory UL conforms to UL 60950 1 CSA C22 2 No 609...

Страница 60: ...Appendix A Product Specifications 60 ...

Страница 61: ...tware embedded in the Qualys Scanner Appliance were developed by third parties and are governed by the terms and conditions detailed in the following Qualys document Qualys Scanner Appliance Software Credits https www qualys com docs qualys software credits scanner appliance pdf ...

Страница 62: ...Appendix B Software Credits 62 ...

Страница 63: ...be considered Reliable Grounding Reliable grounding of rack equipment must be maintained Particular attention should be given to supply connections other than direct connections to the branch circuit for example use of power strips Mechanical Loading The unit should be installed in a rack in a manner that does not create a hazardous condition due to uneven mechanical overloading Cautionary Notices...

Страница 64: ...Appendix C Safety Notices 64 ...

Отзывы: