Scanner Appliance Tour
Configure VLANs and Static Routes
28
Configure VLANs and Static Routes
This is supported in IPv4+v6 network mode (the default) and IPv6-only mode.
The Scanner Appliance supports VLAN trunking on the LAN interface for scanning traffic.
VLAN trunking on the WAN interface is not supported. One VLAN interface (802.1Q) may
be configured using the Scanner Appliance user interface (LCD and Remote Console). Up
to 4094 VLANs and static routes can be defined using the Qualys web application.
How it works - The Scanner Appliance adds VLAN tag(s) to all scanning packets following
the 802.1Q tagging protocol.
Configure VLAN using the Appliance UI
A VLAN that is defined using the Scanner Appliance UI is saved on the Appliance and
can’t be edited using the Qualys UI.
Important!
After making configuration changes, be sure to complete the entire network
configuration so that your Scanner Appliance makes a successful connection to the
Qualys Cloud Platform.
Configure VLAN
To configure the Scanner Appliance with a default VLAN interface on the LAN interface,
follow these steps:
1
Go to the
SETUP NETWORK
menu option and press ENTER
to continue.
2
Press the Down arrow one time. When the
ENABLE VLAN ON LAN
menu option
appears, press ENTER
to continue.
3
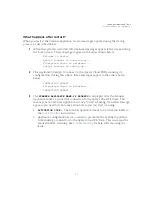
When the prompt
VLAN 0-4094
appears, specify the VLAN ID. The value “0000”
appears in the screen by default. Specify the VLAN ID, and then press ENTER to
continue.
Change VLAN
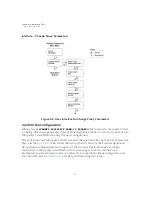
A default VLAN that you’ve added using the Scanner Appliance user interface (LCD and
Remote Console) can be changed at any time. To do this, select the
CHANGE VLAN ON LAN
menu option from the
SETUP NETWORK
menu. Then enter another VLAN ID and press
ENTER.
Disable VLAN
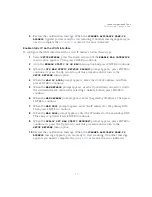
To disable a default VLAN, select the
CHANGE VLAN ON LAN
menu option from the
SETUP
NETWORK
menu. Then enter the VLAN ID “0000” and press ENTER. After the configuration
is disabled the
ENABLE DHCP ON LAN
menu option appears on the Scanner Appliance
interface.
Содержание QGSA-5120-A1
Страница 1: ...Scanner Appliance User Guide December 20 2021 ...
Страница 4: ...Contents 4 Appendix A Product Specifications Appendix B Software Credits Appendix C Safety Notices ...
Страница 6: ...Preface 6 ...
Страница 58: ...Troubleshooting Where can I find the model number and serial number 58 ...
Страница 60: ...Appendix A Product Specifications 60 ...
Страница 62: ...Appendix B Software Credits 62 ...
Страница 64: ...Appendix C Safety Notices 64 ...

