


4-20
IMPORTANT:
User password setup is not available before Supervisor password setup.
Do not set any password before installing the OS.
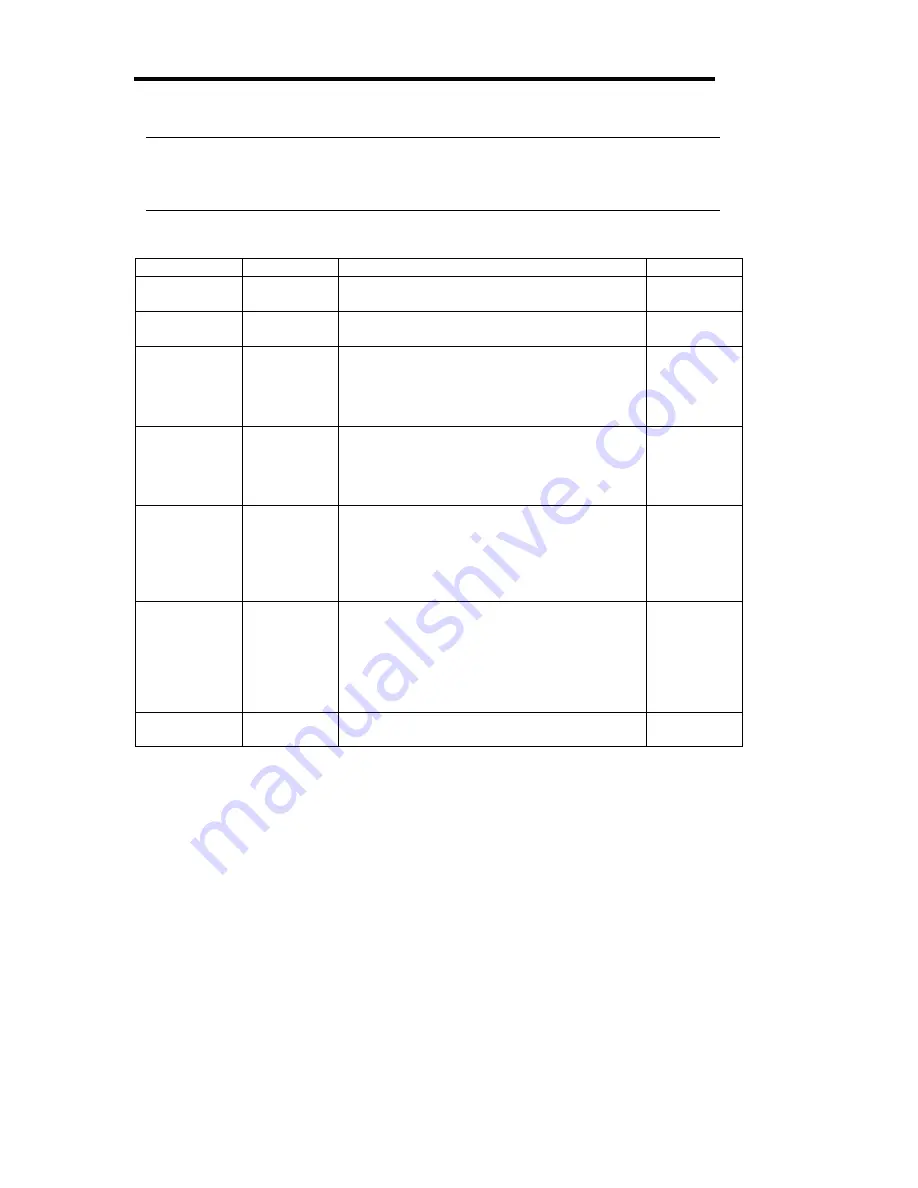
See the table below for setup options on the screen.
Option Parameter
Description
Your
Setting
Supervisor
Password is
[Clear]
Set
Indicates Supervisor password setup status (view
only).
User Password
is
[Clear]
Set
Indicates User password setup status (view only).
Set Supervisor
Password
Up to 7
alphanumeric
characters
Press
Enter
to display the supervisor password
entry screen. With the supervisor password, all
SETUP menus are available for access. This
option is available only when you log into the
SETUP utility with the supervisor password.
Set User
Password
Up to 7
alphanumeric
characters
Press
Enter
to display the user password entry
screen. With a user password, accessing the
SETUP menus is restricted. This option is
available only if the Supervisor Password is
specified.
Password on
boot
Enabled
[Disabled]
Specify whether to request a password entry at
boot-up. Supervisor password setup is required
beforehand. When the supervisor password is
specified and this option is disabled, the BIOS
assumes that a system boot attempt is made by a
user.
Power Switch
Mask
[Unmasked]
Masked
Enable or disable the POWER switch on the
server. If "Masked" is selected, power-off with the
POWER switch becomes unavailable after OS
boot-up. (Forced shut down also becomes
unavailable. Forced shut down is a feature to shut
down by pressing the POWER switch for over
four seconds.)
Option ROM
Menu Mask
[Unmasked]
Masked
Enable or disable key entries during optional
ROM expansion.
[ ]: Factory-set
Содержание Express 5800/320Lb-R
Страница 1: ...N8800 048E 049E NEC Express5800 320Lb 320Lb R User s Guide 1st Edition 10 2004 856 124161 901 A ...
Страница 10: ...iv This page is intentionally left blank ...
Страница 14: ...viii Setup of Optional PCI Board 8 43 Appendix A Specifications A 1 Appendix B I O Port Address B 1 ...
Страница 17: ...1 3 Label D Label C Label B Label A Label E ...
Страница 18: ...1 4 Rack mount Model Label A Label D Label E Label C Label B ...
Страница 19: ...1 5 Label D Label C Label B Label A Label E ...
Страница 20: ...1 6 PCI CPU Modules PCI Module CPU Module Label A Label B Label A External View Internal View External View ...
Страница 21: ...1 7 Label A Internal View Label B Label B ...
Страница 36: ...1 22 This page is intentionally left blank ...
Страница 44: ...2 8 Front View inside Tower model Rack mount model ...
Страница 83: ...3 9 This page is intentionally left blank ...
Страница 84: ......
Страница 156: ...5 28 PCI Device Detailed information Allows the detailed information of a device on the PCI slot to be viewed ...
Страница 168: ...5 40 Sample screen of NEC ESMPRO Manager 2 Maintenance screen of CPU module CPU Module Maintenance ...
Страница 177: ...5 49 Not support ...
Страница 191: ...5 63 This page is intentionally left blank ...
Страница 192: ......
Страница 205: ...Chapter 7 Troubleshooting If the product does not work properly see this chapter before deciding that it is a breakdown ...
Страница 254: ...8 12 Check the disk status to confirm that the disk is added successfully ...
Страница 273: ...8 31 Chapter 7 Troubleshooting ...
Страница 283: ...8 41 18 Use cable ties to fasten the extra length of cables Cable ties included with cabinet ...
Страница 297: ...8 55 This page is intentionally left blank ...
Страница 298: ......
Страница 300: ...A 2 This page is intentionally left blank ...