116
Item
Description
Address assigned from DNS server
Set to "ON" to use DNS server address assigned by provider.
Initial setting: ON
IPv4 Primary
5
Enter primary of DNS server address (IPv4).
IPv4 Secondary
5
Enter secondary of DNS server address (IPv4).
IPv6 Primary
5
Enter primary of DNS server address (IPv6).
IPv6 Secondary
5
Enter secondary of DNS server address (IPv6).
1 The Profile (APN) in the initial settings cannot be edited.
2 Enter up to 32 double-byte characters (excluding ? and single-byte spaces) or enter up to 64 single-byte characters.
3 Enter up to 62 single-byte characters and symbols (excluding single-byte spaces, ", &, ,(comma), :, ;, <, >, and ¥).
4 Enter up to 63 single-byte characters and symbols (excluding ? and single-byte spaces).
5 Turn off "Address assigned from DNS server" before entering this.
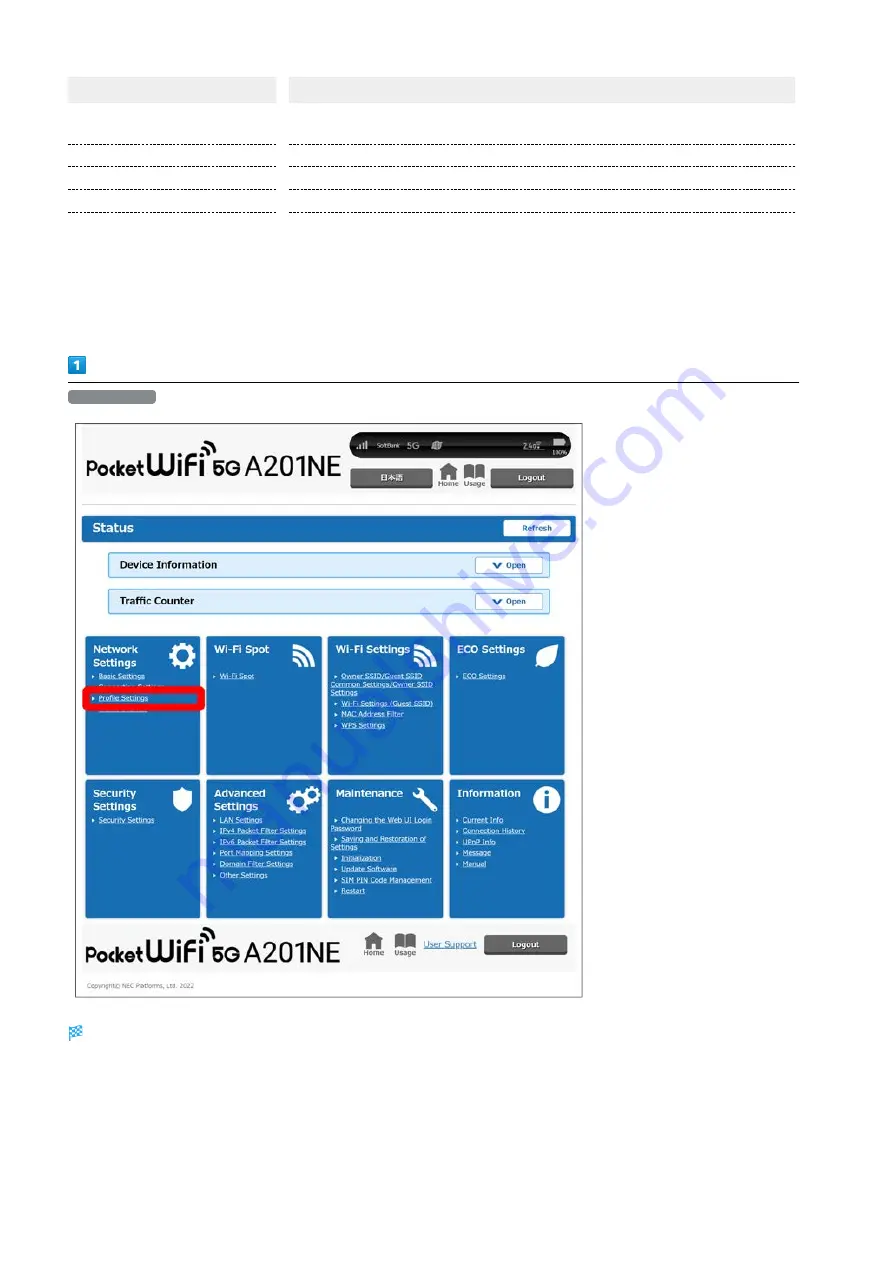
Profile Settings
Profile Settings screen appears.
Содержание A201NE
Страница 1: ...A201NE User Guide ...
Страница 2: ......
Страница 8: ...6 ...
Страница 18: ...16 Power Off Long press for about 3 seconds until the Power Option screen appears Power Power OFF Power is off ...
Страница 36: ...34 ...
Страница 40: ...38 ...
Страница 44: ...42 ...
Страница 112: ...110 Layout of the Settings Screen Item Description ...
Страница 121: ...119 Settings Using Web UI A201NE Traffic Counter Traffic Counter screen appears ...
Страница 122: ...120 Set each item in Monthly Counter Apply Monthly Counter is set Click Reset to reset Traffic Counter ...
Страница 124: ...122 Wi Fi Spot Wi Fi Spot screen appears ...
Страница 128: ...126 Set the items in Owner SSID Guest SSID Common Settings Apply The items common to Owner SSID and Guest SSID are set ...
Страница 130: ...128 Owner SSID Guest SSID Common Settings Owner SSID Settings Owner SSID Settings screen appears ...
Страница 133: ...131 Settings Using Web UI A201NE Wi Fi Settings Guest SSID Guest SSID settings screen appears ...
Страница 134: ...132 Set Wireless Function to ON Set items in Guest SSID settings Apply Guest SSID setting items are set ...
Страница 140: ...138 WPS Settings WPS Settings screen appears ...
Страница 143: ...141 Settings Using Web UI A201NE ECO Settings The ECO Settings screen appears ...
Страница 144: ...142 Set each item in ECO Settings Apply ECO Settings are set ...
Страница 146: ...144 Set Screen Lock Passcode Function to ON Enter Screen Lock Passcode Apply Screen Lock Passcode Function is set ...
Страница 150: ...148 LAN Settings LAN Settings screen appears ...
Страница 153: ...151 Settings Using Web UI A201NE IPv4 Packet Filter Settings IPv4 Packet Filter Settings screen appears ...
Страница 154: ...152 Select the target interface Select Add IPv4 Packet Filter Settings Add screen appears ...
Страница 157: ...155 Settings Using Web UI A201NE IPv6 Packet Filter Settings IPv6 Packet Filter Settings screen appears ...
Страница 158: ...156 Select the target interface Select Add IPv6 Packet Filter Settings Add screen appears ...
Страница 167: ...165 Settings Using Web UI A201NE ...
Страница 168: ...166 Other Setting items are set ...
Страница 177: ...175 Settings Using Web UI A201NE Confirmation Update The latest version of the software appears ...
Страница 185: ...183 Settings Using Web UI A201NE Exit Home Screen appears ...
Страница 188: ...186 Open ...
Страница 189: ...187 Settings Using Web UI A201NE PIN Authentication ...
Страница 196: ...194 Restart Confirmation screen appears OK ...
Страница 197: ...195 Settings Using Web UI A201NE OK Wi Fi router restarts ...
Страница 200: ...198 ...
Страница 203: ...201 Settings Using Web UI A201NE Connection History Connection History screen appears ...
Страница 206: ...204 Check UPnP Info IP address and port number appear ...
Страница 208: ...206 Check notifications Notification is shown You can delete notifications by selecting them and then clicking Delete ...
Страница 210: ...208 Manual A website on which the manual is available is opened ...
Страница 232: ...230 ...
Страница 235: ......


