19
Connecting with WLAN
A201NE
Connecting Windows PC
Connect a Windows PC to Wi-Fi router to connect to the
Internet.
Network Name (SSID) and Password
(Encryption Key: WPA Key)
For network name (SSID) and password (Encryption Key), see
"
Network Name (SSID) and Password (Encryption Key)
."
Default network name (SSID) is in alphanumerics beginning
with "A201NE_".
If they were changed, use the changed network name (SSID)
and password (Encryption Key).
The networks on Display other than network name (SSID) set
on Wi-Fi router are WLAN signals received from nearby. Be
careful when connecting.
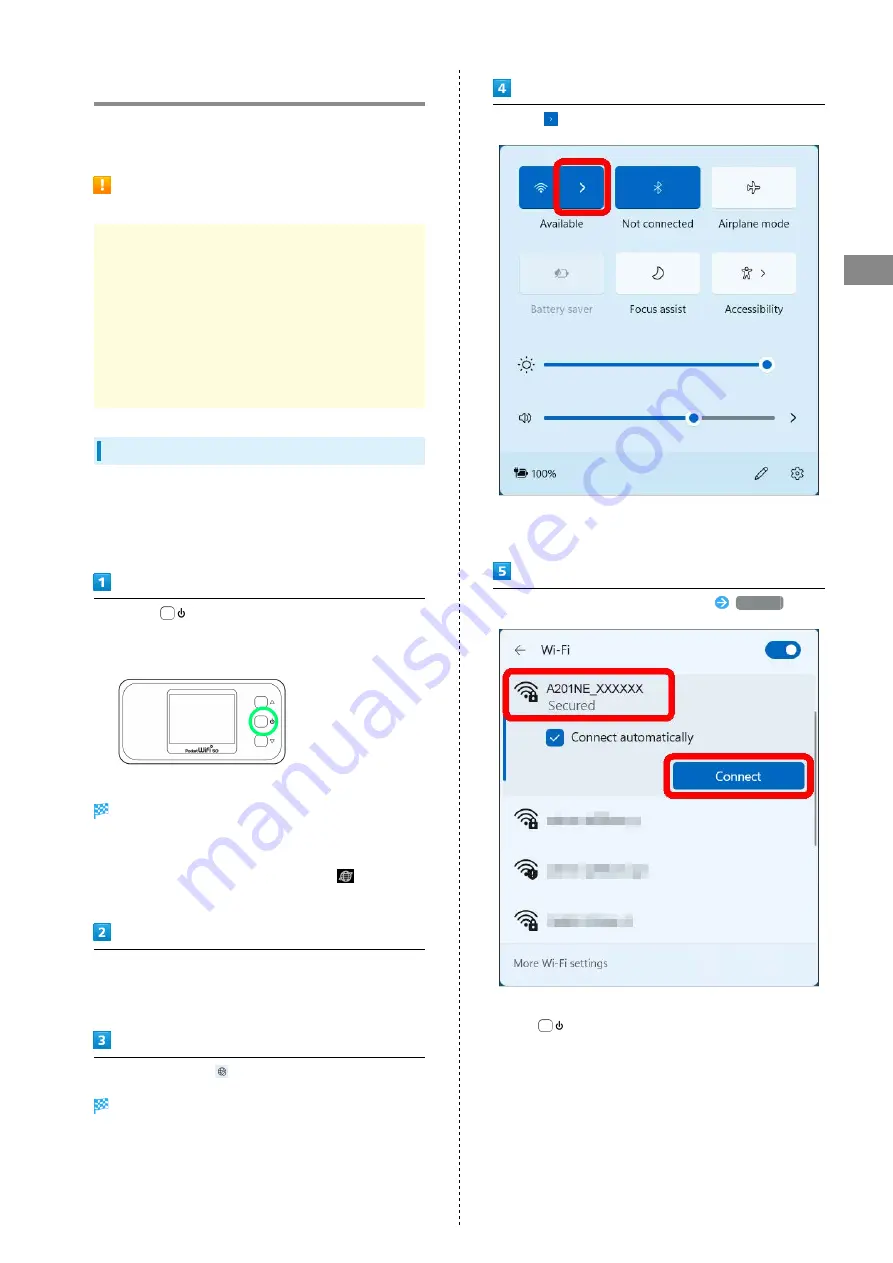
Windows 11
This section describes connection operations with screenshots
and steps in "Network Name(SSID(Owner))" at "WPA3/WPA2"
security setting for Wi-Fi settings on Windows 11 as an
example.
Long press
for about 6 seconds (until "Pocket WiFi 5G"
appears)
When powered on, Home Screen appears and the Internet
connection is established. WLAN function and the Internet
connection using WLAN function are enabled.
・When Wi-Fi router connects to the Internet,
(mobile
networks connection completed) lights.
Activate the PC WLAN function
・Method for enabling WLAN functions of a PC varies by model.
Contact PC manufacturer.
In the task tray, click
"Network settings" appears.
Click on
to the right of the Wi-Fi icon
・If the Wi-Fi icon is white, not blue, then Wi-Fi is OFF. Click
the Wi-Fi icon to change it to ON.
Select Wi-Fi router's network name (SSID)
Connect
・When Wi-Fi router's network name (SSID) is not shown, long
press
for about 3 seconds to cancel Sleep mode. If
network name (SSID) does not appear even though you cancel
Sleep mode and check, try connecting by manually adding a
network name (SSID) and password (Encryption Key) on the
computer.
・Depending on authentication method setting of Wi-Fi router,
a security message may appear. If this happens, change the
authentication method settings and then connect.
Содержание A201NE
Страница 1: ...A201NE User Guide ...
Страница 2: ......
Страница 8: ...6 ...
Страница 18: ...16 Power Off Long press for about 3 seconds until the Power Option screen appears Power Power OFF Power is off ...
Страница 36: ...34 ...
Страница 40: ...38 ...
Страница 44: ...42 ...
Страница 112: ...110 Layout of the Settings Screen Item Description ...
Страница 121: ...119 Settings Using Web UI A201NE Traffic Counter Traffic Counter screen appears ...
Страница 122: ...120 Set each item in Monthly Counter Apply Monthly Counter is set Click Reset to reset Traffic Counter ...
Страница 124: ...122 Wi Fi Spot Wi Fi Spot screen appears ...
Страница 128: ...126 Set the items in Owner SSID Guest SSID Common Settings Apply The items common to Owner SSID and Guest SSID are set ...
Страница 130: ...128 Owner SSID Guest SSID Common Settings Owner SSID Settings Owner SSID Settings screen appears ...
Страница 133: ...131 Settings Using Web UI A201NE Wi Fi Settings Guest SSID Guest SSID settings screen appears ...
Страница 134: ...132 Set Wireless Function to ON Set items in Guest SSID settings Apply Guest SSID setting items are set ...
Страница 140: ...138 WPS Settings WPS Settings screen appears ...
Страница 143: ...141 Settings Using Web UI A201NE ECO Settings The ECO Settings screen appears ...
Страница 144: ...142 Set each item in ECO Settings Apply ECO Settings are set ...
Страница 146: ...144 Set Screen Lock Passcode Function to ON Enter Screen Lock Passcode Apply Screen Lock Passcode Function is set ...
Страница 150: ...148 LAN Settings LAN Settings screen appears ...
Страница 153: ...151 Settings Using Web UI A201NE IPv4 Packet Filter Settings IPv4 Packet Filter Settings screen appears ...
Страница 154: ...152 Select the target interface Select Add IPv4 Packet Filter Settings Add screen appears ...
Страница 157: ...155 Settings Using Web UI A201NE IPv6 Packet Filter Settings IPv6 Packet Filter Settings screen appears ...
Страница 158: ...156 Select the target interface Select Add IPv6 Packet Filter Settings Add screen appears ...
Страница 167: ...165 Settings Using Web UI A201NE ...
Страница 168: ...166 Other Setting items are set ...
Страница 177: ...175 Settings Using Web UI A201NE Confirmation Update The latest version of the software appears ...
Страница 185: ...183 Settings Using Web UI A201NE Exit Home Screen appears ...
Страница 188: ...186 Open ...
Страница 189: ...187 Settings Using Web UI A201NE PIN Authentication ...
Страница 196: ...194 Restart Confirmation screen appears OK ...
Страница 197: ...195 Settings Using Web UI A201NE OK Wi Fi router restarts ...
Страница 200: ...198 ...
Страница 203: ...201 Settings Using Web UI A201NE Connection History Connection History screen appears ...
Страница 206: ...204 Check UPnP Info IP address and port number appear ...
Страница 208: ...206 Check notifications Notification is shown You can delete notifications by selecting them and then clicking Delete ...
Страница 210: ...208 Manual A website on which the manual is available is opened ...
Страница 232: ...230 ...
Страница 235: ......


