


X
GEM-P3200 Installation Instructions
L
NAPCO Security Systems
WI817F 10/05
Page 56
KEYP
A
D
PROGR
A
M
M
ING M
O
DES
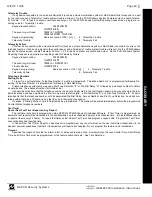
Note:
1. Functions that are not active, not programmed and/or not applicable to user’s authority level will be suppresses
and will not display.
2. Due to space constraints, GEM-RP2ASe2/GEM-K2AS messages are abbreviated.
3. The function mode uses a real time, filtered display. Many functions may not be displayed until it’s condition is
satisfied. For example, “
DISPLAY ZN FAULTS
” will not display unless there is a faulted zone to display.
FUNCTION
LEVEL
(A)
DISPLAY ZN FAULTS
1
DISPLAY ZN BYPASSED
1
DISPLAY ZN DIRECTORY
1
ACTIVE BELL TEST
1
DISPLAY PHONE #’S
1
DISPLAY SYS TRBL
1
DISPLAY FIRE ALARM
1
DISPLAY FIRE TRBL
1
DISPLAY OP/CL
3
ACTIVATE OVERVIEW
3
(B)
ACTIVATE CHIME
1
ACTIVATE WATCH
2
RESET SYSTEM TRBL
3
RESET SENSOR MSG
3
START EXIT TIME
1
FAULT FIND
(C)
ACTIVATE LOCATE
(C)
EZM ZONE FIND
(C)
FUNCTION
LEVEL
(A)
ACTIVATE DIALER TEST
3
DISPLAY ALARM LOG
(D)
3
DISPLAY TOTAL LOG
(D)
3
DISPLAY FIRE LOG
(D)
3
DISPLAY OP/CL LOG
(D)
3
DISPLAY SYSTEM LOG
(D)
3
TO ARM IN 1-4HRS
2
DISPLAY AUTO ARM SCHD
3
ACTIVATE PROGRAM
3
(B)
ACTIVATE DOWNLOAD
3
DISPLAY RF XMITTER STAT
3
RELAY CONTROL
1
DEALER MODE
(A)
Minimum level required to access function
(B)
Level 3 code with appropriate option
(C)
Requires dealer code
(D)
Not available in GEM-RP2ASe2/GEM-K2AS keypads
(E)
Initial Configuration only; suppressed thereafter
EASY MENU PROGRAM
MODE
1 2
4
3
5 6
7 8 9 0
A
B
C
D
E
F
G
NEXT/YES
PRIOR/NO
AREA
Scroll Down
Scroll Up
Exit
Yes
No
R
For "K Series" Keypads
1 2
4
3
5 6
7 8 9 0
A
B
C
D
E
F
G
NEXT/YES
PRIOR/NO
AREA
Scroll Down
Scroll Up
Exit
Yes
No
For "Classic" Keypads
Press
A
button
Enter Dealer Code
Содержание Gemini GEM-P3200
Страница 58: ...X GEM P3200 Installation Instructions L NAPCO Security Systems WI817F 10 05 Page 58 NOTES...
Страница 60: ...X GEM P3200 Installation Instructions L NAPCO Security Systems WI817F 10 05 Page 60 GEM P3200 WIRING DIAGRAM...
Страница 66: ...X GEM P3200 Installation Instructions L NAPCO Security Systems WI817F 10 05 Page 66 Notes...
Страница 67: ...L NAPCO Security Systems X GEM P3200 Installation Instructions WI817F 10 05 Page 67 Notes...


