background image


FRONT VIEW 


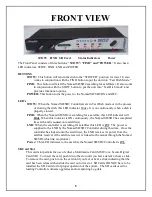
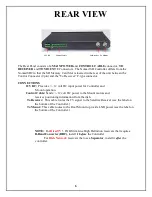
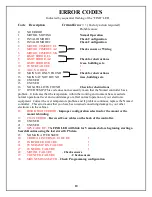
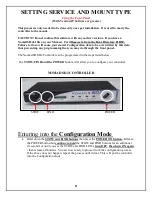
The Front Panel consists of three buttons; “

STOW”, “FIND” and “POWER

.”  It also has 4 

LED indicators; STOW, FIND, LNB and POWER. 
 

BUTTONS 

STOW:  

This button will return the dish to the “STOWED” position for travel. It also 

works in conjunction with the FIND button to put the unit into “Test Dish Mode.” 

FIND:  

This button will start the Nomad SD/SD2 searching for satellite(s). It also works 

in conjunction with the STOW button to put the unit into “Test Dish mode”


and 

provides functional options. 

POWER:

 This button turns the power to the Nomad SD/SD2 ON and OFF. 


LED’s 

STOW: 

 When the Nomad SD/SD2 Controllers are in Test Dish mode or in the process 

of stowing the dish, this LED indicator 

blinks

. It is on continuously when a dish is 

properly stowed. 

FIND:  

When the Nomad SD/SD2 is searching for a satellite, this LED indicator will 

blink

. When this indicator is ON continuously, the Nomad SD/SD2 has completed 

its search and is 

locked

 onto satellite(s). 

LNB:  

When the controller is searching for satellites this LED is 

ON

.  The power is 

supplied to the LNB by the Nomad SD/SD2 Controller during this time.  Once the 
controller has locked onto the satellite(s), the LNB receives its power from the 
satellite receiver if the satellite receiver is linked to the mount through the Nomad 
SD/SD2 (this link is optional.) 

Power:  

This LED indicates to the user that the Nomad SD/SD2 Controller is 

ON. 


SD Card Slot 

 This card slot permits the use of either a Multimedia Card (MMC) or a Secure Digital 
Card (SD).  To insert the card, push it into the slot until you feel a detent or hear a click.  
To remove the card, push in on the card until you feel or hear a click indicating that the 
card has been released then slide the card out of its slot.  SD Cards DO NOT have to be 
installed the SD Card slot for proper operation of the system.  The SD cards used for 
loading Controller software upgrades and/or capturing Log data 


STOW    FIND   SD Card           Status Indicators          Power                                                       

Содержание Nomad SD

Страница 1: ...Satellite TV Nomad SD SD2 USER GUIDE Software Version 116 or higher ALL RIGHTS RESERVED Rev 20 Dec 10 901 Nomad SD2 Manual...

Страница 2: ...grade 8 Log Files 9 Error Message Definition 9 ERROR CODES 10 PROGRAMMING Configuration 11 Using the Front Panel Entering into Configuration Mode SETTING SERVICE AND MOUNT TYPE 12 SHOW MODE SETTINGS 1...

Страница 3: ...otor on the mount that controls azimuth movement Elevation Motor The motor on the mount that controls elevation movement Skew Motor The motor on the mount that controls skew movement Scotch Locks The...

Страница 4: ...rk SHAW Direct and Bell TV GPS option may be added to assist in satellite quicker acquisition The Nomad SD SD2 contains Operational Features such as Three 3 button operation POWER FIND and STOW LED Di...

Страница 5: ...sly the Nomad SD SD2 has completed its search and is locked onto satellite s LNB When the controller is searching for satellites this LED is ON The power is supplied to the LNB by the Nomad SD SD2 Con...

Страница 6: ...tion Control Cable Sends 12 volt DC power to the Mount motors and receives positioning information from the dish To Receiver This cable routes the TV signal to the Satellite Receiver see the label on...

Страница 7: ...urrent network configuration a critical error will be displayed by the flashing FIND LED The number of blinks will indicate the type of error encountered See ERROR CODES in this manual Two minutes aft...

Страница 8: ...in and the socket will eject it then slide the card out of the memory slot The SD Card must be formatted to a FAT32 file format STEPS TO PERFORM A FIRMWARE UPGRADE 1 Stow the dish before beginning thi...

Страница 9: ...Text Editor The controller adds to the logfiles folder when a successful satellite search is completed if a system critical error occurs or after a successful dish stowing operation ERROR MESSAGES The...

Страница 10: ...indicates that the temperature within the working environment has exceeded a normal operational level and could damage or affect normal operation of your electronic equipment Correct the over tempera...

Страница 11: ...do through the front panel The Nomad SD SD2 Controller can be programmed in the steps listed below The STOW FIND and the POWER buttons will allow you to configure your controller NOMAD SD2 CONTROLLER...

Страница 12: ...y see one satellite at a time A comma between the satellites indicates the system will see all these satellites at the same time Once eight 8 rapid blinks is reached the process will start back at one...

Страница 13: ...t START ALL PROGRAMS ACCESSORIES and Note Pad on your computer 2 Enter the Network Configuration number from the selection below and place it on the first line of the file Just the Network Configurati...

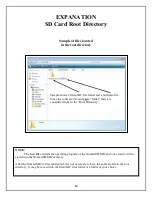
Страница 14: ...not in a folder then it is considered to be in the Root Directory NOTE The hex file contains the operating program of the Nomad SD SD2 and once read it will be stored into the Nomad SD SD2 memory Afte...

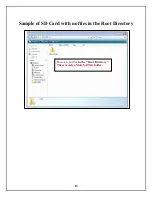
Страница 15: ...15 Sample of SD Card with no files in the Root Directory There are no files in the Root Directory There is only a MotoSAT file folder...

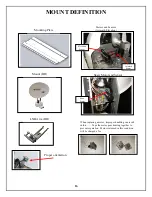
Страница 16: ...on Mounting Plate Mount HD LNB Arm HD Elevation Sensor Azimuth Sensor Skew Sensor When replacing a motor improper handling can result in this Tape the motor gear housing together to prevent separation...

Страница 17: ...stic 3 When handling motors use care as the case can separate causing the motor gearbox housing to come apart and prove to be unusable 4 Scotch Locks are splicing devices which will aid in sensor repl...

Страница 18: ...18...

Страница 19: ...19...

Страница 20: ...e approved and shipping will be charged both directions o If during repair the Service Technician discovers that failure is due to either damage after installation or improper installation the Service...

Страница 21: ...ation warranty provided by the dealer installer WARRANTY SERVICE To receive the benefits of this warranty you must complete the enclosed registration form and mail it to MotoSAT within 30 days from th...

Страница 22: ...em that is perceived to be defective The customer will be given 10 business working days to return the item beginning with the day it is received by the customer from MotoSAT If on the 11th business w...

Страница 23: ...epresentations or warranties other than the warranties contained herein This warranty gives the purchases specific legal rights which may vary from state to state Some states do not allow exclusion of...

Страница 24: ...________________________ Serial Numbers ____________ ________________ Repairs ________________________________________ _________________________________________ _______________________________________...

Страница 25: ...n Skewable 2 What Service do you subscribe to 3 If you feel that it is a Warranty problem then be sure that you have your system registered before you call else it will be treated as a non warranty si...

Отзывы: