


Chapter 2: Network Setup
.
.
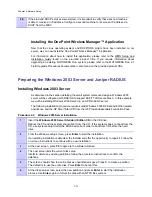
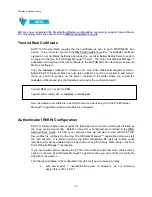
The following section details how to set up Windows 2003 Server to provide certificate
services. Digital certificates are required in order to exchange and/or validate security
credentials in support of
Secure Mesh
.
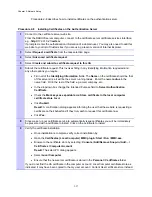
Procedure 2-6 describes how to install certificate services in a Microsoft Windows 2003
Server.
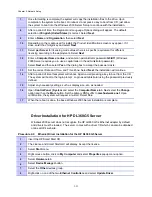
Procedure 2-6
Installing Certificate Services
1
Add the
Certificate Services
and the
IIS
windows component.
Assuming that the permanent hostname and domain registration of the server selected to
provide certificate services has already been set, perform the following steps to begin
installation:
•
Open
Settings / Control Panel
and select
Add/Remove Programs
.
•
Open
the
Add/Remove Windows Components
dialog window and add the
Certificate Services
and
Application Server
(IIS) components. Read the note about
not being able to change hostname or domain registration and click Yes to confirm.
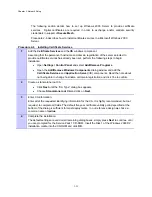
2
Create a stand-alone root CA.
•
Click
Next
until the “CA Type” dialog box appears.
•
Choose
Stand-alone root CA
and click on
Next
.
3
Enter CA information.
Enter all of the requested identifying information for the CA. It is highly recommended, but not
required, to complete all fields. The default five year certificate validity period specified at the
bottom of the dialog is sufficient for most deployments. In our reference design we chose a
common name of
radius
.
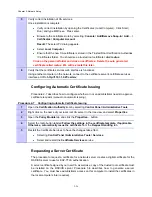
4
Complete the installation.
The default settings are valid on all remaining dialog boxes, simply press
Next
to continue until
you are prompted for the Service Pack 1 CD-ROM. Insert the Disk 1 of the Windows 2003 R2
installation media into the CD-ROM and click
OK
.
2-25
Содержание 2.1
Страница 2: ...This page intentionally left blank ii ...
Страница 4: ...This page intentionally left blank iv ...
Страница 10: ...This page intentionally left blank x ...
Страница 12: ...This page intentionally left blank xii ...
Страница 14: ...This page intentionally left blank xiv ...
Страница 59: ...Chapter 3 MOTOMESH Duo Hardware This page intentionally left blank 3 12 ...
Страница 86: ...Chapter 5 Customer Information This page intentionally left blank 5 7 ...
Страница 123: ......
Страница 131: ...Appendix A Figure 9 39 General Settings Tab in the Web User Interface 9 30 ...


