background image

2-34   

Confirming the operation

2 Unpacking to Installation

(6) Work jog operation

Setting of the work coordinates system is necessary.
By this jog operation, robot can be move along with the direction of work (or working table etc.), so teaching 
operations get easier.
When jog operation, select by which work coordinates the robot moves
The setting method of the work coordinates system using T/B (R33TB) is shown in the following.
(Parameter: Setting the coordinate value to WKnCORD ("n" is meaning the number (1-8) of work 
coordinates) can also set up the work coordinates system. Refer to the separate manual "Detailed 
Explanation of Functions and Operations" for details of parameter.)

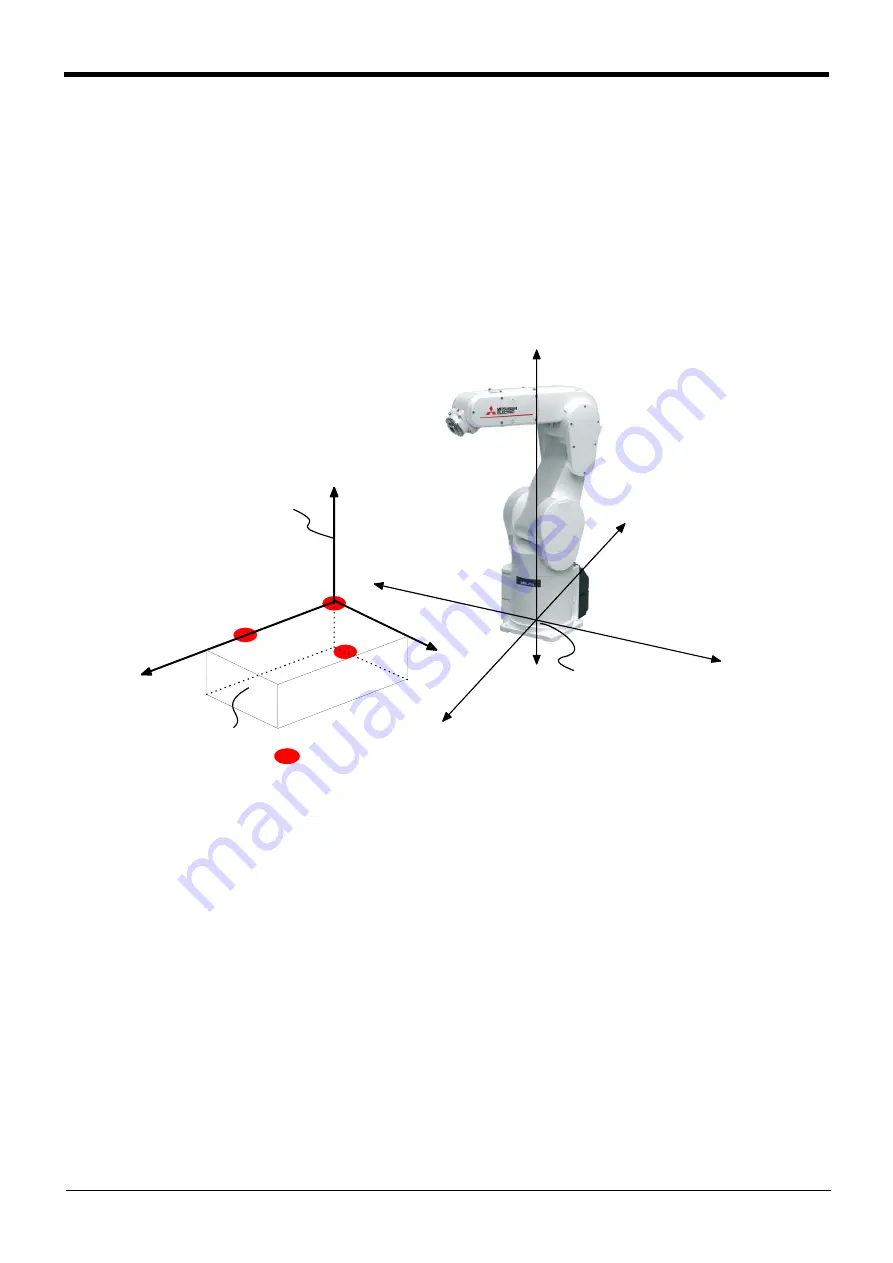
The work coordinates system teaches and sets up the three points (WO, WX, WY).

Fig.2-15:Setting of the work coordinates system (teaching point) 

The setting (definition) method of the work coordinates system is shown as following. 


+Zw

+Xw

+Yw

+Z

+Y

+X

Robot coordinates 
system

Workpiece

WY

WO

WX

work coordinates

Notes) The figure is the example 

of RV-4FR, but other types 
are the same

The jogging movement 
based on this work is 
possible.

<         Teaching point>
WO: Work coordinates system origin
WX: Position on the "+X" axis of work coordinates system.
WY: Position at the side of  "+Y" axis on the X-Y plane of work coordinates system.

[Supplement] : The coordinate values which use all three teaching points for setting of the 

work coordinates system are each only X, Y, and the Z-axis. Although the 
coordinate value of A, B, and C axis is not used, positioning will get easy if the 
XYZ jog or TOOL jog movement is effected with the same value. (The direction 
of the hand is the same)

Содержание MELFA RH-3CRH Series

Страница 1: ...Mitsubishi Electric Industrial Robot RH 3CRH 6CRH INSTRUCTIONMANUAL ROBOT ARM SETUP MAINTENANCE RH 3CRH series RH 6CRH series BFP A3609 B ...

Страница 2: ......

Страница 3: ...s on the start switch etc This also applies to maintenance work with the power source turned ON Indication of teaching work in progress Provide a fence or enclosure during operation to prevent contact of the operator and robot Installation of safety fence Establish a set signaling method to the related operators for starting work and follow this method Signaling of operation start As a principle t...

Страница 4: ...t the workpiece weight including the hand does not exceed the rated load or tolerable torque Exceeding these values could lead to alarms or faults Securely install the hand and tool and securely grasp the workpiece Failure to observe this could lead to personal injuries or damage if the object comes off or flies off during operation Securely ground the robot and controller Failure to observe this ...

Страница 5: ...can automatically operate the robot regardless of whether the operation rights are enabled or not Do not remove the SSCNET III cable while power is supplied to the multiple CPU system or the servo amplifier Do not look directly at light emitted from the tip of SSCNET III connectors or SSCNET III cables of the Motion CPU or the servo amplifier Eye discomfort may be felt if exposed to the light Refe...

Страница 6: ...ures against EMI and the addition of the ferrite core may be necessary Please fully confirm the operation by customer Guarantee and maintenance of the equipment on the market usual office automation equipment cannot be performed To maintain the safety of the robot system against unauthorized access from external devices via the network take appropriate measures To maintain the safety against unaut...

Страница 7: ...nnect one end of the grounding cable to the PE protective earth terminal on the controller and ground the other end 2 point grounding in order to comply with the requirements of EN 61800 5 1 for the touch current of 3 5 mA AC or more 7 Connect the primary power cable to the primary side terminal of the earth leakage breaker Part name Specifications Remarks Earth leakage breaker The following is re...

Страница 8: ... cut distance may change Therefore when beginning automatic operation moves at low speed at first and you should gather speed slowly with being careful of interference with peripheral equipment 2 It can be confirmed whether the specified position exist in the defined area by using the instruction command Zone It can utilize as one of the methods for collision evasion Refer to the detailed descript...

Страница 9: ...f the ACIN cable Revised the instructions for replacing machine cables replaceable type Revised the instructions for replacing the backup battery Revised the positions of the ABS marks 2020 01 24 BFP A3609 B Corrected the type of timing belt used for the J3 axis of the RH 6CRH Added information on the recommended tightening torque for installation bolts ...

Страница 10: ...S15 S19 Note Only the standard models RH 3CH RH 6CH are available in Japan and China No part of this manual may be reproduced by any means or in any form without prior consent from Mitsubishi The details of this manual are subject to change without notice The information contained in this document has been written to be accurate as much as possible Please interpret that items not described in this...

Страница 11: ... jog operation 2 26 3 TOOL jog operation 2 28 4 3 axis XYZ jog operation 2 30 5 CYLNDER jog operation 2 32 6 Work jog operation 2 34 2 3 4 Setting the hand parameters 2 41 3 Installation of optional equipment 3 42 3 1 Operation range change 3 42 1 Angle setting for changing the operation range 3 42 2 Operation range change method 3 43 3 2 Replacement procedure for machine cables replaceable type 3...

Страница 12: ...rigin with the origin data input method 5 69 1 Confirming the origin data 5 69 2 Selecting the origin setting method 5 70 3 Inputting the origin data 5 71 5 6 2 Jig method 5 73 1 J1 axis origin setting 5 74 2 J2 axis origin setting 5 76 3 J3 and J4 axis origin setting 5 78 5 6 3 ABS origin method 5 81 1 Origin setting procedure 5 82 5 6 4 User origin method 5 83 5 6 5 Recording the origin data 5 8...

Страница 13: ...so explained Robot Arm Setup Maintenance Explains the procedures required to operate the robot arm unpacking transportation installation confirmation of operation and the maintenance and inspection procedures Controller setup basic operation and maintenance Explains the procedures required to operate the controller unpacking transportation installation confirmation of operation basic operation fro...

Страница 14: ...ndalone type Controller Indicates the controller which controls the robot arm Symbol Precaution indicating cases where there is a risk of operator fatality or serious injury if handling is mistaken Always observe these precautions to safely use the robot Precaution indicating cases where the operator could be subject to fatalities or serious injuries if handling is mistaken Always observe these pr...

Страница 15: ...ng work This also applies to maintenance work with the power source turned ON Setting of emergency stop switch During teaching work place a sign indicating that teaching work is in progress on the start switch etc This also applies to maintenance work with the power source turned ON Indication of teaching work in progress Provide a fence or enclosure during operation to prevent contact of the oper...

Страница 16: ... could lead to personal injuries or damage if the object comes off or flies off during operation Securely ground the robot and controller Failure to observe this could lead to malfunctioning by noise or to electric shock accidents Indicate the operation state during robot operation Failure to indicate the state could lead to operators approaching the robot or to incorrect operation When carrying o...

Страница 17: ...ectors or SSCNET III cables Eye discomfort may be felt if exposed to the light Reference SSCNET III employs a Class 1 or equivalent light source as specified in JIS C 6802 and IEC60825 1 domestic standards in Japan Attach the cap to the SSCNET III connector after disconnecting the SSCNET III cable If the cap is not attached dirt or dust may adhere to the connector pins resulting in deterioration c...

Страница 18: ...d in the plastic bag of attachment in the robot arm No Part name Type Qty Remarks RH 3CRH 1 Robot arm 1 unit 2 Installation bolts M8 30 4 pcs For robot arm installation 3 Spring washer for installation bolts For M8 4 pcs 4 Plain washer for installation bolts For M8 4 pcs 5 D sub connector set 2 sets Connector for fixing the tool wiring RH 6CRH 1 Robot arm 1 unit 2 Installation bolts M8 30 4 pcs Fo...

Страница 19: ...ith the edge of the robot CAUTION The robot does not stand on its own in the posture after the unpacking Fix the robot securely in place for installation CAUTION Always unpack the robot at a flat place Otherwise the robot may fall down CAUTION Take the controller box straight up slowly Be careful not to let the controller slip out of the box CAUTION The parallel I O interface is installed on the c...

Страница 20: ...the outer box 3 3 Lift and remove the fixing plate A 4 and the fixing plate B 5 one after another 4 Cut the cable tie 6 with nippers etc and open the plastic bag 5 Take the robot arm out of the box Note that the robot does not stand on its own in the posture after the unpacking 6 Grip the cutout sections of the controller box 8 and take out the controller Unpacking is completed ...

Страница 21: ...id strong impact on the robot while carrying the robot 4 Transfer the robot slowly Be careful not to get injured with the edge of the robot arm 5 Transport the robot with fixing it to the packing box at delivery again for secondary transportation such as changing the installation place If the robot is lifted while it is in the operation posture its components may be damaged or its gravity position...

Страница 22: ...a malfunction When fixtures for fixing the joints of the robot arm are required please consult your local Mitsubishi Electric The reference figure of the fixture is shown in Fig 2 3 Fig 2 3 Reference figure of the fixture Axis RH 3CRH RH 6CRH J1 0 0 J2 145 7 154 2 J3 100 mm not fixed 100 mm not fixed J4 Not fixed Not fixed Fixture Safety socket 2 M4 12 Fixture Safety socket 2 M4 12 2 3t 80 56 5 4 ...

Страница 23: ...ixtures adjust the posture of each axis of the robot as specified in Table 2 3 Table 2 3 Fixture installation posture Axis RH 3CRH RH 6CRH6020 RH 6CRH7020 J1 50 30 30 J2 130 150 150 J3 90 mm not fixed 90 mm not fixed 90 mm not fixed J4 Not fixed Not fixed Not fixed ...

Страница 24: ... table to prevent the position of the devices and jigs subject to robot work from deviating 5 The installation surface must have sufficient strength to withstand the arm reaction during operation and resistance against deformation and vibration caused by the static dynamic load of the robot arm and peripheral devices etc 6 If you operate the robot at a high speed reaction forces are applied to the...

Страница 25: ...present or heat is generated from lighting The skin temperature of the robot arm may rise and the error may occur Item Unit Value RH 3CRH Tilt moment ML N m 220 Torsional moment MT N m 180 Horizontal direction translation force FH N 820 Vertical direction translation force FV N 320 RH 6CRH6020 Tilt moment ML N m 410 Torsional moment MT N m 260 Horizontal direction translation force FH N 800 Vertic...

Страница 26: ...ld be as close to the robot arm and controller as possible and the length of the grounding wire should be short Fig 2 5 Grounding methods 2 Grounding procedures 1 Prepare a grounding cable AWG 11 4 2 mm2 or more and the installation screw and washer for the robot 2 If there is rust or paint on the grounding screw section A remove it with a file etc 3 Connect the grounding cable to the grounding sc...

Страница 27: ...ional machine cables replaceable type However refer to the separate Standard Specifications Manual for information on how to fix a flexible cable Connecting the machine cable is completed When connecting and disconnecting the connector be careful not to get your hand pinched When installing or removing the connector to the connector of the other party in parallel install or remove If load strong a...

Страница 28: ...e correctly creating a dangerous situation Take special care to the leading of the connection cable If the cable is pulled with force or bent excessively wires could break or the connector could be damaged Connect the machine cable at the place without the effect of the dust or oil mist Please keep the dust and oil mist from being applied to of the robot arm connector section in the condition that...

Страница 29: ...switch on the back of the T B Note The figure of the robot which indicated to the explanation page in each jog mode is an example The robot will move during this operation Make sure that there are no operators near the robot and that there are no obstacles such as tools in the robot operation range To immediately stop the robot release the deadman switch on the back of the T B The servo power will...

Страница 30: ...ower supply is OFF 2 Refer to Fig 2 8 and connect T B connector to the robot controller Use as the upper surface the lock lever and push in until there is sound 3 Pressing down the lock lever to lock the connector as shown below Fig 2 8 Installing the T B The installation of T B is finished 2 3 2 Turning ON the control power Confirm that there are no operators near the robot before turning the pow...

Страница 31: ...stop related operations such as an emergency stop can be performed regardless of the valid invalid setting How to choose the jog mode Press the JOG key the jog screen will be displayed and display the jog mode which can be chosen at the bottom of the screen Because these correspond to the function key of F1 F4 press the function key corresponding to the jog mode to wish And if the FUNCTION key is ...

Страница 32: ...J2 axis 䠇 䠉 J3 axis 䠇 䠉 J4 axis 䠇 䠉 Each axis moves independently 䠇X 䠉X 䠇Y 䠉Y 䠉Z 䠇Z Base coordinate system reference origin End axis 䠇 䠉 䠇Z 䠉Z 䠇X 䠉X 䠇Y 䠉Y C While maintaining the end axis posture the axis moves straight along the base coordinate system Also while maintaining the end axis position the end axis posture changes ...

Страница 33: ...aining the end axis posture the axis moves straight along the tool coordinate system Also while maintaining the end axis position the end axis posture changes 䠇X 䠉X 䠇Y 䠉Y 䠉Z 䠇Z Base coordinate system reference origin End axis 䠇 䠉 䠇Z 䠉Z 䠇X 䠉X 䠇Y 䠉Y J4 axis The axis moves straight along the base coordinate system At this time the end axis posture is not maintained Also the end axis posture changes ...

Страница 34: ... C Radius Arc Vertical The current position is set as the arc centering on the Z axis and the axis moves along that arc expands and contracts in the radius direction and moves vertically At this time the end axis posture is maintained Also while maintaining the axis posture position the end axis posture changes ...

Страница 35: ... axis posture the axis moves straight along the work coordinate system Also while maintaining the end axis position the end axis posture changes Jog operation around the work coordinates system is available EX T jog In this jog operation when the jog operation is performed for the posture elements the posture rotates on the Xw axis Yw axis or Zw axis of the work coordinates system while the contro...

Страница 36: ... Conversely if the OVRD key is pressed it will go down The current setting speed is displayed on the screen upper right Set the override to 10 here for confirmation work When the X J1 keys are pressed the J1 axis will rotate in the plus direction When the X J1 keys are pressed rotate in the minus direction When the Y J2 keys are pressed the J2 axis will rotate in the plus direction When the Y J2 k...

Страница 37: ...J4 keys are pressed rotate in the minus direction When the robot is in the transportation posture The axes may be outside the movement area Move these axes toward the inner side of the movement area J3 axis 䠇 䠉 J3 axis jog operation 㻶㻠㻌㼍㼤㼕㼟 䠇 䠉 J4 axis jog operation If the buzzer of T B sounds and the robot does not move If it is going to move the robot across the operation range the buzzer of T B...

Страница 38: ...ction When the X J1 keys are pressed move along the minus direction When the Y J2 keys are pressed the robot will move along the Y axis plus direction When the Y J2 keys are pressed move along the minus direction When the Z J3 keys are pressed the robot will move along the Z axis plus direction When the Z J3 keys are pressed move along the minus direction CURRENT JOINT 100 M1 T0 J1 0 00 J5 0 00 J2...

Страница 39: ...this case please move to the counter direction 䠇X 䠉X 䠇Y 䠉Y 䠉Z 䠇Z 䠇Z 䠉Z 䠇X 䠉X 䠇Y 䠉Y 䠇 䠉 C Changing the end axis posture The Position of the end axis will not change When alarm No 5150 occurs If alarm No 5150 ORIGIN NOT SET occurs the origin has not been set correctly Reconfirm the value input for the origin data Tool length The default tool length is 0mm and the control point is the center of the e...

Страница 40: ... the override to 10 here for confirmation work When the X J1 keys are pressed the robot will move along the X axis plus direction of the tool coordinate system When the X J1 keys are pressed move along the minus direction When the Y J2 keys are pressed the robot will move along the Y axis plus direction of the tool coordinate system When the Y J2 keys are pressed move along the minus direction Whe...

Страница 41: ... XYZ jog If the buzzer of T B sounds and the robot does not move If it is going to move the robot across the operation range the buzzer of T B sounds and the robot does not move In this case please move to the counter direction 䠇Z 䠉Z 䠇X 䠉X 䠇Y 䠉Y 䠇 䠉 C Changing the end axis posture The Position of the end axis will not change When alarm No 5150 occurs If alarm No 5150 ORIGIN NOT SET occurs the orig...

Страница 42: ...n upper right Set the override to 10 here for confirmation work When the X J1 keys are pressed the robot will move along the X axis plus direction When the X J1 keys are pressed move along the minus direction When the Y J2 keys are pressed the robot will move along the Y axis plus direction When the Y J2 keys are pressed move along the minus direction When the Z J3 keys are pressed the robot will ...

Страница 43: ...inus direction The flange surface end axis posture cannot be maintained with 3 axis XYZ jog With 3 axis XYZ jog the flange surface end axis posture orientation is not maintained when moving linearly in the X Y or Z axis direction Use XYZ jog to maintain the posture 䠇㼆 䠉㼆 䠇㼄 䠉㼄 䠇㼅 䠉㼅 䠇 䠉 䠇㼄 䠉㼄 䠇㼅 䠉㼅 䠉㼆 䠇㼆 㻶㻠 The Position of the end axis will not change Changing the end axis posture ...

Страница 44: ... work Assuming that the current position is on an arc centering on the Z axis the robot moves along that arc When the X J1 keys are pressed the robot will expand in the radial direction When the X J1 keys are pressed contract in the radial direction When the Y J2 keys are pressed the robot will move along the arc in the plus direction When the Y J2 keys are pressed move in the minus direction When...

Страница 45: ...e operation 2 33 When the C J6 keys are pressed the Z axis will rotate in the plus direction When the C J6 keys are pressed rotates in the minus direction 䠇 䠉 䠇X 䠉X 䠇Y 䠉Y 䠉Z 䠇Z C Radius Vertical Arc The position of the end axis will not change ...

Страница 46: ... and sets up the three points WO WX WY Fig 2 15 Setting of the work coordinates system teaching point The setting definition method of the work coordinates system is shown as following Zw Xw Yw Z Y X Robot coordinates system Workpiece WY WO WX work coordinates Notes The figure is the example of RV 4FR but other types are the same The jogging movement based on this work is possible Teaching point W...

Страница 47: ...n screen is displayed MENU 1 FILE EDIT 2 RUN 3 PARAM 4 ORIGIN BRK 5 SET INIT 6 ENHANCED CLOSE 123 EMHANCED 1 SQ DIRECT 2 WORK COORD CLOSE 123 The screen shows the coordinate value of the origin WO of the work coordinates number 1 EMHANCED 1 SQ DIRECT 2 WORK COORD CLOSE 123 WORK COORD WORK NUMBER 1 TEACHING POINT WO X 0 00 Y 0 00 Z 0 00 123 TEACH WX WY DEFINE WORK COORD WORK NUMBER 1 TEACHING POINT...

Страница 48: ... re teach the three points This work coordinate data is registered into parameter WKnCORD n means the work coordinates numbers 1 8 If the function key corresponding to CLOSE is pressed it will return to the previous screen 6 Finishing of setting the work coordinates Press the FUNCTION keys and display CLOSE function Press the function key corresponding to CLOSE Returns to the MENU screen WORK COOR...

Страница 49: ... decrease Always confirm that the number of the target work coordinates system is displayed correctly Display of W1 W8 at the upper right of the screen If mistaken the robot will move in the direction which is not meant and will cause the damage and the personal injuries Whenever it presses the key of OVRD Upper arrow the override goes up Conversely if the OVRD Lower arrow key is pressed it will g...

Страница 50: ... J3 keys are pressed Move along the minus direction When the X Y or Z keys are used the operation is the same in the WORK jog and the Ex T jog modes WORK jog operation mode Conventional WORK jog Ex T jog Parameters WKnJOGMD n is 1 to8 setting 0 initial value 1 XYZ key operation Moves along each axis of the work coordinates system Same as the conventional WORK jog C key operation With the control p...

Страница 51: ... plus direction of the XYZ coordinate system When the C J6 keys are pressed rotate in the minus direction 䠇X 䠉X 䠇Y 䠉Y 䠉Z 䠇Z 䠇 䠉 Z Z Xw Yw Zw Zw Xw Yw Tool length Work coordinates system Changing the end axis posture 1 Work jog mode Control point The position of the control point does not change The end axis is rotated ...

Страница 52: ... linear movement is not possible from the transportation posture In this case the robot will not move Refer to Page 24 1 JOINT jog operation and move the robot to a position where linear movement is possible and then carry out XYZ jog If the buzzer of T B sounds and the robot does not move If it is going to move the robot across the operation range the buzzer of T B sounds and the robot does not m...

Страница 53: ...parameters Table 2 5 Hand parameter Parameter Parameter name Details explanation Factory setting Hand I O type HIOTYPE Set either the sink type or the source type for the solenoid valve and the logic of the hand input signal 1 Not set 0 Source type 1 Sink type 1 Hand condition HNDDAT is 0 to 8 Set the initial condition of the hand Specify with the tool coordinate system Weight size X size Y size Z...

Страница 54: ...nical stopper position P10 P11 Negative 132 110 Mechanical stopper angle 133 5 111 9 Hexagon socket bolt M8 length 16 Mechanical stopper position P10 P12 J2 axis Positive 141 125 Mechanical stopper angle 145 7 127 7 Move the bolt at P13 Mechanical stopper position P13 P14 Negative 141 125 Mechanical stopper angle 145 7 127 7 Move the bolt at P15 Mechanical stopper position P15 P16 RH 6CRH6020 J1 a...

Страница 55: ...operation range angle setting in Table 3 1 in the joint operation range parameter MEJAR 1 Turn on the controller s power supply 2 Set the operation range after the change in the parameter MEJAR MEJAR J1 negative direction operation range J1 positive direction operation range Checking the operation range Turn off and on the controller s power supply after changing the setting of this parameter Then...

Страница 56: ...ling out CON plate B ensure the exposed circuit board does not come into contact with any surrounding metal parts 2 Cut the cable tie 1 with nippers and remove the cables from the plate The cables use the two holes on the plate and are fixed with cable ties 㻮 㻭 Machine cables CON plate B Base section 1 a Hexagon socket bolt M4 12 6 places b Hexagon socket bolt 4 FG wire yellow and green CON plate ...

Страница 57: ...Refer to Page 68 5 6 Resetting the origin and set the origin again 6 Remove the installation screws c from the CN plate 7 Confirm that 1 to 5 are all removed and pull the connector out from the rectangular hole on CON plate B and remove the machine cables together with the CN plate Follow the removal procedure from 1 to 7 in reverse to install the optional machine cables replaceable type When inst...

Страница 58: ... Basic operations The basic operations from creating the program to automatic operation are explained in section 4 Basic operations in the Controller setup basic operation and maintenance manual Refer that manual as necessary ...

Страница 59: ... operation of 15 hours per day for 20 days per month When the robot operates for 8 hours per day the operating hours per month become about a half of the one under the above condition Then the monthly inspection is required every two months To check the periodic inspection schedule and calculate the operating hours refer to Page 50 2 Schedule 1 Daily inspection Inspection works to be performed eve...

Страница 60: ...ween the robot and controller securely connected Visual Securely connect 6 Are there any cracks foreign contamination or obstacles on the robot and controller cover Replace with a new part or take remedial measures 7 Is there any abnormality in the pneumatic system Are there any air leaks drain clogging or hose damage Is the air source normal Visual Drain the drainage and remedy the air leaks repl...

Страница 61: ...ar inspectionNote1 Note1 When the robot is operated 24 hours a day or with a heavy load it is recommended to be inspected every 6 months 1 800hr Is the friction at the timing belt teeth severe If the teeth are missing or severe friction is found replace the timing belt Is the timing belt tension value more than the guideline value Does any position mismatch occur When the tension value becomes les...

Страница 62: ...x 500 hr Inspection schedule Type of periodic inspection works Note2 Note2 The item marked with the circle is to be performed According to the guideline of the operating hours perform the inspection to check the items described in Table 5 3 15 hours per day 8 hours per day Monthly inspection 3 month inspection 2 year inspection Battery replacement Lubrication 300hr 1 month 2 months Every year Note...

Страница 63: ...ection are described in Page 67 5 5 Maintenance parts of this manual Always contact your dealer when parts are needed The origin of the machine system could deviate when this work is carried out Review of the position data and re teaching will be required 5 3 1 Robot arm structure An outline structure drawing of the robot arm is shown below RH 3CRH RH 6CRH Fig 5 1 Outline structure drawing of robo...

Страница 64: ...edures 5Maintenance and Inspection 5 3 2 Installing removing the cover Fig 5 2 Installing removing the cover RH 3CRH RH 6CRH 1 No 2 arm cover U 2 Battery cover Note RH 3CRH is shown The same method is applicable to RH 6CRH RH 3CRH RH 6CRH ...

Страница 65: ... and inspection use the procedure of removal in reverse Bolt the installation screw with the torque shown in Table 5 4 No Cover name Installation screw name Qty Note1 Note2 Note1 Use a bolting torque of 1 39 to 1 89 N m for the installation screws 1 and 2 Note2 Use a bolting torque of 4 02 to 5 00 N m for the installation screw 3 Remarks Common for RH 3CRH and RH 6CRH 1 No 2 arm cover U Truss scre...

Страница 66: ... the robot working conditions elongation will occur gradually over a long time The tension must be confirmed during the periodic inspection Please prepare the sound wave type belt tension gauge in inspection of the timing belt Refer to the Page 58 4 Timing belt tension for the tension of the timing belt The recommendation gauge is shown below Manufacture Gates Unitta Asia Company Type U 508 Fig 5 ...

Страница 67: ...occur Wear chips may accumulate in the cover after approx 300 hr of operating the robot but this is not a fault When the belt is replaced the machine system origin may deviate After the replacement ensure to reset the origin Damage condition Appearance Cause Gear tooth crack Overload Backside crack Deterioration of rubber due heat to or ozone Worn teeth Overload Excessive or insufficient tension T...

Страница 68: ...m the automatic operation or jog operation at measuring target axis for a few minutes then measure the tension of the belt Fig 5 4 Timing belt tension measurement The procedure is shown below 1 Turn on the controller s power supply 2 Rotate the timing pulley A to one direction in jog operation while visually checking its position and measure the belt tension at every 90 degrees four times in total...

Страница 69: ...ming belt The procedure for inspecting the timing belt is shown below 1 Refer to Page 52 5 3 2 Installing removing the cover and remove the No 2 arm cover U 2 Visually confirm that the symptoms indicated in Page 55 1 Timing belt replacement period have not occurred with the timing belt 3 Refer to Page 56 2 Timing belt tension measurement and confirm the belt tension 4 Install the No 2 arm cover U ...

Страница 70: ... are shown in Table 5 7 Table 5 7 Amount of movement of each axis during the tension measurement Axis Belt type Preset value Tension for new belt installation N Replacement guideline tension N M g m W mm R S mm RH 3CRH series J3 60 MTS3M 309 G 2 0 6 103 31 to 38 12 J4 motor side 226 2GT 10 1 3 10 61 40 to 45 15 J4 shaft side 160 S2M 272 GB 1 3 16 65 44 to 52 16 RH 6CRH series J3 60 MTS3M 489 G 2 0...

Страница 71: ...ation amount guide Cover to remove RH 3CRH 1 J1 axis reduction gears Grease nipple WA 610 SK 1A Harmonic Drive Systems Inc 6 000 Hr 8 g 2 J2 axis reduction gears Grease nipple WA 610 6 000 Hr 5 g No 2 arm cover U 3 Shaft Ball screw spline Wipe the old grease and paint Marutenpu PS No 2 KYODO YUSHI CO LTD Every 2000km movement 1 g RH 6CRH 1 J1 axis reduction gears Grease nipple WA 610 SK 1A Harmoni...

Страница 72: ...essary 3 Insert the grease shown in Table 5 8 using a grease gun from the lubrication grease nipple Apply the specified amount of grease Too much lubrication causes grease leakage Use manual grease gun and inject grease with pressure 0 03Mpa or less Do not use the grease gun which derived by the factory air presser to avoid injecting by too high pressure A grease gun that fits the grease nipple is...

Страница 73: ... and remove the No 2 arm cover U 3 Wipe off the old grease on the shaft Also wipe off the grease scattered inside the No 2 arm cover U 4 Turn on the controller s power supply and move the J3 axis to the upper end limit by jog operation Then turn off the controller s power supply again 5 Wipe off the old grease on the shaft which was hidden beneath the ball screw spline nut Wipe off the grease Lowe...

Страница 74: ... off the controller s power supply 9 Wipe off the grease adhering around the shaft ends or the nuts of the ball screw spline indicated with the arrows below When the ball spline and the ball screw are moved with extra grease on them a large amount of grease is scattered inside the arm The grease may reach the timing belt inside the No 2 arm causing the timing belt to deteriorate early 10 Reinstall...

Страница 75: ...tery shown in Table 5 9 If error 7500 occurs please exchange the battery of the robot arm and the controller simultaneously Table 5 9 The error about the battery The method of replacing the battery of robot arm is shown below About the purchase of the battery refers to Page 67 5 5 Maintenance parts If error 7500 or 112n n indicates the axis number occurs the program data and other data in the cont...

Страница 76: ...ed on the back side of the battery cover Remove the old battery from the holder and disconnect the lead connector To remove the lead connector squeeze the retaining latch while pulling on the connector 4 Insert the new battery into the holder and connect the lead connector Replace all batteries with new ones at the same time 5 All the batteries should be checked that it has been exchanged newly If...

Страница 77: ...may be deteriorated and cracked 1 Replacing the felt Fig 5 8 Replacing the felt 1 Remove the No 2 arm cover U 2 Remove the cable tie securing the old felt and remove the felt 3 Wrap the new felt around the ball screw spline and secure it with a cable tie At this time align the cutout parts of the felt with the position of the ball screw spline fixing screws 4 Install the No 2 arm cover U The felt ...

Страница 78: ...l be carried out before the total amount of servo on time reaches the specified time 24 000 hours for the robot arm and 36 000 hours for the controller See Fig 5 9 However the degree of the equipment s wear and deterioration presumably varies depending on their operating conditions Especially for operation with high load and frequency the maintenance cycle may be shorter For details on the part se...

Страница 79: ...ectric 2 shaft Asmall amount 3 Lithium battery battery ER6 Inside the battery cover 2 5 3 5Replacing the backup battery RH 3CRH 4 Timing belt J3 axis 1 5 3 3Inspection replacement of timing belt Mitsubishi Electric 5 J4 axis motor side 1 6 J4 axis shaft side 1 7 Felt Ball screw spline 1 5 3 6Felt replacement RH 6CRH 8 Timing belt J3 axis 1 5 3 3Inspection replacement of timing belt Mitsubishi Elec...

Страница 80: ...tion are correct For the details of the ABS mark position and the joint coordinates refer to Page 85 5 6 5 Recording the origin data No Method Explanation Cases when setting the origin is required Remarks 1 Origin data input method The origin data set as the default is input from the T B When the data is lost due to flat battery of the robot controller when C7500 occurs The setting method is expla...

Страница 81: ...jig before shipment Fig 5 10 Origin data label an example The origin data to input is found on also the robot examination report sheet Always install remove the cover with the controller control power turned OFF Failure to do so could lead to physical damage or personal injury should the robot start moving due to incorrect operations Origin data history table Origin Data History Serial No ES804008...

Страница 82: ...IN BRK 5 SET INIT 6 ENHANCED CLOSE 123 ORIGIN BRAKE ORIGIN 2 BRAKE CLOSE 123 1 ORIGIN 1 DATA 2 MECH 3 TOOL 4 ABS 5 USER CLOSE 123 ORIGIN DATA D J1 J2 J3 J4 J5 J6 J7 J8 CLOSE 123 Selecting a menu The menu can be selected with one of the following methods A Press the numeral key for the No of the item to be selected B Using the and keys etc move the cursor to the item to be selected and then press t...

Страница 83: ...Press the key five times will be set Press the key once and advance the cursor Press the key twice input and press the PQRS key four times input S Press the CHARACTER key and set to the numeral input mode Condition that 123 was displayed under the screen Press the 2 key input 2 and press the 9 key input 9 V S29 will appear at the D data on the teaching pendant screen 3 Press the key and move the c...

Страница 84: ...y and set to the character input mode Condition that ABC was displayed under the screen The displayed character is scrolled each time at pressing the key How to input symbols The symbol is allocated to and key Please repress each key until the symbol to wish is displayed a key b key c key _ Correcting an input After returning one character by pressing the CLEAR key input the character again If the...

Страница 85: ...stead of for all axes Go to steps for the target axis to set the origin In the following procedure the J3 axis brake is released to move its shaft with both hands When the brake is released the J3 axis falls by its own weight To ensure safety take appropriate measures such as supporting the axis to avoid the free fall This operation is carried out with the teaching pendant Set the mode of the cont...

Страница 86: ...as ten 3 Press the 1 key and display the Origin setting selection screen 4 Press the 3 key and display the Tool selection screen 5 Input 1 into the J1 axis Set 0 to other axes 6 Press the EXE key and display Confirmation screen MENU 1 FILE EDIT 2 RUN 3 PARAM 4 ORIGIN BRK 5 SET INIT 6 ENHANCED CLOSE 123 Select ORIGIN BRK No 1 arm J1 axis jig origin position ORIGIN BRAKE ORIGIN 2 BRAKE CLOSE 123 1 O...

Страница 87: ...d record the origin data on the origin data seal ORIGIN TOOL CHANGE TO ORIGIN OK No 123 Yes ORIGIN TOOL J1 1 J2 J3 J4 J5 J6 J7 J8 CLOSE 123 COMPLETED Select the axis of origin setting Do cursor movement into the parenthesis of each axis by the arrow key The origin is set only for the axis for which a 1 is displayed on the screen If the origin is not to be set press the 0 key and display a 0 ...

Страница 88: ...CRH and 110 degrees for RH 6CRH 3 Press the 1 key and display the Origin setting selection screen 4 Press the 3 key and display the Tool selection screen 5 Input 1 into the J2 axis Set 0 to other axes 6 Press the EXE key and display Confirmation screen MENU 1 FILE EDIT 2 RUN 3 PARAM 4 ORIGIN BRK 5 SET INIT 6 ENHANCED CLOSE 123 No 1 arm No 2 arm J2 axis jig origin position ORIGIN BRAKE ORIGIN 2 BRA...

Страница 89: ...d record the origin data on the origin data seal ORIGIN TOOL CHANGE TO ORIGIN OK No 123 Yes ORIGIN TOOL J1 J2 J3 J4 J5 J6 J7 J8 CLOSE 123 COMPLETED 1 Select the axis of origin setting Do cursor movement into the parenthesis of each axis by the arrow key The origin is set only for the axis for which a 1 is displayed on the screen If the origin is not to be set press the 0 key and display a 0 ...

Страница 90: ... pressing the key Note To prevent sudden fall of the J3 axis release and lock the brake of the following axis repeatedly at intervals of about 200 ms Intermittent releasing of the brake 6 With both hands slowly move the J3 axis in plus direction and contact the axis against the mechanical stopper When the brake is released the J3 axis falls by its own weight To ensure safety take appropriate measu...

Страница 91: ...e F4 key and return to the origin brake screen 9 Press the 1 key and display the Origin setting selection screen 10 Press the 3 key and display the Tool selection selection screen 11 Input 1 into the J3 and J4 axis Set 0 to other axes 12 Press the EXE key and display Confirmation screen 㪘㪙㪪㩷㫄㪸㫉㫂 㪡㪋㩷㪸㫏㫀㫊 BRAKE J1 0 J2 0 J3 1 J4 0 J5 0 J6 0 J7 0 J8 0 CLOSE 123 REL ORIGIN BRAKE ORIGIN 2 BRAKE CLOSE 1...

Страница 92: ...is by the arrow key The brakes can be released only for the axis for which a 1 is displayed on the screen If the brakes are not to be released press the 0 key and display a 0 If the F1 key on the teaching pendant or the enabling switch is detached while the brakes are released the brakes will be work immediately Select the axis of origin setting Do cursor movement into the parenthesis of each axis...

Страница 93: ...the origin is to be set with jog operation This can be set for all axes simultaneously or each axis independently To align the ABS marks view the robot from the front The deviation between the end points of the two triangular marks must be 1 mm or less The positions where the ABS mark is attached are shown in below Refer to Page 17 2 3 Confirming the operation for details on the jog operation Fig ...

Страница 94: ...ss the F1 key and the origin position is set up The origin settings are completed by the ABS method After setting the origin when the joint coordinates of the ABS mark position deviate from the coordinates of the ABS origin by 1 5 or more align the end points of the ABS marks and set the origin using the ABS origin method again ORIGIN 1 DATA 2 MECH 3 TOOL 4 ABS 5 USER CLOSE 123 MENU 1 FILE EDIT 2 ...

Страница 95: ... 2 3 Confirming the operation for details on the jog operation Choose the user origin position as the position where it doesn t move by the gravity This position is left as a guideline to position all axes with jog operation when setting the origin again with this method 2 Enter the JOINT jog mode and display the joint coordinates on the teaching pendant screen Record the value of the axis for whi...

Страница 96: ...o origin setting Press the EXE key and display Confirmation screen 9 Press the F1 key and the origin position is set up The origin settings are completed by the User origin method USER J1 1 J2 0 J3 0 J4 0 J5 0 J6 0 J7 0 J8 0 CLOSE 123 REL ORIGIN USER CHANGE TO ORIGIN OK No 123 Yes ...

Страница 97: ...ethod and write the origin data displayed on the teaching pendant onto the origin label 1 Confirming the origin data Confirm the value displayed on the teaching pendant s Origin Data Input screen Refer to Page 69 5 6 1 Setting the origin with the origin data input method 3 Inputting the origin data and display the Origin Data Input screen on the teaching pendant display screen 2 Recording the orig...

Страница 98: ... to the 24V DC power supply 3 When the 24V DC power supply is turned on the controller starts and then errors H0712 H0090 H0212 will occur 4 Release the brake using the teaching pendant For the brake release operation using the teaching pendant refer to Explanation of operation methods in the separate volume Instruction Manual Detailed Explanations of Functions and Operations 㼀㼛㻌㼑㼙㼑㼞㼓㼑㼚㼏㼥㻌 㼜㼛㼣㼑㼞㻌㼟...

Страница 99: ...t the robot can change to The posture is expressed by this configuration flag and the posture is saved with FL1 in the position constant X Y Z A B C FL1 FL2 The types of configuration flags are shown below 1 RIGHT LEFT Indicates the location of the end axis relative to the line that passes through both the rotational center of the J1 axis and the rotational center of the J2 axis Fig 6 1 Configurat...

Страница 100: ...Appendix 88 Configuration flag 6Appendix ...

Страница 101: ......

Страница 102: ...ADA MINAMI HIGASHI KU NAGOYA 461 8670 JAPAN Authorised representative Mitsubishi Electric Europe B V FA European Business Group Mitsubishi Electric Platz 1 D 40882 Ratingen Germany Tel 49 0 2102 4860 Jan 2020 MEE Printed in Japan on recycled paper Specifications are subject to change without notice ...

Отзывы: