background image

When Nozzle Clogging Cannot Be Solved

4-17

1

1

1

4

Routine Maintenance

5

Press 

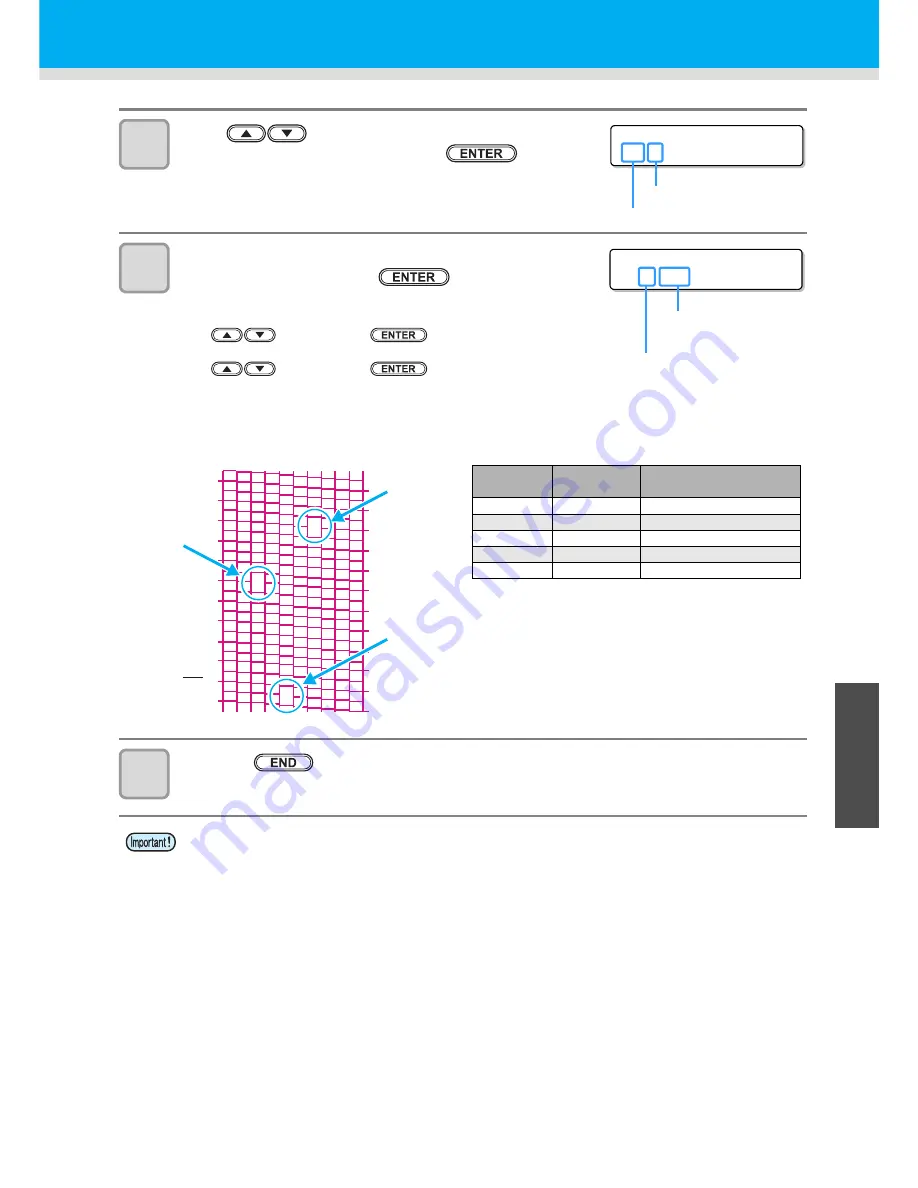
 to select the Nozzle line that needs 

NOZZLE RECOVERY and press the 

 key.

6

Register the Nozzle number that needs NOZZLE 
RECOVERY and press the 

 key.

(1)

Select the registration number from 1 to 10 by pressing

 and press the 

 key.

(2)

Register the nozzle number that needs recovery by pressing

 and press the 

 key.

• If the registered nozzle cannot be recovered, the screen of

the Step 3 in P.4-18 “Check the print condition for which
nozzle recovery cannot be performed” is displayed.

7

Press the 

 key several times to end the setting.

• Up to 10 nozzles can be registered per 1 nozzle line.
• Even if you use this function, time required for drawing does not change.
• For the lowest number of paths of the drawing mode, the NOZZLE RECOVERY function is invalid.
• Even if you register the NOZZLE RECOVERY, the pattern of test print etc. is not recovered.

SE L ECT NOZ Z L E

: H 1 - A

Head No.: H1 or H2

Nozzle line: A,B,C,D

H 1 - A
N o . 1 : 1 8 4

Registration No.: 1 to 10

Recovery nozzle No. 

(1 to 320) or OFF

1

10

21

30

41

50

61

70

81

90

101

110

121

130

141

150

161

170

181

190

201

210

221

230

Nozzle missing

No.184

Nozzle

number

Nozzle missing

No.16

Nozzle missing

No.128

Registration 

number

Recovery 

Nozzle No.

State

1

16

Target for nozzle recovery

2

128

Target for nozzle recovery

3

184

Target for nozzle recovery

4

OFF

No registration

5

OFF

No registration

Example of nozzle to be recovered

Содержание TS500-1800

Страница 1: ...MIMAKI ENGINEERING CO LTD URL http eng mimaki co jp D202330 13 Original instructions...

Страница 2: ...ide of the Machine 1 5 Operation Panel 1 6 Heater 1 7 Media sensor 1 7 Carriage 1 8 Cutter blade and slot for cutting 1 8 Indicator 1 8 Capping station 1 9 Pinch rollers and Feed rollers 1 9 Connectin...

Страница 3: ...38 Chapter 3 Extended Functions List of Functions 3 2 Setting Heater 3 3 Setting Logical Seek 3 4 Setting Drying Time 3 5 Setting Margins 3 6 Perform setting to reduce stripes between passes 3 7 Setti...

Страница 4: ...e improved 4 16 Automatic Maintenance Function 4 20 Setting the Refreshing Intervals 4 20 Setting the Cleaning Intervals 4 21 Cleaning Y motor 4 22 Replacing consumables 4 23 Replacing the wiper 4 23...

Страница 5: ...pendix Specifications 6 2 Machine specifications 6 2 Ink specifications 6 3 Setting orders depending on ink type 6 4 Setting orders of ink bottles 6 4 Sheet for inquiry 6 5 Warning labels 6 6 Function...

Страница 6: ...adio frequency energy and if not installed and used in accordance with the Operation manual may cause harmful interference to radio communications Operation of this equipment in a residential area is...

Страница 7: ...ration manual is describing the operations and maintenance of Color inkjet printer TS500 Series called as this machine hereafter TS500 1800 are identical with models SGPR656 180 Read this Operation ma...

Страница 8: ...rtant notes in use of this machine are given with this symbol Understand the notes thoroughly to operate the machine properly Useful information is given with this symbol Refer to the information to o...

Страница 9: ...g can result in an electric shock or breakdown of the machine Take care that no dust or dirt sticks to platen heaters Dust and dirt sticking heaters can cause fire Hazardous Moving Parts Keep Fingers...

Страница 10: ...on the RIP refer to the instruction manual for your RIP Pay attention to the expansion and contraction of the media Do not use media immediately after unpacking The media can be affected by the room t...

Страница 11: ...e below CAUTION A place exposed to direct sunlight On an inclined surface A place where temperature or humidity varies significantly Use the machine under the following environmental conditions Operat...

Страница 12: ...xi...

Страница 13: ...nd Functions 1 4 Front Side of the Machine 1 4 Rear Side and Right Side of the Machine 1 5 Operation Panel 1 6 Heater 1 7 Media sensor 1 7 Carriage 1 8 Cutter blade and slot for cutting 1 8 Indicator...

Страница 14: ...e set value depending on the ambient temperature Model Width Depth Height Gross weight TS500 1800 3830mm 1440mm 1 1 When the tension bar is flat 1700mm 750kg External ink supply unit 775mm 490mm 785mm...

Страница 15: ...operation if it is not fixed with the leveling feet Moving This Machine Put the supplied iron base plate black between each leveling foot and the floor To hold the weight of the printer using plate is...

Страница 16: ...se the media Waste ink tank Waste ink gathers in this tank Stand Supports the main body of the machine Left maintenance cover Open the cover in maintenance Even when the power button is off keep all c...

Страница 17: ...achine LAN connector Please use this connector when you use event mail function Main power switch Turns on off the main power for this machine Leave the main power turned on to prevent ink clogging Ro...

Страница 18: ...gap key Draws test patterns to check if there are any drawing failures such as ink clogging Or executes Head cleaning at ink clogging key Use this key to set the temperatures of the Print heater and...

Страница 19: ...ed lower the heater temperatures and wait until the platen temperature drops otherwise you can get burned When the media is to be replaced with a thin one lower the heater temperatures and wait until...

Страница 20: ...ng the slot for cutting on the platen The cutter blade is consumables If it gets dull replace it with new one P 4 26 Indicator Functions of the Indicator on the top right of this unit are described he...

Страница 21: ...a new one P 4 23 Pinch rollers and Feed rollers This machine retains the media with the pinch rollers and feed rollers During printing operation the feed rollers feed the media forward Be sure to wear...

Страница 22: ...USB 2 0 repeater cables available on the market Notes on peripheral devices in USB high speed mode When a peripheral device USB memory or USB HDD to be operated in USB high speed mode is connected to...

Страница 23: ...ower supply specifications of this machine is as below Single phase 200 to 240 Vac 20 A or less cannot be used with 100 V system For the power supply to the main body of the printer electrical work is...

Страница 24: ...over the ink bottle cap with a paper towel etc Being in that status slowly shake it twenty times and more by flowing ink 4 Remove the cap of the ink bottle If you shake it too strong it may cause ink...

Страница 25: ...of the ink bottles refer to P 6 4 How to make slits When you make slits in the aluminum sheet divide it into eight parts as shown in the figure or cut off the aluminum sheet along the inner side of th...

Страница 26: ...ad washing liquid evenly 3 When the float comes to move smoothly wipe washing liquid adhering to the float and the pipe with a waste cloth etc Move the float up down again and check that there is no a...

Страница 27: ...lamps located over the ink bottles Condition of Ink bottle lamp Description OFF No error Blinks in red There is less ink in the ink bottle Near End Or one month has passed from the expiration date of...

Страница 28: ...h your eyes with a lot of clean running water for at least 15 minutes In doing so also wash the eyes to rinse ink away completely Then consult a doctor as soon as possible Use genuine ink bottles for...

Страница 29: ...ging Use media recommended by MIMAKI to ensure reliable high quality printing Set the heater temperature to meet the characteristics of the media Set the temperature of the Print heater and Post heate...

Страница 30: ...1 18...

Страница 31: ...mperature Settings for the Heaters 2 26 Checking the Heater Temperature 2 27 Test Feeding 2 28 Test Printing 2 29 Test Printing 2 30 Head Cleaning 2 31 About head cleaning 2 31 Perform head cleaning d...

Страница 32: ...Referring to Preparing for the Heaters P 2 26 Referring to Test Printing P 2 29 Referring to Set the media feeding P 2 32 9 Correct the ink drop position for bidirectional printing Referring to Correc...

Страница 33: ...panel The firmware version is displayed when the power is turned ON The machine performs its initial operation 3 The machine enters LOCAL 4 Turn ON the power of the connected PC Turn the power ON afte...

Страница 34: ...and the pressure adjusting function operate When the main power switch has been turned OFF the auto maintenance functions such as flushing do not operate and this may cause nozzle clogging Keep the f...

Страница 35: ...CAL 2 Press the key 3 Press to set a value of the head gap Set value 1 5 to 7 0mm 4 Press the key 5 Press the key several times to end the setting How to check the value of the head gap When you check...

Страница 36: ...ransparent media when a media is exposed to direct sunshine Do not use a printed media Otherwise ink can adhere to the pinch rollers and media may be stained or may not be detected Straighten the sign...

Страница 37: ...h the locks 2 Remove the roll shaft on the take up device at the front of this machine 1 Loosen the cover fixing screw attached to the cover of right left of take up device and unlock the AMF lock by...

Страница 38: ...Step 1 and 2 to release the lock of the roll holder 4 After rotating the handle of the roll holder counterclockwise take out the roll holder l 4 Attach the paper core 1 Put the roll shaft through a p...

Страница 39: ...AMF lock to the locking position and tighten the cover fixing screw 6 Fix the roll holder The roll holders are at both of right and left Fix both with the procedures below 1 While lifting the lever o...

Страница 40: ...fective print Take care not to drop the media on your foot when setting the media Handle clamp levers carefully Do not push the lever up when tension bar is lifted Be sure to fix the tension bar with...

Страница 41: ...dle of the roll holder counterclockwise take out the roll holder 4 Set a media on the roll shaft 1 Put the roll shaft through the paper core of the media 2 Adjust the media so that it comes to the rig...

Страница 42: ...at both of right and left Fix both with the procedures below 1 While lifting the lever of the roll holder stopper rotate it to the position indicated in the figure 2 Get off of the lever once and rota...

Страница 43: ...it to the front Pull the media out to the front of this machine with enough length 9 Push down the clamp lever from the back of this machine Lock the media temporarily 10 Raise the clamp lever at the...

Страница 44: ...to the locking position and tighten the cover fixing screw 13 At the back lift the tension bar down to the stopper slowly to tighten the media Unlock the tension bar and then lift it down Check the po...

Страница 45: ...switch 3 When the tension bar arm becomes parallel to the floor turn the left switch to AUTO to stop the tension bar 4 Turn the switch to the feeding direction of the media 16 Hold the media with the...

Страница 46: ...positions with tape in the order in the figure so that the media may not wrinkle 20 Press to loosen the media Loosen the media until it reaches to the floor 21 With switches of the take up device rol...

Страница 47: ...r the media thickness 0 1 to 1 0mm 3 Press the key The media selection screen is displayed 4 Press to select ROLL or LEAF Detects the media width Thickness detection is also performed here if the key...

Страница 48: ...MEDIA THICKNESS to AUTO in the Media detection of the machine setting this screen is not displayed P 3 23 2 Press to enter the media thickness 0 1 to 1 0mm 3 Press the key 4 Display the screen for en...

Страница 49: ...ng The media sags and the machine cannot take it up beautifully The tension applied on the media is too weak According to your media attach the counter weight on the A part The media floats on the pla...

Страница 50: ...er to the position where the media may be right seen from the front of the machine 4 Tighten the roll holder fixing screw Check the Steps 2 to 3 again 5 Set the left end of the core of the roll media...

Страница 51: ...by slanting the media 1 Pull the media out of the roll to the head of the platen 2 Insert the media between the platen and the pinch roller Pull the media out of the roll so that the media can be gra...

Страница 52: ...ont cover 14 Press the key to select ROLL Detects the media width When MEDIA RESIDUAL of the machine setup is ON P 3 16 the screen for entering media remaining amount is displayed after detecting the...

Страница 53: ...a and automatically stops at the proper position Surface waviness or ruck may affect the quality of currently printed image When fixing media with tape align the media along the direction indicated wi...

Страница 54: ...not reach the slot of the post heater 4 Hold the media with the media press gently Set the media so that no media sticks out from the right end pinch roller to the right side When using a thick media...

Страница 55: ...re you can perform media cutting 3 After determining the origin press the key The printing origin is changed Typical setting position of printing origin The printing origin in the depth direction X is...

Страница 56: ...xternal heater setting 5 Press the to select ON OFF When using the external heater set this to ON 6 Press the key to end the setting You can change the temperature set here also in HEATER of the SETUP...

Страница 57: ...5 6 Preparing for the Heaters Checking the Heater Temperature 1 Press the key The current heater temperature is displayed 2 Press the key at the end of confirmation The screen returns to LOCAL PRT POS...

Страница 58: ...es 2 Press the key 3 Press to select ON OFF 4 Press the key 5 Press the key Start test feeding 6 Press the key The feeding operation is continued until you press the key Feed it to some extent and che...

Страница 59: ...ging slight touching of ink or nozzle missing Relationship between head row and test pattern The relations between head row and test pattern print position are as follow Head 1 Head 2 Media advance Pa...

Страница 60: ...ess the key Test printing starts When the printing has been completed the screen returns to step1 3 Check the printed test pattern When the result is normal end the operation When the result is abnorm...

Страница 61: ...s missing NORMAL When any line is missing when colors are mixed HARD When poor image quality cannot be improved even by NORMAL or SOFT cleaning 3 Press the key 4 Press to select a head to cleaning Set...

Страница 62: ...s is narrowed When you have changed the media type check the pattern and perform adjustment depending on the status When you have changed the temperature of the heaters make sure that the CONSTANT lam...

Страница 63: ...media feeding rate can be corrected even in the remote mode or when image data is printed 1 Press the key in the Remote 2 Press to enter a corrected feeding rate Corrected feeding rate 255 to 255 The...

Страница 64: ...nted patterns are called Pattern 1 Pattern 2 Pattern 3 in the order of printing 5 Press to correct the dot position of Pattern 1 Corrected feeding rate 40 0 to 40 0 Check the test patterns The positio...

Страница 65: ...r correcting all patterns perform the procedures in the Step 7 7 Press the key several times to end the setting Performing to correct the dot position without key You can select DROP POScorrect by usi...

Страница 66: ...from the PC The printing conditions are displayed For the method of data transmission see the instruction manual for the output software 5 Start printing When using a roll media rewind the media by ha...

Страница 67: ...key The received data is erased then it returns to the local mode Behavior after printing has been completed Drying Feed When printing has been completed the feeding operation is performed to dry the...

Страница 68: ...When a media is cut be careful that the printed side does not touch the floor or the printed side of other already cut media When using the take up device take up a cut medium using the switch of the...

Страница 69: ...s 3 12 Setting a AUTO Power off 3 14 Setting the feeding and take up 3 15 Setting the Display of Media Residual 3 16 Setting Time 3 18 Setting Units 3 19 Setting a KEY BUZZER 3 20 Selecting the head l...

Страница 70: ...ON OFF Sets ON OFF of the external heater LOGICAL SEEK P 3 4 HOST ON OFF HOST ON Sets the scan movable area during printing INK LAYERS P 3 11 HOST 1 9 HOST 1 Sets the number of layers in which ink is...

Страница 71: ...60 C 8 Press the key The POST2 heater temperature setting screen appears 9 Press to set the temperature of POST2 heater 20 C to 70 C 10 Press the key The external heater setting screen appears 11 Pre...

Страница 72: ...mes to end the setting You cannot specify the logical seek at the RasterLink side When you set this machine to Host printing will be performed in LOGICAL SEEK ON status UNI DIRECTIONAL BI DIRECTIONAL...

Страница 73: ...TIME 4 Press the key 5 Press to set drying time for scanning To enable the drying time specified in your RIP select Host Scanning setting value Host or 0 0 sec to 9 9 sec 6 Press the key 7 Press the...

Страница 74: ...shipping Change this when you want to set the right margin of media to the setting value of this machine Set Value HOST or 10 to 85mm in 1mm increment 8 Press the key 9 Press the key several times to...

Страница 75: ...MAPS effect becomes strong and feeding stripes become less visible When printing if you set the printing speed to 0 and more MAPS becomes invalid In addition it prints at 0 speed When you use MAPS set...

Страница 76: ...3 8 Perform setting to reduce stripes between passes 8 Press the key 9 Press the key several times to end the setting SETUP MAPS ENT...

Страница 77: ...rms head cleaning automatically LENGTH When the set length has passed the machine performs head cleaning automatically TIME When the set time has passed the machine performs head cleaning automaticall...

Страница 78: ...interval between each operation shorter 1 Press the key in LOCAL 2 Press the key 3 Press to select INTERVAL WIPING 4 Press the key 5 Press to set intervals Set Value 3 to 255 Minutes OFF When OFF is s...

Страница 79: ...to select an item for setting Select it referring to P 3 2 List of Functions 4 Press the key 5 Press to select the setting value Select it referring to P 3 2 List of Functions 6 Press the key 7 Press...

Страница 80: ...L HEAD line 1 HEAD line 2 HEAD line 3 ALL If a trouble such as nozzle clogging cannot be solved you can print only with the head without the trouble MEDIA DETECT P 3 23 THICKNESS DETECT AUTO MANUAL AU...

Страница 81: ...he characters to write in the subject of the event mail Alphanumeric characters and symbols within 8 characters Server Setup SMTP Address Set the SMTP server SMTP PORT No Set the SMTP port number SEND...

Страница 82: ...e to turn OFF the power supply Set Value none 10 to 600min 5 Press the key 6 Press the key several times to end the setting If it has received data from the PC in the auto power off status the power s...

Страница 83: ...Up separately 1 Press the key in LOCAL 2 Press to select MACHINE SETUP 3 Press the key 4 Press to select Feeding TakeUp 5 Press the key 6 Press to select ON OFF 7 Press the key 8 Press to select ON OF...

Страница 84: ...inted is displayed When the media remaining amount display is turned to OFF the remaining amount of a media is not displayed in the Remote The amount of a media that has been fed by the printing and j...

Страница 85: ...remaining amount of a media starts to be printed When the printing has been completed the screen returns to LOCAL Set Remaining amount of a media to display to ON When you replace the media you use no...

Страница 86: ...ar Month Day Time selecting by the keys Year Month Day Time inputting by the keys 7 Press the key The entered date is displayed 8 Press the key several times to end the setting 20 hours to 4 hours can...

Страница 87: ...ct UNIT 5 Press the key 6 Press to select a unit of the temperature Set value C F 7 Press the key 8 Press to select a unit of the length Set value mm inch 9 Press the key 10 Press the key several time...

Страница 88: ...key 6 Press to select ON OFF 7 Press the key 8 Press the key several times to end the setting When the key buzzer is set to OFF the buzzer sound for errors warnings operation completion etc cannot be...

Страница 89: ...CHINE SETUP 3 Press the key 4 Press to select HEAD SELECT 5 Press the key 6 Press to select a head to use Set value ALL HEAD line 1 HEAD line 2 HEAD line 3 7 Press the key 8 Press the key several time...

Страница 90: ...5 Press the key 6 Press to select language Set Value English Deutsch Fran ais Espa ol Italiano Portugu s 7 Press the key 8 Press the key several times to end the setting FUNCT I ON SETUP ENT FUNCT I O...

Страница 91: ...LOCAL 2 Press to select MACHINE SETUP 3 Press the key 4 Press to select MEDIA DETECT 5 Press the key 6 Press to select AUTO or MANUAL 7 Press the key 8 Press the key several times to end the setting...

Страница 92: ...e key 4 Press to select DRYING FEED 5 Press the key 6 Press to select the feeding length Set value OFF 100 to 1000mm 7 Press the key 8 Press and set whether you perform backward feed after dry feed or...

Страница 93: ...is displayed 7 Press the key 8 Press to select Check MAC Addr 9 Press the key The MAC address currently used by this machine is displayed 10 Press the key 11 Press to select DHCP After connecting with...

Страница 94: ...the key 17 Press to select the set values Both of DHCP and AutoIP is OFF you can set IP Address Default Gateway DNS Address Sub Net Mask For other than above proceed to the Step 21 18 Press the key 1...

Страница 95: ...N 8 Press the key 9 Press the key several times for terminating this function Disclaimer The customer is responsible for the communication fee for Internet communication such as e mail notification Th...

Страница 96: ...ion stops because an error occurs Press to set ON OFF 10 Press the key Set whether you send do not send the e mail when a warning occurs during printing Press to set ON OFF 11 Press the key Set whethe...

Страница 97: ...ey 8 Press to set mail address Set the e mail address to which you send the event mail Set it with alphanumeric characters and symbols within 96 characters 9 Press the key 10 Press the key several tim...

Страница 98: ...of the event mail Set it with alphanumeric characters and symbols within 8 characters 9 Press the key 10 Press the key several times for terminating this function FUNCT I ON SETUP ENT FUNCT I ON MACH...

Страница 99: ...Press the key 10 Press to select SMTP Port No 11 Press the key 12 Press to set SMTP Port Set the SMTP port number 13 Press the key FUNCT I ON SETUP ENT FUNCT I ON MACH I NE SETUP ENT MACH I NE SETUP A...

Страница 100: ...ss to set the user name to use for the authentication Set it with alphanumeric characters and symbols within 30 characters 23 Press the key 24 Press to select Pass Word Depending on your server if you...

Страница 101: ...ss the key Press the jog key to set POP server Input the POP server name 29 Press the key 30 Press to select APOP 31 Press the key Press to set ON OFF of APOP 32 Press the key 33 Press the key several...

Страница 102: ...n error code is displayed Refer to the next page to solve the problem 9 Press the key several times for terminating this function FUNCT I ON SETUP ENT FUNCT I ON MACH I NE SETUP ENT MACH I NE SETUP AU...

Страница 103: ...annot connect with the POP server Check the POP server setting Check the firewall setting 12010 An error returns from the POP server Check the POP server setting 13000 The POP authentication has faile...

Страница 104: ...s to select MACHINE SETUP 3 Press the key 4 Press to select RESET 5 Press the key 6 Press the key The already configured settings are initialized 7 Press the key several times to end the setting FUNCT...

Страница 105: ...achine information below are displayed in series Item Description USAGE WIPING The information of this machine can be confirmed PRINT LENGTH PRINT AREA USE TIME VERSION This displays the firmware vers...

Страница 106: ...P ENT FUNCT I ON I NFORMAT I ON ENT I NFORMAT I ON USAGE ENT I NFORMAT I ON VERS I ON ENT TS 5 0 0 1 8 0 0 V 1 0 0 MRL I I I V 1 9 0 S b 3 0 0 MMBBYYKK REMA I N 9 9 9 9 9 9 9 9 S b 3 0 0 MMBBYYKK REMA...

Страница 107: ...n 4 5 Cleaning around the wiper 4 5 Washing the Ink Discharge Passage DISWAY WASH 4 8 When the Machine Is Not Used for a Long Time CUSTODY WASH 4 9 Cleaning the Head and the Area around It 4 12 When N...

Страница 108: ...ine can cause electric shock hazards or damage to the machine To ensure stable ink jetting it is necessary for the machine to eject a small amount of ink flushing regularly when a printing outputting...

Страница 109: ...he post heater cover and the rear platen cover are easy to be dirty because of the powder of the media etc If it shows dirt wipe it with a soft cloth soaked in water or waterish mild detergent and wru...

Страница 110: ...en cleaning the sensor on the lower surface of the head is cleaned move the carriage to the left end by the operations of step 1 of P 4 12 Cleaning the Head and the Area around It and then clean it Cl...

Страница 111: ...Press the key The carriage moves onto the platen Tools required for Maintenance Cleaning liquid 03 maintenance kit ML003 Z K1 Clean stick SPC 0527 Gloves Goggles Be sure to wear the supplied goggles a...

Страница 112: ...o the wiper and bracket with a clean stick dipped in cleaning solution for maintenance Wipe off so that cleaning solution for maintenance will not remain 8 Clean the wiper slider Wipe off the ink stic...

Страница 113: ...peration the machine returns to step1 Performing the station maintenance without key You can select station maintenance by using the key in the Local without pressing the key Make sure to be careful w...

Страница 114: ...move them 2 Hold the bottom of the right maintenance cover and pull it to the front 3 While pulling the right maintenance cover downward remove it If the right maintenance cover is hard to remove use...

Страница 115: ...ing solution for maintenance ML003 Z K1 Wipe off so that cleaning solution for maintenance will not remain 3 Insert it in the original position by holding the projections at both ends of the wiper Che...

Страница 116: ...key 10 Press to set the time for the cleaning solution to be left as it is Set Value 1 to 99 min by the unit of 1 min Until wiper cleaning is competed COMPLETED NEXT ENT is displayed on the screen Af...

Страница 117: ...en the right maintenance cover 13 Fill up the cap with cleaning solution for maintenance using a dropper Fill the cap with the cleaning solution just before the solution overflows from the cap 14 Clos...

Страница 118: ...While pulling the left maintenance cover downward remove it If the left maintenance cover is hard to remove use the supplied screwdriver Tools required for cleaning Clean stick SPC 0527 Gloves Goggles...

Страница 119: ...zzle surface from the rear side to the front side 8 Press the key after the cleaning Close the left maintenance cover then press the key Clean the wiper until it looks as shown in the photo on the rig...

Страница 120: ...WASH Wash the head nozzle P 4 14 NOZZLE RECOVERY Alternative nozzles for printing when nozzles missing can not be improved P 4 16 Check the items on the right beforehand Is INK END displayed The ink i...

Страница 121: ...lution to be left as it is Set value 1 to 99 minutes Unit minute 11 Press the key The cleaning solution filled in the cap is absorbed The screen on the right is displayed only for the duration set in...

Страница 122: ...and Line D for one head Rear side of machine H1 H3 H5 H2 H4 H6 A B C D NOZ Z L E RECOVERY PR I NT SE L ECT HEAD H1 2 SE L ECT HEAD H3 4 PR I NT I NG P L EASE WA I T 1 10 21 30 41 50 61 70 81 90 101 11...

Страница 123: ...can be registered per 1 nozzle line Even if you use this function time required for drawing does not change For the lowest number of paths of the drawing mode the NOZZLE RECOVERY function is invalid...

Страница 124: ...to select MAINTENANCE and press the key 3 Press to select NOZZLE RECOVERY 4 Press the key 2 Press to select CHECK 3 Press the key The mode for which nozzle recovery is invalid is displayed If there is...

Страница 125: ...Press the key 2 Press to select RESET and press the key 3 Press to select the head H1 2 H3 4 H5 6 for which you reset nozzle recovery 4 Press the key 5 Press to select the Nozzle line that needs rese...

Страница 126: ...y 3 Press the key 4 Press to set the refreshing interval Set value OFF Lv 1 Lv 2 Lv 3 As the LEVEL increases the interval between each operation gets shorter 5 Press the key 6 Press the key several ti...

Страница 127: ...select CLEANING 3 Press the key 4 Press to set the interval between each cleaning operation Set value OFF Lv 1 Lv 2 Lv 3 As the LEVEL increases the interval between each operation gets shorter 5 Press...

Страница 128: ...over for absorbing abrasion powder and absorb abrasion powder accumulating in the hole for absorbing abrasion powder with a vacuum Using a flat blade screwdriver open the cover 3 Return the cover for...

Страница 129: ...rotrusions at its both ends 4 Insert a new wiper Insert a new wiper by holding its both ends 5 Close the right maintenance cover and press the key After its initial operation the machine returns to LO...

Страница 130: ...ent of the waste ink tank Confirmation Message in LOCAL 1 The message on the right is displayed 2 Check the state of the waste ink tank Replace the waste ink tank with another 1 Open the waste ink tan...

Страница 131: ...oved 4 Replace the waste ink tank 1 Prepare a new waste ink tank SPC 0197 2 Hold the handle of the waste ink tank and insert it along the rail 3 Raise the waste ink tank 5 Close the waste ink tank cov...

Страница 132: ...es of the maintenance cover and remove the maintenance cover The blade is sharp Be careful not to hurt yourself or anyone else Store the cutter blade in a place that is out of the reach of children In...

Страница 133: ...cutter unit by the carriage 1 Loosen the screw of the cutter unit 2 Remove the cutter unit 3 Mount a new cutter unit 4 Fasten the screw of the cutter unit to secure the cutter unit 8 Close the front...

Страница 134: ...4 28...

Страница 135: ...a get jammed media is soiled 5 3 HEAT or CONSTANT LED does not light up 5 3 Image quality is poor 5 4 Nozzle is clogged 5 4 Ink bottle warning appears 5 5 If an error related to the sub tank occurs Er...

Страница 136: ...achine properly It can also occur when the printing function does not work properly or the media is not set correctly Has the power cable been connected between the machine and a power plug socket Sec...

Страница 137: ...he basic operation Is a recommended media used Use recommended media Is the media not curled or bent ends Avoid using any media with curls or bent ends Yes Is the media hanging down along the platen U...

Страница 138: ...n the direction of travel of the heads 1 Execute the head cleaning P 2 31 2 Perform maintenance of the inside of the station P 4 5 3 Execute the MEDIA COMP function P 2 32 4 If any pieces of paper or...

Страница 139: ...on immediately Displaying the description of ink bottle trouble The contents of ink bottle error are confirmable by the following operations 1 Press the key in LOCAL 2 Press the key When multiple bott...

Страница 140: ...he key 3 Press to select SUB TANK 2 Press the key 3 Press and select a sub tank to be maintained Select a sub tank Select whether you perform maintenance or not If Error 61b occurs an appropriate head...

Страница 141: ...e right maintenance cover and then remove head cover 4 Press the key 5 Discharge the ink from the valve of the Y port Insert the syringe into the valve of Y port and then slowly withdraw about 10cc of...

Страница 142: ...edures are completed 10 Terminate air purge by pressing the key Close the port When some port is skipped the air purge press to return to the step 4 11 Press Cleaning is performed 12 Press the key sev...

Страница 143: ...3 Press the key 4 Remove the cover under the left maintenance cover Remove the screws for five positions in the part indicated with circles in the figure 5 Rotate the adjustment screw of the throttle...

Страница 144: ...and the ink bottle lamp as well as the screen display For the negative pressure the buzzer stops within the range of 0 1kPa For the positive pressure the buzzer stops within the range of 1 0kPa Pressu...

Страница 145: ...temperature 1 Use the POST heater only 2 Lower all heaters temperatures When you lower the heater temperature drying time may not be enough Lower the FEED SPEED Media feeding 1 For roll media feed th...

Страница 146: ...int cleaning etc can not be performed Press the key to check the ink bottle generating the warning Replace them with usable ink bottles The waste ink tank is full Check the waste ink tank The waste in...

Страница 147: ...your local distributor to call for service Though a certain amount was con sumed there is no change in the sub tank sensor High Though a certain amount was con sumed there is no change in the sub tank...

Страница 148: ...position if the same message is displayed contact a distributor in your district our office or our call center An abnormality occurred in the take up status of the media take up machine Check that th...

Страница 149: ...ink bottle generating the warn ing with a new one The ink of the ink bottle has been nearly used up Replace the ink bottle generating the warn ing with a new one Even when there are enough ink ink end...

Страница 150: ...e If the same error message appears again contact your local distributor to call for ser vice Sequential number abnormality of the event log occurred An error occurred in the main PCB 1 2V power suppl...

Страница 151: ...nnect the interface cable in position Use an interface cable conforming to the specifications Any parameter outside the range of acceptable numeric values was received A maintenance command error occu...

Страница 152: ...e up cover The feeding cover opened during printing Close the feeding cover The take up limit sensor was detected during printing Lower the tension bar or move it to the wait ing position The feeding...

Страница 153: ...in amount was con sumed there is no change in the sub tank sensor High Perform SUB TANK P 5 6 of the maintenance Even if you performed this when the message is displayed contact your local distributor...

Страница 154: ...ted the operation that cannot be performed There remains received data that has not yet been printed Execute the data clear function P 2 37 The number of mounted heads is 0 zero Turn off the main powe...

Страница 155: ...nd functions of this machine Specifications 6 2 Machine specifications 6 2 Ink specifications 6 3 Setting orders depending on ink type 6 4 Setting orders of ink bottles 6 4 Sheet for inquiry 6 5 Warni...

Страница 156: ...s Roll weight 1 60kg or less Roll inside diameter 3 inches Printing surface Side facing outward Roll end treatment The roll end is gently fixed to the core with weak adhesive tape or weak glue for eas...

Страница 157: ...2 EC 4 Main unit and heater included 5 When take up machine feeding machine are flat Item Specifications Supply 2L Ink bottle Color 4 colors Black ink Blue ink Magenta ink Yellow ink 6 colors Black in...

Страница 158: ...e ink type you use Setting orders of ink bottles The orders of ink bottles set in the ink station differ depending on the ink set you use Set the ink bottle aligning with the label pasted on the top s...

Страница 159: ...the following necessary items and then fax the sheet to our sales office Company name Person in charge Telephone number machine model Operating OS Machine information 1 1 Refer to Confirming Machine i...

Страница 160: ...Warning labels are stuck on the machine Be sure to fully understand the warning given on the labels If a warning label is illegible due to stains or has come off purchase a new one from a distributor...

Страница 161: ...Warning labels 6 7 Appendix 6 1 Reorder M903239 3 Reorder M903330 4 Reorder M901549 5 Reorder M903404 6 Reorder M908973...

Страница 162: ...ES T PR I NT F EED D I R ENT PR I NT I NG P L EASE WA I T T ES T F EED ENT BACKWARD F EED ON CARR I AGE OUT ENT DA T A C L EAR ENT DARA C L EAR CARRIAGE OUT NOZZLE WASH DISWAY WASH COSTODY WASH FEED...

Страница 163: ...Function Flowchart 6 9 Appendix 6 C L EAN I NG 0 0 0 0 0 0 T ES T F EED P L EASE WA I T T ES T F EED S T ART ENT CUT POS I T I ON 0 0 EX T ERNA L HEA T ER OF F ON OFF...

Страница 164: ...6 10 From P 6 8 F EED COMP ENT F EED COMP PR I NT ENT DROP POS c o r r e c t ENT DROP POS c o r r e c t PR I NT ENT S b 3 0 0 MMBBYYKK REMA I N 9 9 9 9 9 9 9 9 I NK I C CAN T READ MMBBYYKK...

Страница 165: ...SER I A L N o T S 5 0 0 1 8 0 0 V 1 0 0 MR L I I I V 1 9 0 RECOVERY NOZ Z L E CONF I RM DE T A I L S MNT When there is no recovery it is not displayed F EED COMP 0 PR I NT I NG P L EASE WA I T PA T T...

Страница 166: ...I ON SE TUP ENT LOCA L WH I DTH mm SETUP FUNCT I ON MA I NT ENANCE ENT MAINTENANCE FUNCT I ON MACH I NE SE TUP ENT MACHINE SET FUNCT I ON I NFOMA T I ON ENT I NFOMA T I ON USAGE ENT I NFOMA T I ON VER...

Страница 167: ...Function Flowchart 6 13 Appendix 6 To P 6 14 To P 6 18 To P 6 22 WI P I NG 0 T S 5 0 0 1 8 0 0 V 1 0 0 MR L I I I V 1 9 0 PR I NT L ENGTH 0m PR I NT AREA 0m 2 USE T I ME 0 h...

Страница 168: ...NT ENT To P 6 16 HOST 0 to 9 9s SE TUP LOG I CA L SEEK e n t PR I NT I NG P L EASE WA I T HOST ON OFF POS T 1 OF F LOG I CA L SEEK HOS T PR I NT I NG P L EASE WA I T OFF 20 to 60 C OFF 20 to 60 C SE...

Страница 169: ...Function Flowchart 6 15 Appendix 6 F EED COMP 0 9999 to 9999 Print end PA T T ERN 1 0 0 40 0 to 40 0 Print end PA T T ERN 2 0 0 40 0 to 40 0 POS T 2 OF F OFF 20 to 70 C...

Страница 170: ...I NT ERVA L 1 p a g e 1 to 1000page I NT ERVA L 0 1m 0 1 to 100 0m OFF 3 to 255min SE TUP I NT ERVA L WI P I NG ENT I NT ERVA L WI P I NG OF F 1 5 to 7 0mm SE TUP HEAD GAP ENT HEAD GAP 2 0mm AUTO C L...

Страница 171: ...Function Flowchart 6 17 Appendix 6 T YPE SOF T SOFT NORMAL HARD T YPE SOF T SOFT NORMAL HARD T YPE SOF T SOFT NORMAL HARD...

Страница 172: ...NG COMP L E T ED NEX T ENT D I SWAY WASH COMP L E T ED ENT WI PER C L EAN I NG COMP L E T ED NEX T ENT STATION MAINT HEAD MAINT NOZ Z L E RECOVERY PR I NT ENT MA I NT ENANCE NOZ Z L E RECOVERY ENT NO...

Страница 173: ...a c o v e r COMP L E T ED ENT PR I NT I NG P L EASE WA I T H 1 A RESE T EXECUT E ENT C l o s e a c o v e r COMP L E T ED ENT C L EAN I NG P L EASE WA I T D I SWAY WASH P L EASE WA I T H 1 A N o 1 0 0...

Страница 174: ...Lv 3 MA I NT ENANCE PRESSURE AD J US T ENT PRESSURE AD J US T NEGA T I VE Op e n T h r o t t l e V a l v e COMP L E T ED ENT MA I NT ENANCE SUB T ANK ENT SE L ECT SUB T ANK MMBBYYKK SUB T ANK EXECUT E...

Страница 175: ...6 T YPE NORMA L NORMAL SOFT HARD AD J US T I NG P L EASE WA I T PRESSURE 0 0 0 k P a F I L L UP P L EASE WA I T P L EASE WA I T C L EAN I NG P L EASE WA I T A I R PG COMP L E T ED ENT A I R PG END RE...

Страница 176: ...OF F MACH I NE SE TUP F e e d i n g T a k e U p ENT ROL L OF F OFF ON OFF ON MACH I NE SE TUP MED I A DE T ECT ENT TH I CKNESS DE T ECT AUTO AUTO MANUAL MACH I NE SE TUP DRY I NG F EED ENT DRY I NG F...

Страница 177: ...Function Flowchart 6 23 Appendix 6...

Страница 178: ...t Ma s k ENT S u b N e t Ma s k 2 4 Settable when DHCP and AutoIP are both OFF To P 6 26 EVENT MA I L Ma i l D e l i v e r y ENT Ma i l D e l i v e r y OF F MACH I NE SE TUP EVENT MA I L ENT ON OFF EV...

Страница 179: ...Function Flowchart 6 25 Appendix 6 E r r o r E v e n t OF F P r i n t E n d E v e n t OF F Wa r n i n g E v e n t OF F ON OFF ON OFF ON OFF O t h e r E v e n t OF F ON OFF...

Страница 180: ...SERVER SE TUP A u t h e n t i c a t i o n ENT SERVER SE TUP U s e r N ame ENT SERVER SE TUP P a s s Wo r d ENT SERVER SE TUP POP 3 A d d r e s s ENT SERVER SE TUP APOP ENT RESE T A L L SE T T I NG OK...

Страница 181: ...uthentication it is displayed SMT P A d d r e s s SMT P P o r t N o 2 5 A u t h e n t i c a t i o n OF F U s e r N ame P a s s Wo r d POP 3 A d d r e s s APOP ON ON OFF OFF POP before SMTP SMTP Authen...

Страница 182: ...6 28...

Страница 183: ...TS500 1800 Operation Manual September 2013 MIMAKI ENGINEERING CO LTD 2182 3 Shigeno otsu Tomi shi Nagano 389 0512 JAPAN D202330 13 26092013...

Страница 184: ...NH FW 1 4 MIMAKI ENGINEERING CO LTD 2013...

Отзывы: