MIDIbox SEQ V4 Скачать руководство пользователя страница 53

2019/10/22 16:44

51/76

MIDIbox SEQ V4 Beginner's Guide

MIDIbox - http://wiki.midibox.org/

the track selection buttons, or by using the track selection page.

The mute page can be accessed by pressing the MUTE button. While on the page, you can press the
GP buttons to toggle mutes for each track in any combination you like. The mutes and umutes set on
this page can also be sync'd to measure in UTILITY   Opt.   Option #6 (sync mutes) and #7 (sync
unmutes). If sync mutes/unmutes to measure is activated, muting a channel shows a measure
countdown to when the next muting or unmuting is going to happen. Note that if your tracks are not
sync'd to measure, but the mutes/unmutes are, the mutes/unmutes might not happen predictably.

While on the MUTE page, you can press & hold SELECT, and choose any number of tracks with the GP
buttons. The selected tracks will be muted simultaneously when you release SELECT.

Mutes from sources other than the MUTE page (from bookmarks, with CCs etc.) are not affected by
options #6 and #7, but happen instantaneously. Sync'ing mutes to measure works along the same
principles as sync'ing a track to measure. See section 5.4. on Measure for more information.

It is possible to mute individual parameter layers for Note, Chord or CC type tracks by pressing &
holding the MUTE button and selecting layers with the GP buttons. With Drum tracks, you can mute
individual drum instrument layers similarly.

While on the MUTE page, the ALL and FAST buttons have special functions. First, if you have sync'd
mutes/unmutes to measure with Options #6 and/or #7, activating the FAST function allows you to
bypass this temporarily. While the FAST function is active, mutes and unmutes happen
instantaneously, regardless of mute/unmute sync settings. Second, you can activate the ALL function
to bring up a menu for quick muting and unmuting options (which happen instantly). The options are:

1. Mute all tracks;
2. Mute the active track's layers;
3. Mute all tracks and all layers;
4. Unmute all tracks;
5. Unmute the active track's layers; and
6. Unmute all tracks and all layers.

Note that unmuting a track and unmuting a track's layers are different operations. Muting a track is
an all-or-nothing operation, while muted layers can be unmuted one by one by pressing & holding the
MUTE button and selecting layers with the GP buttons.

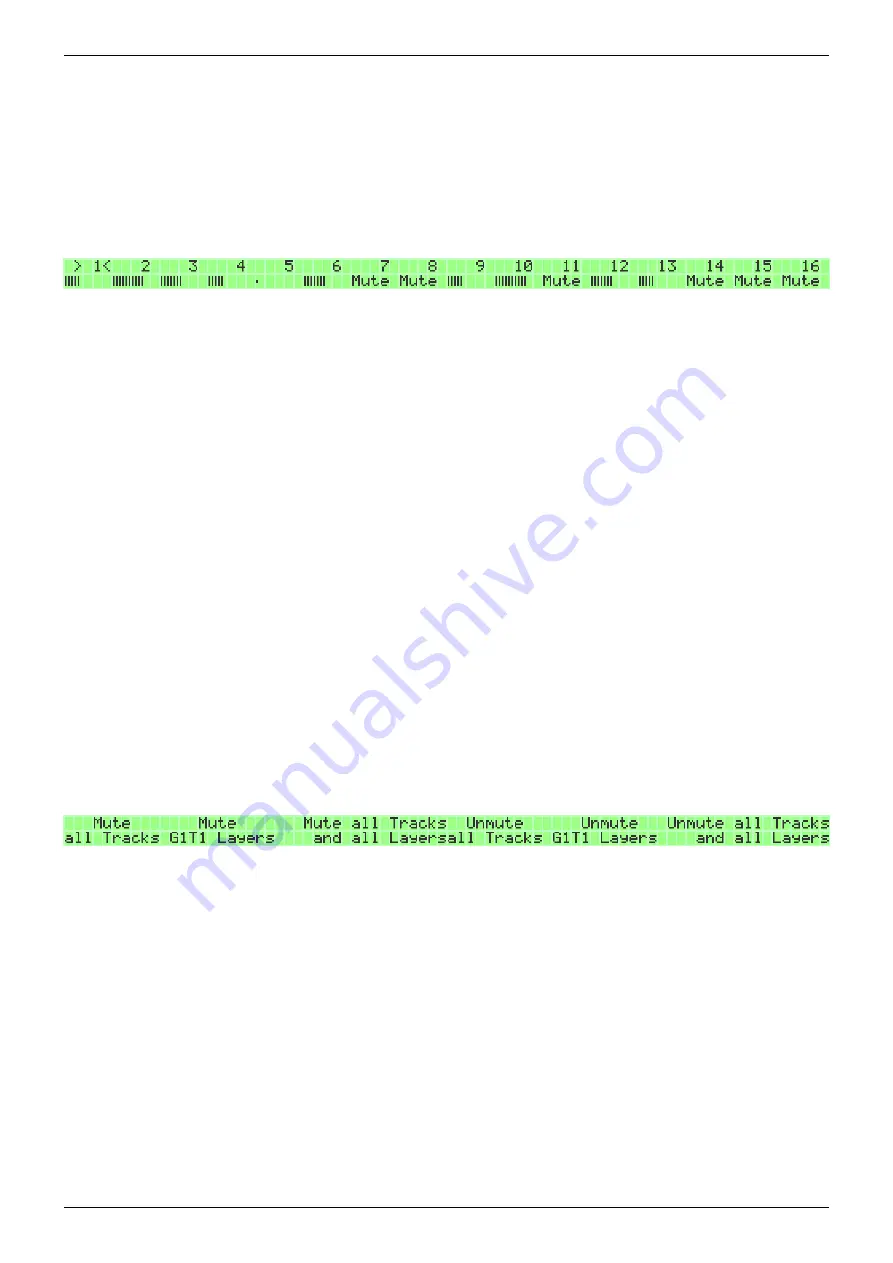
If a complete track is muted, the track's velocity bar on the MUTE page is replaced by the text 'Mute'.
However, if one or more of the track's layers are muted, the track entry's upper row on the MUTE
page will have a small “m” next to the track's orginal number to denote that even though the track is
not muted, one or more of its layers are.

A quick muting and unmuting of all tracks (instantly) is also available on the UTILITY page (GPB15 and
GPB16).

Finally, the bookmark page (see Appendix 2) can be used to effect customised mutes/unmutes of any
combination of tracks with one button. Mutes and unmutes from bookmarks happen instantaneously,
regardless of any sync settings.

Содержание SEQ V4

Страница 1: ...ge 28 4 2 Working on the EDIT page 36 5 Working with patterns and songs 41 5 1 Saving a pattern 41 5 2 Phrase Mode and Song Mode 42 5 3 Copying Patterns 46 5 4 Measure 47 5 5 Guide Track 49 5 6 Track...

Страница 2: ...Last update 2018 04 30 18 00 mididocs seq beginners_guide start http wiki midibox org doku php id mididocs seq beginners_guide start http wiki midibox org Printed on 2019 10 22 16 44...

Страница 3: ...ed and working unit at your disposal preferably with Wilba s frontpanel design Also this guide is based on the premise that you have a MIDI controller connected to the sequencer s MIDI IN1 and a polyp...

Страница 4: ...l which is called the datawheel The displays are called the left LCD and right LCD The unit should have at least one physical MIDI IN and one physical MIDI OUT port and that s taken for granted in thi...

Страница 5: ...track is currently selected though the information is often available on the LCDs as well most often on the left edge of the left LCD You can select multiple tracks at once within a group by pressing...

Страница 6: ...his data is in trigger layers and parameter layers For details see section 3 In addition to the musical data tracks also contain settings data De ning the settings for each individual track is one of...

Страница 7: ...ks one after the other a pattern is made up of four tracks and that is the smallest unit that can be chained A totality of tracks patterns songs and settings and a few other things like groove pattern...

Страница 8: ...und on one synth and G1T2 to play a bass sound on another but it s ok if both tracks are playing the same sound as long as your synth is polyphonic If your synth is monophonic you will have to apply t...

Страница 9: ...k needs to be initialised for the changes to take e ect Press GPB16 for a few seconds to initialise the track Initialisation erases all data in the track s layers It is important to note that even tho...

Страница 10: ...in a chord track parameter layer A is a chord layer instead of a note layer The chord layer doesn t take normal notes as input but instead a value from A P to a p plus octave value from 0 to 3 each of...

Страница 11: ...ords whether transposed or not Sustain holds each note chord until another one is played and this spares you the trouble of having to set the length of each individual note chord Given the disadvantag...

Страница 12: ...several others the real availability of which depends on the hardware choices made when your sequencer was put together However if you scroll to the end of the value list you will nd values Bus1 4 Th...

Страница 13: ...tches If this is causing problems Program Change commands can be sent also on a parameter layer dedicated for this purpose allowing you to time them more exibly so that your equipment has time to reac...

Страница 14: ...FX settings etc See Appendix 4 for details 2 1 4 Setting parameter layer functions Finally the EVENT page allows you to customise your parameter layers Use GPK9 to select the layer and GPK10 to selec...

Страница 15: ...for the purposes of this demonstration and despite the shortened length let s keep the notes on the right LCD Everything should now be ready Press PLAY on the front panel to start the sequencer If yo...

Страница 16: ...r display 16 steps altogether represents a 16th note allowing for four note or other events per quarter note If on the DIVIDER page you select timebase 8 divider value 32 each of the 16 steps on the E...

Страница 17: ...n buttons you will see they are running at equal speed It s good to be on the EDIT page for the best demonstration of this STOP the sequencer and select G1T1 then go to the DIVIDER page and quick sele...

Страница 18: ...e EDIT page left LCD top row Px Name gives the active parameter layer where x is the layer A P and Name the name of the layer such as Vel velocity Len length etc Tx Name gives the active trigger layer...

Страница 19: ...ave something in them Now use GPK1 to select Step 2 All the information in the steps stays the same only the gate ag is turned o o If you switch back to step view press hold EDIT you can t see anythin...

Страница 20: ...kip trigger is on the step in question will be skipped This is not simply an empty step but the step will be jumped over and the track will e ectively become one step shorter than its length set on th...

Страница 21: ...tons Or if you have only four parameter layers button C alternates between the 3rd and the 4th layer Note that all steps will have Note Velocity CC etc values in them by default but they are e ective...

Страница 22: ...o the note layer value from the rst note layer The note layer value is merely displayed and cannot be edited when the velocity layer is visible and vice versa because the GP knob is used to edit the v...

Страница 23: ...er you can set the number of notes played within the step their intensity range 0 15 and whether the intensity is ascending or descending D for descending U for ascending For example setting 3D03 mean...

Страница 24: ...ger to trigger layer B on the TRIGGER page rolls don t get triggered anymore unless you explicitly set them to trigger on the RollG trigger layer In other words now the normal gate layer can be used t...

Страница 25: ...hange patches in the middle of a track However this requires that your MIDI equipment can e ect patch changes quickly enough On the other hand if your MIDI equipment cannot handle the Program Change c...

Страница 26: ...ion for both steps is mute and because the parameter is Nth1 muting starts immediately from the rst occurrence and then repeats every second for step 2 or fourth for step 4 time step1 step2 step3 step...

Страница 27: ...ls on this For example you could use only one type of chord a major chord on the chord layer of a track and control whether it is a C major F major or G major with the Root note track 3 2 12 Scale The...

Страница 28: ...rameter layers that are 64 steps long i e they repeat four times while track goes through its length of 256 8 di erent drum sounds can be played 64 64 16 Track length is 64 steps one trigger layer One...

Страница 29: ...velocity value for each drum instrument layer can be set on EVENT page with GPK13 and GPK14 VelN for normal and VelA for accent velocity range 0 127 Only Accent layer has these extra settings You can...

Страница 30: ...options and settings are available on the Jam page 4 1 The Jam page You can enter the Jam page by pressing UTILITY GPB10 Jam However as the Jam page is likely to be used quite often it might be useful...

Страница 31: ...ctive track s output port and MIDI channel This is done regardless of the active track s bus settings on the track s MODE page see section 6 1 1 for details on the MODE page If Fwd is o the active tra...

Страница 32: ...1 to control a synth that is listening to MIDI channel 6 The nal option on the MIDI Con guration page is Reset Stacks This is useful for special situations where e g a MIDI controller has become detac...

Страница 33: ...s you to record as many notes simultaneously as you have note layers on the track you re recording on The number of available note layers depends on how you have set up the track see section 2 1 1 Bot...

Страница 34: ...h layers for each recorded step If a step had several note layers with notes in them i e a chord and you record a single note in that step which always goes in the rst note layer all the other note la...

Страница 35: ...the notes will be recorded in steps 1 4 8 and 13 instead of step 1 5 9 and 13 like you wanted The rst note will always be on time if you start live recording with the rst key press Quantize allows yo...

Страница 36: ...one of 16 di erent live patterns for any of the available drum instruments Select the drum instrument that you want with GPK9 Ptn setting turns the live patterns function on and o for the selected dr...

Страница 37: ...se while on the Live Patterns page you can paste the copied live pattern with GPB16 Paste or with the dedicated PASTE button on the frontpanel This means that the COPY and PASTE buttons won t copy or...

Страница 38: ...rly brackets the display will ash EDIT RECORDING and you can enter a note or notes into the step while pressing holding the GP button Note that Edit Recording mode takes its settings notably Mode and...

Страница 39: ...recording notes and other data in a track you can also copy paste and duplicate the data in each track Copy and paste have their dedicated buttons on the frontpanel while the rest of the editing opti...

Страница 40: ...target track e g pasting a 16 step section into a 24 step track 8 steps of the target track will not be overwritten Which 8 steps won t be overwritten depends on your paste operation s starting point...

Страница 41: ...ter 4 2 2 Clear move scroll undo Clear has a dedicated button on the frontpanel while move scroll and undo can be found by pressing UTILITY CLEAR clears all layers of all steps in the selected track e...

Страница 42: ...ther than the one in the current cursor position the sequencer will generate a descending or ascending ramp between the present cursor position and the knob you turn This way you can generate e g velo...

Страница 43: ...atterns A single pattern can be saved with MENU SAVE GPB14 The source pattern to be saved is always one of the four active patterns each group has one active pattern With GPK1 4 you can choose the sou...

Страница 44: ...ase mode and don t do anything the pattern will play 16 steps over and over because that s the length of the tracks If you turn a knob on the PATTERN page or SONG page to switch to pattern 1 A2 when t...

Страница 45: ...n A H and the GP buttons 9 16 to choose the actual pattern 1 8 within the sections A H Also on the PATTERN page the group and track selection buttons on the upper left of the frontpanel have a special...

Страница 46: ...time group 3 will be playing 3 A1 all the way from the beginning This is because now there is a previous song position for the in G3 for song position A1 namely position A5 from the rst iteration wher...

Страница 47: ...pasting and clearing the active track they perform the operation on the current song position If you re in Song mode pressing holding the SONG button shows an extra entry on the right display Guide Tr...

Страница 48: ...depends on your settings on the Options page UTIL Opt option 3 17 In a nutshell S ToP allows you to start with four patterns e g 1 A1 2 A1 3 A1 4 A1 jam to your heart s content and when you have somet...

Страница 49: ...rn structure and settings you can copy the rst seed pattern with the right settings into several other pattern slots which otherwise would have the sequencer s default settings like this rst copy x A1...

Страница 50: ...16 steps every track that is sync d to measure will be reset and started from the beginning at the time when the measure count resets back to the beginning no matter how long the tracks are and where...

Страница 51: ...ack function by setting it to However as by default no track is sync d to measure this will result in behaviour that is unlikely to be as useful as the more predictable ways that are available Guide T...

Страница 52: ...guide track For easily predictable results the track set as Guide Track should have its divider value set to 16 normal the default setting on the track s DIVIDER page Smaller divider values i e faster...

Страница 53: ...ayers similarly While on the MUTE page the ALL and FAST buttons have special functions First if you have sync d mutes unmutes to measure with Options 6 and or 7 activating the FAST function allows you...

Страница 54: ...sending track to control the arpeggios on a receiving track The chord data can be either chord parameter layer data or it can be data from multiple simultaneous note layers For example if the sending...

Страница 55: ...the latest note or chord played on the track until another one is played or the sequencer is stopped This is useful for tracks that play long notes or chords so that you don t have to set each note s...

Страница 56: ...rst receiving track has just C 3 notes in it and the second receiving track has only E 3 notes in it changing the sending track s note from C 2 to C 2 will transpose the receiving tracks notes half a...

Страница 57: ...track s currently playing chord C 3 transposed up by one octave so the nal note played by the Arpeggiator track for this step is C 4 See also the options Hold and Sort in section 6 1 1 6 1 5 Using a...

Страница 58: ...you want that all the notes in a track are in a certain key and mode you can force them to a chosen scale This is useful e g in combination with randomly generated notes see section 6 3 which would be...

Страница 59: ...yer selection button C Likewise trigger layer assignments can be checked by pressing trigger layer selection button C Parameter layers are randomised by setting the intensity of the randomisation Rand...

Страница 60: ...length of the loop repeating the pattern over the whole track For example if the loop length is 16 steps and the number of pulses is 4 a pulse will be placed each four steps In principle any number of...

Страница 61: ...ERG will leave the Note layer values untouched but will switch the gates on and o based on the loop length pulse and o set settings you make For track length normal accent velocity settings and their...

Страница 62: ...rb Page 7 Chorus Page 8 Modulation wheel Page 9 Freely assignable CC CC1 Page 10 Freely assignable CC CC2 Page 11 Freely assignable CC CC3 Page 12 Freely assignable CC CC4 The freely assignable CCs fo...

Страница 63: ...n 3 F4 is located at SR M1 Pin 2 SR Pin this line begins with a so it s commented out not part of the code BUTTON_TRACK_SEL M3 3 this line defines button F1 as the Track Selection button BUTTON_LIVE M...

Страница 64: ...s BUTTON_MUTE_ALL_TRACKS 0 0 Button behaviour momentary toggle In the HW setup le it is possible to change the behaviour of a number of buttons so that they do their function while the button is press...

Страница 65: ...lect the bookmark you want A bookmark can be stored by going to the Bookmarks page and pressing holding a GP button for 3 seconds The page that was selected before entering the Bookmarks page is store...

Страница 66: ...ction won t be stored but it will always be what s written in the bookmark le in this case this bookmark will always select tracks 1 4 no matter what the track selection status happens to be at the mo...

Страница 67: ...Port options If you select Def as the Port it will refer to the Default Port setting on the MIDI Router page Note that the router settings might overlap with the Jam page note live forwarding option F...

Страница 68: ...ke this IN Chn P OUT Chn P Node 2 IN2 1 Sel Trk Node 2 contains the settings for the keyboard synthesizer which is connected to IN1 and set to send on and listen to exclusively channel 1 This way you...

Страница 69: ...which should be modified via NRPN See list below o CC 99 0x63 NRPN MSB Selects the Track which should be modified via NRPN Allowed values 0 15 for Track 1 16 127 to modify the current selected track...

Страница 70: ...18 0 99 0 LFO Phase 0 0 1 1 2 2 99 99 0x13 19 0 127 15 LFO Interval in Steps 0 1 Step 1 2 Steps 2 3 Steps 127 128 Steps Note range is 1 256 steps if edited from CS 0x14 20 0 127 15 LFO Interval Reset...

Страница 71: ...d 0x1c 28 0x1d 29 0 128 0 Pattern Bank Change Low Byte 0 off 1 128 Bank Selection Low Byte 0x1e 30 0 128 0 Pattern Bank Change High Byte 0 off 1 128 Bank Selection High Byte 0x1f 31 0 128 0 Pattern Pr...

Страница 72: ...ff 0x25 37 0 3 0 Transposer Arpeggiator Bus assignment Bus1 Bus4 0x26 38 0 15 0 MIDI Channel of Track 0x27 39 0 127 0 MIDI Port of Track 0x00 Default 0x10 USB1 0x11 USB2 0x12 USB3 0x13 USB4 0x20 OUT1...

Страница 73: ...1 128 Range is 0x00 0xff 1 256 steps if edited from CS 0x2f 47 0 3 0 Clock Divider Flags Bit 0 Synch to Measure Bit 1 Triplets Bit 2 Manual Clock the next step only on manual requests or via Step CC 0...

Страница 74: ...0 Groove Style 0 off 1 Shuffle 2 Inv Shuffle 3 Shuffle2 4 Shuffle3 5 Shuffle4 6 Shuffle5 7 21 Custom Grooves 1 16 0x33 51 0 15 0 Groove Intensity 0x34 52 0 1 0 Morph Mode 0 off 1 on 0x35 53 0 128 0 Mo...

Страница 75: ...Layer Assignment for Gate 0x41 66 0 8 2 Trigger Layer Assignment for Skip 0x42 67 0 8 3 Trigger Layer Assignment for Accent 0x43 68 0 8 4 Trigger Layer Assignment for Glide 0x44 69 0 8 5 Trigger Laye...

Страница 76: ...44 10 2T 11 2 12 1T 13 1 14 Rnd1 15 Rnd2 16 64d 17 32d 18 16d 19 8d 20 4d 21 2d 22 0 0x52 82 0 40 15 Initial Velocity Level 0 0 1 5 2 10 20 100 40 200 0x53 83 0 40 15 Feedback Velocity Level 0 0 1 5...

Страница 77: ...Echo Taps 3 Forward to Random channel 4 7 reserved bit 4 Forward CCs PitchBender Channel Pressure Program Change to all Fx channels 0x59 89 0 40 0 Fx MIDI Port 0x00 Same as configured for track 0x10...

Страница 78: ...iki midibox org doku php id mididocs seq beginners_guide start http wiki midibox org Printed on 2019 10 22 16 44 0x7f 127 From http wiki midibox org MIDIbox Permanent link http wiki midibox org doku p...

Отзывы: