28
If an optional Fire Release Mechanism was ordered with your operator:
1.
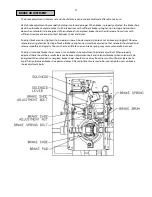
Loosen socket head cap screw on adjustment nut. Loosen the fire release adjustment nut.
2.
Slide fire release assembly onto output shaft of reducer. Align assembly so that the drive sprocket on assembly is
aligned with door sprocket when the assembly is not engaged (i.e. when the engagement arm is at rest and the internal
spring is not compressed).
3.
Tighten set screw on fire release hub.
4.
Using fire release adjustment tool, rotate fire release adjustment nut so as to allow 3/16” clearance between the clutch
hub and the drive sprocket hub when the mechanism is not engaged.
5.
After adjustment is completed make sure socket head cap screw on clutch nut is locked in place.
6.
Verify fire release mechanism by pushing or pulling the engagement arm so as to engage the 3 ball bearings into the 3
holes in the drive sprocket.
7.
Rotate and position engagement arm so as to not interfere with operator drive chain. Slide stabilizing rod through slot
of engagement arm and attach to frame or external support to prevent arm from rotating during operation. (Note:
Location of arm and stabilizing bolt vary depending on mounting and specifics of the particular installation).
8.
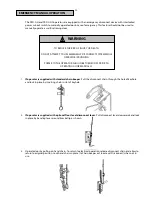
Attach fusible link (not supplied) to cable tensionner on cable assembly. Using pulleys and sash chain provided,
position cable assembly so as to locate fusible link in appropriate location to suit installation.
NOTE: Cable assembly may be installed to pull release arm towards the operator or away from operator, whichever
is most applicable to the particular installation.
9.
Attach the keyring located at the end of sash chain to a fixed location so that tension on cable will cause engagement
arm to fully engage the fire release mechanism.
10.
When fusible link melts, the cable should release tension on the arm allowing the spring loaded fire release mechanism
to disengage drive sprocket causing an open door to close under it’s own weight.
Note: Limit switch settings must be re-adjusted anytime the fire release has been activated.
FIRE RELEASE MECHANISM INSTALLATION
Содержание PRO-GH
Страница 1: ...INSTALLATION AND INSTRUCTION MANUAL MODELS PRO GH PRO GHC AUG 2010...
Страница 32: ...32...
Страница 33: ...33 33...
Страница 34: ...34...
Страница 35: ...35 35...
Страница 36: ...36 36...
Страница 37: ...37...
Страница 38: ...38...
Страница 39: ...39...
Страница 40: ...40...
Страница 41: ...41...
Страница 42: ...42...
Страница 43: ...43...
Страница 44: ...44...

