


Copyright Meritor, Inc., 2021
MM-96147 / Revised 03-21
Page 58
(16579)
Printed in USA
9 155R Series Slip Drive Shaft Assembly
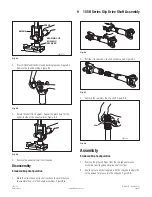
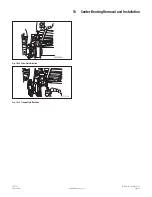
Thread the
trunnion
through the yoke
bore to pilot the
bushing into
the yoke.
Fig. 9.18
6. Use an appropriate press, yoke bearing cup installation tool or
universal joint press to install the second bushing slightly past
the snap ring groove. Check that the bushing is aligned with
the universal joint. Figure 9.16.
CAUTION
You must fully seat the snap ring into the snap ring groove to
avoid damage to the driveline.
7. Use snap ring pliers to install the second snap ring into the
snap ring groove. Figure 9.19.
Fig. 9.19
8. Strike the yoke ear with a brass or copper hammer to ensure
that the universal joint moves freely. Figure 9.20.
Move the joint with your hand
to ensure free movement.
Fig. 9.20
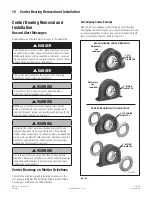
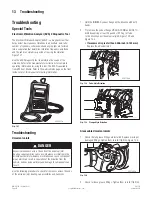
Driveline
1. Wipe off the yoke saddle.
NOTE:
Any time a universal joint is disconnected, new capscrews
must be used during reassembly.
2. Support the driveline. Install the bearing straps and new
capscrews onto the slip yoke end of the driveline.
NOTE:
Capscrews have a "lock patch" and can be hand-tightened
only two or three threads.
3. Hand-tighten the capscrews through the bearing strap into the
yoke.
4. Use a torque wrench to alternately tighten the capscrews to
Meritor’s driveline torque specifi cation. Figure 9.21.
Fig. 9.21
5. Repeat Step 1 to Step 3 to attach the weld yoke end of the
driveline to the vehicle.