


Copyright Meritor, Inc., 2021
MM-96147 / Revised 03-21
Page 46
(16579)
Printed in USA
6 Full-Round
NOTE:
Any time a universal joint is disconnected, new capscrews
must be used during reassembly.
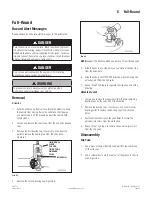
5. Install new capscrews and hand-tighten them through the
bearing cover plate and into the yoke.
6. Repeat Step 2 to Step 5 to install the second bearing cup.
• If the cover plate will not seat fl ush against the yoke
surface:
Remove each bearing cup from the yoke bore.
Check the bottom of each bearing cup. If you fi nd a needle
bearing, replace the bearing cup.
7. Use a torque wrench to alternately tighten the capscrews to
correct specifi cations. Refer to Table B. Figure 6.14.
4001842a
Fig. 6.14
Table B: Torque Specifi cations – Full-Round
Driveline
Series
"A" Inches
(mm)
Thread
Size
Inches
Torque Specs
lb-ft (Nm)
16N
5.31 (134.87)
5/16-24
26-35 (35-47)
17N
6.09 (154.69)
3/8-24
38-48 (51-65)
176N
7.00 (177.8)
3/8-24
38-48 (51-65)
18N
7.55 (191.77)
3/8-24
38-48 (51-65)
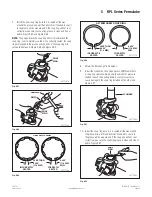
YOKE GAUGE
TOOL
“A” dimension
across yoke
ears determines
end yoke/universal
joint series.
“A”
Identifies
driveline
series
4001848a
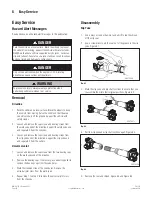
Lubrication
Universal Joint
After installation into the end yokes, lubricate the universal joints at
the grease fi tting until grease fl ows from the bearing cup seals on
all four trunnions. Use Meritor grease specifi cation O-634-B, NLGI
Grade 2 with EP additive. Figure 6.15.
• If grease does not purge from the seals:
Follow the
steps below.
New grease must
flow at all four seals.
Shown without end
yokes for clarity.
4001843a
Fig. 6.15
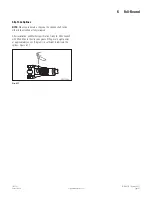
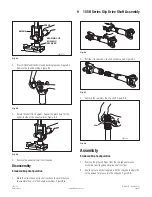
a. Move the assembly UP-AND-DOWN or SIDE-TO-SIDE while
you apply grease gun pressure. Figure 6.16.
4001844a
Fig. 6.16
b. Loosen the bearing cup capscrews. Add grease until grease
purges from the seals.
• If grease still does not purge from all four trunnion
seals:
Remove the universal joint and correct the problem.
• If you cannot determine the problem:
Replace the
universal joint.
c. Tighten the capscrews. Refer to Table B.