background image

EX1001, EX2001, EX8017 

5

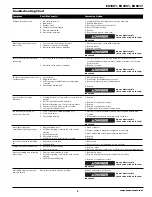
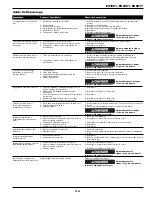
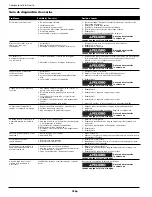
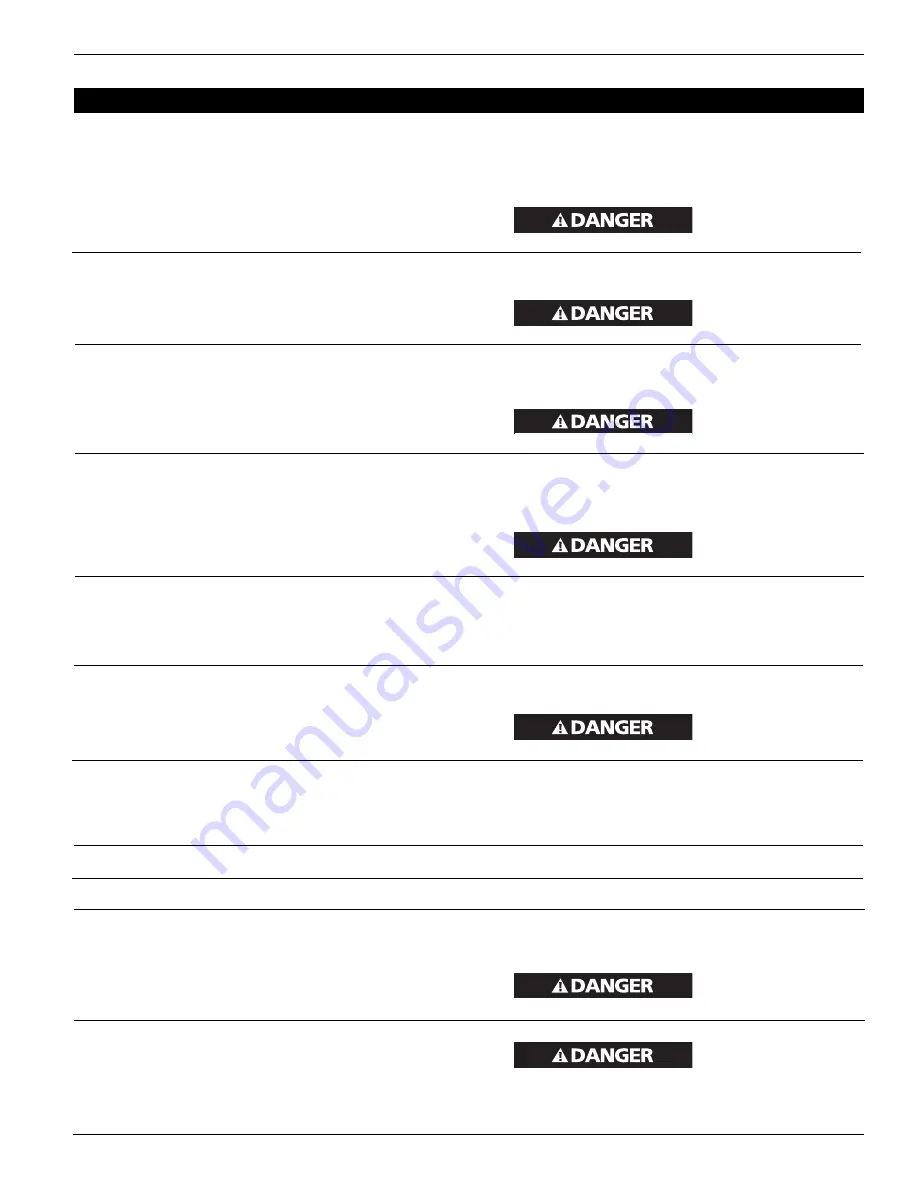
Troubleshooting Chart

Symptom

Possible Cause(s)

Corrective Action

1. No electrical power
2. Blown fuse
3. Breaker open
4. Thermal overload tripped
5. Pressure switch bad
6. Check valve defective

1. Poor contacts, line voltage incorrect
2. Shorted or open motor winding
3. Defective check valve or unloader

1. Incorrect size fuse, circuit overloaded

2. Defective check valve or unloader

1. Low voltage
2. Clogged air filter
3. Lack of proper ventilation/room temperature

too high

4. Check valve malfunction

1. Leaking, broken, or loose valves or restricted air

passage

2. Defective pressure switch unloader
3. Defective bearing on eccentric or motor shaft
4. Cylinder or piston ring is worn or scored
5. Loose bolts, tank not level

1. Loose connections (fittings, tubing, etc.)
2. Loose drain valve
3. Check valve leaking

1. Clogged intake port
2. Air leaks in piping (on machine or in outside

system)

3. Broken inlet valves 
4. Piston ring broken
5. Cylinder or piston ring is worn or scored

1. Excessive water in tank
2. High humidity

1. Defective pressure switch
2. Excessive air usage

1. Excessive condensation in tank
2. Air leaks in piping (on machine or in outside

system)

3. Tank check valve leaking

Check valve stuck in an open position

1. Plugged in? Check fuse/breaker or motor overload
2. Replace blown fuse
3. Reset, determine cause of problem
4. Reset Thermal overload
5. Replace
6. Remove and replace check valve

Do not disassemble
check valve with air in tank;

bleed tank

1. Check connections, check with voltmeter
2. Replace motor
3. Replace or repair

Do not disassemble
check valve with air in tank;

bleed tank

1. Check for proper fuse, use time-delay fuse. Disconnect other

electrical appliances from circuit or operate compressor on its own
branch circuit

2. Replace or repair

Do not disassemble
check valve with air in tank;

bleed tank

1. Check with voltmeter
2. Clean filter (See Maintenance section)
3. Move compressor to well ventilated area

4. Replace

Do not disassemble
check valve with air in tank;

bleed tank

1. Replace

2. Replace or repair as necessary
3. Replace
4. Replace or repair as necessary
5. Tighten bolts, shim tank to level position

1. Check all connections with soap and water solution and tighten
2. Tighten
3. Disassemble check valve assembly, clean or replace

Do not disassemble
check valve with air in tank;

bleed tank

1. Clean or replace
2. Replace leaking components or tighten as necessary

3. Have authorized service representative repair unit
4. Replace
5. Replace

1. Drain tank
2. Move to area of less humidity; use air line filter

1. Replace switch
2. Decrease air usage; compressor not large enough for air requirement

1. Drain more often
2. Replace leaking components or tighten as necessary

3. Replace or repair as necessary

Do not disassemble
check valve with air in tank;

bleed tank

Remove and replace check valve

Do not disassemble
check valve with air in tank;

bleed tank

Compressor will not run

Motor hums but cannot run or
runs slowly

Fuses blow/circuit breaker trips
repeatedly

Thermal overload protector cuts
out repeatedly

Knocks, rattles, excessive
vibration

Tank pressure drops when
compressor shuts off

Air output lower than
normal/low discharge pressure

Excessive moisture in discharge
air

Compressor runs continuously

Excessive starting and stopping
(auto start)

Air leaking from unloader on
pressure switch

www.maxustools.com

Содержание EX1001

Страница 1: ...he State of California to cause cancer and birth defects or other reproductive harm Wash hands after handling Please read and save these instructions Read carefully before attempting to assemble insta...

Страница 2: ...sitors away and NEVER allow children in the work area 5 Wear safety glasses and use hearing protection when operating the pump or unit 6 Do not stand on or use the pump or unit as a handhold 7 Before...

Страница 3: ...fer from area to area Source wiring plug and protector must be rated for at least the amperage and voltage indicated on motor nameplate and meet all electrical codes for this minimum 2 Use a slow blow...

Страница 4: ...ut off flow of air completely OUTLET PRESSURE GAUGE 1 This gauge shows at a glance air pressure at outlet Air pressure is measured in pounds per square inch psi 2 Be sure this gauge reads ZERO before...

Страница 5: ...lve with air in tank bleed tank 1 Check for proper fuse use time delay fuse Disconnect other electrical appliances from circuit or operate compressor on its own branch circuit 2 Replace or repair Do n...

Страница 6: ...limited warranty The Purchaser must comply with the warranty given by the engine manufacturer which is supplied with the product H Additional items not covered under this warranty 1 All Compressors a...

Страница 7: ...vant de mettre ce produit en service En cas de dommage ou de parties manquantes S V P composer le 1 888 MAXUS4U pour demander conseil ou appeler un Centre De Service Autoris Maxus S il vous pla t lire...

Страница 8: ...t son utilisation 2 Suivre tous les codes de s curit locaux ainsi que les National Electrical Codes NEC and Occupational Safety and Health Act OSHA des U 3 Seules les personnes bien familiaris es avec...

Страница 9: ...a pression du r servoir arrive la pression maximale r gl e d avance Dans la position OFF le compresseur ne fonctionnera pas Cet interrupteur devrait tre dans la position OFF pendant le branchement ou...

Страница 10: ...nne obstru par la surpulv risation PROTECTEUR DE SURCHARGE THERMIQUE Ce compresseur est dot d un protecteur de surcharge thermique r armement manuel qui coupera le moteur s il surchauffe Si le protect...

Страница 11: ...idanger le r servoir 1 V rifier le type de fusible utiliser un fusible retardement D brancher les autres appareils lectriques du circuit ou faire fonctionner le compresseur sur un circuit unique 2 Rem...

Страница 12: ...ricant de moteur qui est fournie avec le produit H Articles suppl mentaires qui ne sont pas couverts sous cette garantie 1 Tous les Compresseurs a Toutes pi ces d tach es endommag es pendant l exp dit...

Страница 13: ...edidas de Seguridad Este manual contiene informaci n que es muy importante que sepa y comprenda Esta informaci n se la suministramos como medida de SEGURIDAD y para EVITAR PROBLEMAS CON EL EQUIPO Debe...

Страница 14: ...el equipo 2 Siga todos los c digos de seguridad laboral y electricidad establecidos en su pa s por ejemplo los de la NEC y OSHA en EUA 3 Este compresor s lo debe ser usado por personas que est n bien...

Страница 15: ...erna del aislante es verde con o sin rayas amarillas es el cable de conexi n a tierra Nunca conecte los cables verdes o verde con rayas amarillas a un terminal con tensi n 3 Cons ltele a un electricis...

Страница 16: ...Esta perilla controla el aire comprimido que se le suministra a las herramientas neum ticas o pistolas pulverizadoras 2 Gire la perilla en el mismo sentido de las agujas del reloj para aumentar la pr...

Страница 17: ...be colocarse lo m s lejos posible del rea de trabajo seg n lo permita la longitud de la manguera para evitar que el filtro se atasque PROTECTOR TERMICO Este compresor est equipado con un protector de...

Страница 18: ...e 1 Cerci rese de que est usando el fusible adecuado use un fusible de acci n retardada Desconecte los otros artefactos el ctricos del circuito o conecte el compresor a otro circuito 2 Reempl cela o r...

Страница 19: ...clu dos de la cobertura de esta garant a limitada stos deben ser enviados por el comprador al fabricante original o a los centros de servicio autorizados por el fabricante para que se les den servicio...

Страница 20: ...EX1001 EX2001 EX8017 20 Oilless Compressors Compresseur Sans Huile Compresores Sin Aceite Notes Notas...

Отзывы: