


FIG. 27
CAUTION:
Never use another person as an additional support for a work piece that is longer or wider than the
basic saw table, or to help feed, support, or pull the work piece.
WARNING:
To avoid serious personal injury, always keep hands outside of the “No-Hands Zone”, as marked on
the saw table. Never perform any cutting operation “freehand” (i.e., without holding the work piece against the fence),
because the blade could grab the work piece, causing it to slip and twist.
WARNING:
To avoid serious personal injury, always tighten the bevel lock levers to secure the cutting head in
position before making a cut.
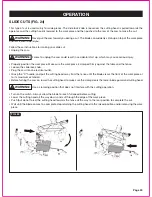
• Plug the saw into an electrical outlet.
•
Place the work piece flat on the miter table with one edge securely against the fence. If the board is warped, place the
convex side against the fence. The board could collapse on the table at the end of the cut and jam the blade (see “cutting
warped material” section)
•
Turn on the laser and align the pencil line with the laser line.
•
Use the work piece clamp to secure the work piece against the saw table and fence.
•
When cutting a long work piece, use table extension to support the work piece.
•
Before turning on the saw, perform a trial of the cutting operation by lowering the cutting head to make sure that no
problems will occur when the cut is made.
•
Raise the cutting head, hold the saw handle and turn the saw on: squeeze the ON/OFF switch trigger.
•
Allow several seconds for the blade to reach maximum speed.
•
Slowly lower the blade into and through the work piece. Complete the cut.
•
Release the ON/OFF switch trigger; Allow the saw blade to stop rotating before raising the blade out of the work piece.
CAUTION:
Always perform a “dry run” cut to determine whether the operation being attempted is possible before
power is applied to the miter saw.
CAUTION:
It may be necessary to slide the sliding
fence out to the required location or remove it to insure
proper clearance prior to making the cut.
Page 33
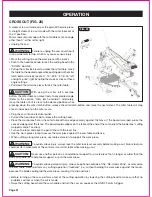
COMPOUND MITER CUT (FIG. 27, 28)
A compound miter cut is a cut made using a miter angle
and a bevel angle at the same time. This type of cut is used
for decorative moldings, picture frames, and other fine
joinery. To make this type of cut, the miter table must be
rotated to the correct miter angle and the cutting head must
be tilted to the correct bevel angle.
Always take special care when making compound miter
cuts, due to the interaction of the two angle settings.
Adjustments of miter and bevel settings are interdependent.
Whenever the miter setting is adjusted, the effect of the
bevel setting also changes. Whenever the bevel setting is
adjusted, the effect of the miter setting is changed. It may
take several settings to obtain the desired cut. The
first angle setting should be checked after setting the second
angle, because adjusting the second angle affects the first.
Once the two correct settings for a particular cut have been
obtained, always make a test cut in scrap material before
OPERATION
Содержание 240-0028
Страница 44: ......


