


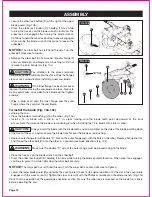


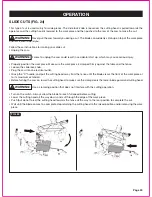

FIG. 6
CAUTION:
The dust port adapter is equipped with
two exhaust port (Port 1: ø 2 1/2 in. and port 2: ø 1 1/4 in.).
Use the port 1 (C) or 2 (D) according to your vacumm hose
size.
INSTALL THE DUST PORT ADAPTER (FIG. 6)
The miter saw can also be used to attach a vacuum hose
with the dust port adapter.
• Install the end of the dust port adapter (A) onto the exhaust
port (B) on the miter saw.
• Attach the vacuum hose to exhaust port on the dust port
adapter.
Page 16
ASSEMBLY
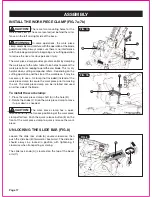
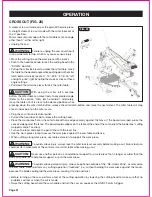
INSTALL RIGHT SLIDING FENCE (Fig. 4)
• Loosen the sliding miter fence lock knob (A) by turning
it about 112° counter-clockwise.
• Slide the right sliding fence (B) into the slot (C) on the miter
fence.
• Tighten the sliding miter fence lock knob (A) by turning it
clockwise.
FIG. 4
A
NOTICE:
To avoid damage, never carry the miter saw by
the blade guard, power cord, miter lock lever or cutting head.
ALWAYS use the designated carrying handles.
WARNING:
Do not use this saw to cut and/or sand
metals. The hot chips or sparks may ignite sawdust from
the bag material.
CAUTION:
To empty the dust bag squeeze the
metal collar wings and remove from exhaust port. Open
zipper on underside of bag and empty into waste container.
INSTALL THE DUST BAG (Fig. 5)
• Squeeze the metal collar wing on the dust bag (A).
• Place the dust bag neck opening around the exhause port
(B) and release the metal collar.
FIG. 5
B
B
B
A
A
C
D
C
1
3
2
Содержание 240-0028
Страница 44: ......


