


a. Position a for full cutting
b. Position b for non-through cutting
CAUTION:
Make sure that the square contacts the
flat part of the saw blade, not the blade teeth.
CAUTION:
If the saw has not been used recently,
recheck blade squareness to the fence and readjust if
needed.
•
After the fence has been aligned, make a cut at 90° (0°)
using a scrap piece of wood and check squareness of the
piece. Readjust if necessary.
FIG. 14a
FIG. 14b
FIG. 15
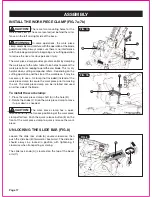
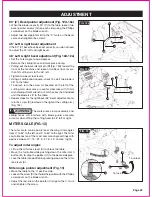
SQUARING THE SAW BLADE TO THE MITER FENCE (FIG. 14a-14b)
•
Rotate the miter table until the pointer on the miter scale
is positioned at 0°.
• Lower the cutting head and lock in place.
•
Loosen the four miter fence lock bolts (A) using the hex
key on the blade wrench.
•
Lay a framing square (B) flat on the miter table. Place one
leg of the square against the miter fence (C). Slide the
other leg of the square against the flat part of saw blade.
DEPTH STOP ADJUSTMENT (FIG. 15)
When used, the depth stop (A) limits the downward travel
of the blade when doing non-through cuts.
• Unlock the head lock knob.
• Raise the cutting head assembly.
•
Push the depth stop (A) to the left to use the depth stop
bolt (B) setting.
• Pull down on the saw head to check the current setting.
•
To change the setting, turn the depth stop bolt (B)
clockwise to decrease depth and counter-clockwise to
increase depth.
•
If needed, push the depth stop to the right to temporarily
disable it.
•
Adjust the miter fence 90° to the blade and tighten four
miter fence locking bolts (A).
b
a
b
a
a
b
b
a
ADJUSTMENT
Page 23
A
C
A
A
B
B
B
A
A
A
Содержание 240-0028
Страница 44: ......


