96
MAINTENANCE
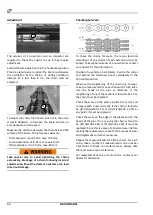
Adjustment
The services of an operator and an inspector are
required to check the chains to see if they require
adjustment.
Extend the telescopic boom in the horizontal position.
Provide a rapid pulse to retract the boom and observe
the oscillation of the chains. If, during oscillation,
distance
H
is less than 4 cm, the chain must be
adjusted.
To adjust the chain, first loosen lock nut
1
, then turn
screw
2
clockwise to increase the chain tension, or
anti-clockwise to decrease it.
Measure the distance between the chain axis and the
surface of the boom. The reference values are:
-
first extension: min. 85 mm, max. 100 mm;
-
second extension: min. 65 mm, max. 80 mm.
-
third extension: min. 70 mm, max. 80 mm.
Take special care to avoid tightening the chains
excessively. Breakage of a chain following incorrect
adjustment without the dealer’s assistance can lead
to serious damage.
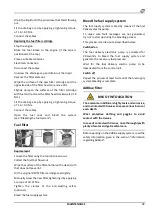
Checking for wear
To check the chains for wear, the main structural
dimensions of the chains of each extension must be
known. Take measurements of a new chain or contact
your dealer for this information.
Position the vehicle on stabilisers. Centre the turret
and extend the telescopic boom completely in the
horizontal position.
Measure the lengthening of the chain due to wear.
Take the measurements on sections with 15-18 links.
Use the heads of the pins as reference. If the
lengthening of any of the sections is found to be
≥ 2%,
the chain must be replaced.
Check the wear on the plates profile (H1 or H2) and
compare with a new chain (H). If the chain is found to
be [(H-
H1)/H]x100 ≥ 2% or [(H
-
H2)/H]x100 ≥ 3.5% at
any point, it must be replaced.
Check the wear on the edge of the plates and on the
heads of the pins. If in any point the chain is found to
be (R1/R)x100
≥ 25% or /S1/S)x100 ≥ 20%, it must be
replaced. Since this is a case of abnormal wear, before
making the replacement, check for the causes of wear
and implement corrective measures.
Repeat the measurements for all the chains. For each
chain, take a number of measurements on a number
of sections to check non uniform wear. Always take
the most worn area as reference.
For replacement of one or more chains, contact your
dealer for assistance.
H
1
2
Содержание RTH 4.18
Страница 6: ......
Страница 27: ...SECTION ON PRODUCT INFORMATION 27 DIMENSIONS RTH 4 18 RTH 5 18 ...
Страница 28: ...28 SECTION ON PRODUCT INFORMATION RTH 5 21 RTH 5 23 ...
Страница 29: ...SECTION ON PRODUCT INFORMATION 29 RTH 5 25 RTH 6 21 ...
Страница 30: ...30 SECTION ON PRODUCT INFORMATION RTH 6 23 RTH 6 25 ...
Страница 78: ......


