


Chapter 2. Basic Application
2-2
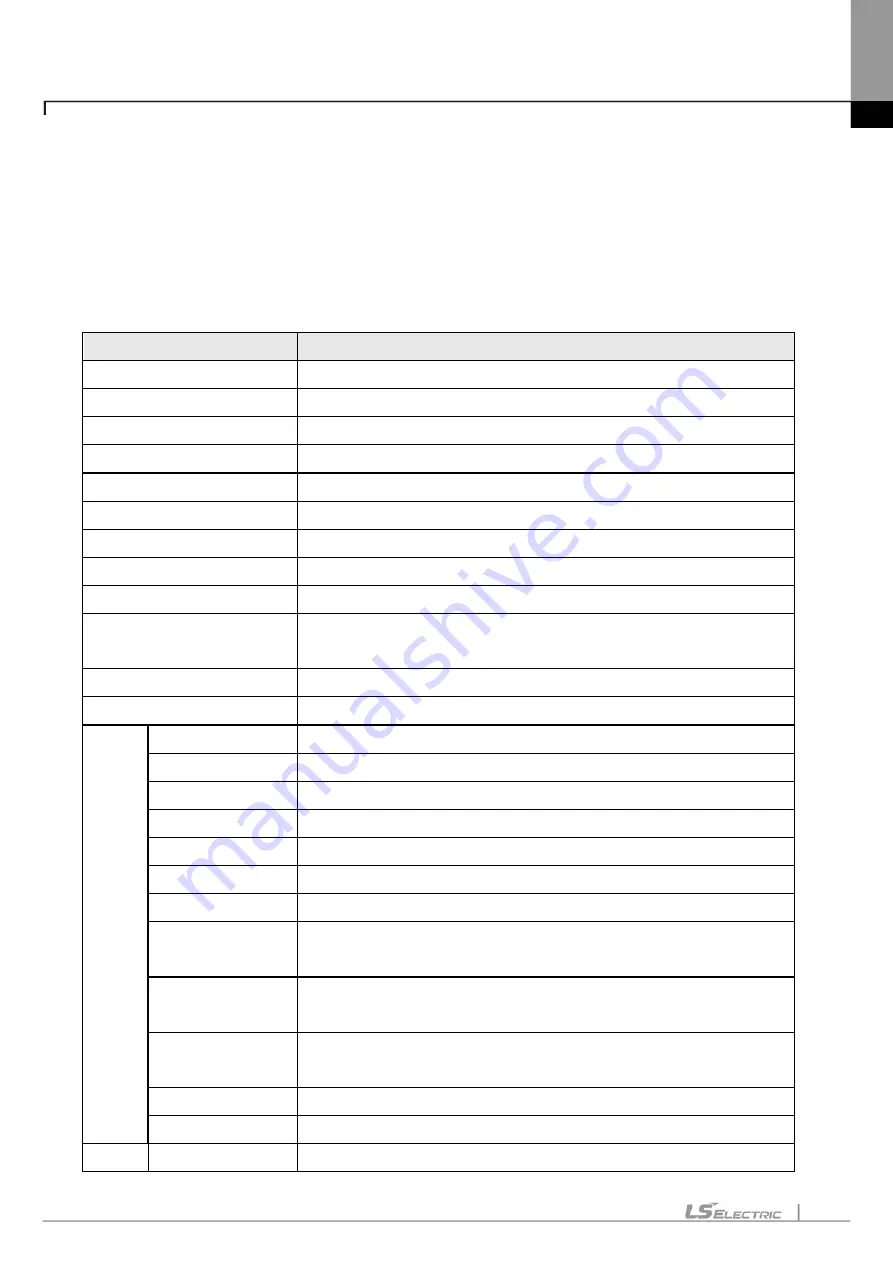
2.1.1 Menu Configuration
If the menu is selected, application instructions will be appeared and an instruction will be executed when
an instruction is selected by clicking mouse button or pressing shortcut key. If the shortcut key for the
menu (Ctrl + X, Ctrl + C) is available, press the shortcut key directly to select the instruction.
1) Project
Instruction
Description
New Project
Creates a new project.
Open Project
Opens the existing project.
Open from PLC
Uploads the project and program stored in PLC.
Open KGLWIN File
Opens the project file for KGLWIN.
Open GMWIN File
Opens the project file for GMWIN.
Save Project
Saves the project.
Save As
Saves the project as a different name.
Close Project
Closes the project.
Save as Binary
Saved as the binary file that cannot show the details of the project.
Write Binary to PLC
Writes the binary file with the PLC. You cannot see the details of the
project.
Open from Memory
Opens the project from the memory module.
Write to Memory
Writes the project in the memory module.
Add
Item
PLC
Adds a new PLC to the project.
Task
Adds a new task program to the project.
Program
Adds a new scan program to the project.
Function
Adds new user functions to the PLC.
Function block
Adds new user function blocks to the PLC.
Data type
Adds new user data types to the PLC.
Network
Adds new networks to the project.
Communication
module
Adds new communication modules to the network.
P2P
Communication
Adds new P2P items to the communication module.
High-speed link
communication
Adds new high-speed link items to the communication module.
User frame
Adds new user frames to the P2P items.
Add groups
Adds new groups to the P2P items.
Import
PLC
Reads the PLC program from the file.
Содержание XGT Series
Страница 7: ...Safety Instruction 6 ...
Страница 11: ...About User s Manual 2 ...
Страница 34: ...Chapter 1 Introduction 1 9 11 Wait a second for the installation to be complete ...
Страница 47: ...Chapter 1 Introduction 1 22 ...
Страница 69: ...Chapter 2 Basic Application 2 22 ...
Страница 74: ...Chapter 2 Basic Application 2 27 ...
Страница 82: ...Chapter 2 Basic Application 2 35 When changing from Run mode to Stop mode the following message shows ...
Страница 91: ...Chapter 2 Basic Application 2 44 ...
Страница 117: ...Chapter 3 Project 3 26 Steps 1 On the project window select the PLC Item 2 Select Project Add Item Task on the menu ...
Страница 118: ...Chapter 3 Project 3 27 Dialog Box a b c d f e h g ...
Страница 143: ...Chapter 3 Project 3 52 5 Click Compare 6 Compare result will be displayed on the Result window ...
Страница 151: ...Chapter 3 Project 3 60 2 Select View Properties on the menu 3 In the program dialog select the Password tab ...
Страница 153: ...Chapter 3 Project 3 62 4 Enter the old password in the Previous Password 5 Click the Delete button ...
Страница 154: ...Chapter 3 Project 3 63 ...
Страница 156: ...Chapter 3 Project 3 65 3 Specify the communication module in the I O parameters ...
Страница 159: ...Chapter 3 Project 3 68 7 Double click the communication module in the project window and enter the basic setup items ...
Страница 170: ...Chapter 3 Project 3 79 3 Press OK button in the dialog box to set up the high speed link communication module ...
Страница 171: ...Chapter 3 Project 3 80 ...
Страница 174: ...Chapter 4 Variable Comment 4 3 4 1 3 View flag Dialog Box Description of Dialog Box a b c d ...
Страница 192: ...Chapter 4 Variable Comment 4 21 ...
Страница 194: ...Chapter 4 Variable Comment 4 23 3 Click the CANOpen module items to execute the XG CANopen tool ...
Страница 197: ...Chapter 4 Variable Comment 4 26 ...
Страница 203: ...Chapter 4 Variable Comment 4 32 5 Save the EtherNet IP variable as CSV file ...
Страница 205: ...Chapter 4 Variable Comment 4 34 2 Select Project Save Variable Names to File Dialog box a b d e c ...
Страница 209: ...Chapter 4 Variable Comment 4 38 3 Click File Open and select file created by step 1 Then click on Open ...
Страница 218: ...Chapter 4 Variable Comment 4 47 Dialog box ...
Страница 219: ...Chapter 4 Variable Comment 4 48 ...
Страница 221: ...Chapter 4 Variable Comment 4 50 ...
Страница 263: ...Chapter 5 LD Edit 5 42 4 Previous Bookmark Sequence 1 Select Edit Bookmark Previous Bookmark on the menu ...
Страница 269: ...Chapter 5 LD Edit 5 48 ...
Страница 297: ...Chapter 6 IL Edit 6 28 3 Click Go To ...
Страница 331: ...Chapter 8 Find Replace 8 4 Note Advanced Button is pressed ...
Страница 344: ...Chapter 8 Find Replace 8 17 ...
Страница 347: ...Chapter 8 Find Replace 8 20 3 Set what to search content to replace type selection direction and so on ...
Страница 351: ...Chapter 8 Find Replace 8 24 2 Click the Find All button Find all the M0 bit devices in the Find 2 Results window ...
Страница 354: ...Chapter 8 Find Replace 8 27 ...
Страница 363: ...Chapter 8 Find Replace 8 36 ...
Страница 365: ...Chapter 8 Find Replace 8 38 ...
Страница 381: ...Chapter 9 Parameters 9 16 2 Click the right mouse button to select Delete 3 Click the right mouse button to select Undo ...
Страница 452: ...Chapter 10 Online 10 57 1 Skip I O Setting for each slot Sequence 1 Select the base with the slot to specify Skip I O ...
Страница 455: ...Chapter 10 Online 10 60 4 If you press OK the changed items are displayed ...
Страница 457: ...Chapter 10 Online 10 62 3 If you press OK the changed items are displayed 4 Base Skip I O cancel Sequence ...
Страница 482: ...Chapter 10 Online 10 87 ...
Страница 487: ...Chapter 10 Online 10 92 ...
Страница 603: ...Chapter 11 Communication and Special Function Blocks 11 116 ...
Страница 625: ...Chapter 13 Online Editing 13 4 ...
Страница 635: ...Chapter 14 Print 14 10 ...
Страница 690: ...Chapter 16 SFC Edit 16 25 3 Move cursor to the area to paste to 4 Select menu Edit Paste ...
Страница 695: ...Chapter 16 SFC Edit 16 30 1 View Comments Comments not displayed Comments displayed 2 View Print Area 3 View Page No ...
Страница 715: ...Chapter 17 ST Edit 17 8 Dialog ...
Страница 731: ...Chapter 17 ST Edit 17 24 ...
Страница 763: ...Chapter 18 Exclusive Functions for Event Input Module 18 32 ...
Страница 766: ...Chapter 19 User Function Function Block 19 3 h g a b c d e f Dialog box ...
Страница 773: ...Chapter 19 User Function Function Block 19 10 ...
Страница 783: ...Chapter 19 User Function Function Block 19 20 ...
Страница 801: ...Chapter 20 LS Studio 20 18 7 After setting the save area select the OK button ...
Страница 803: ...Warranty and Environment Policy 2 ...