


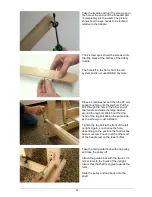


37
By changing the length of the Texsolv cord, you will adjust the friction of the brake. Adjust the friction
to the point where you can easily turn the crank on the warp beam, but where the beam does not
turn back by itself when you let go of the crank.
After unlocking the brake again, replace the hook onto the eye of the pedal, otherwise it can damage
the wood while the back part of the loom moves up and down.
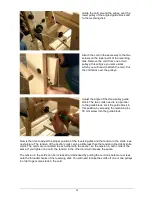
Blocking the back part during the beaming-up of the warp
In order to prevent the back part of the loom from being pulled up during the beaming-up of the
warp, you need to block the back part in its lowest position.
If your Octado has a mechanical dobby, you can achieve this by taking off the spring that connects
the blocking block to the frame of the loom.
If your loom does not have a mechanical dobby, you can block the treadle and the back part by
putting some books under the treadle.
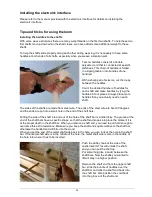
The tie-up bars and the tying-up of the warp to the cloth beam
The tie-up bar of the cloth beam is a bit shorter than the bar of the warp beam, because when you
beam up the cloth, it has to pass between the spring arms. Make sure that the tie-up bar does not
get caught behind the spring arm.
The tie-up bars are marked where the beam cords must be tied. Make loops in the cords and put the
tie-up bar through them. Position the loops on the pre-marked spots. Pull on the tie-up bar to check
if the cords are equally tight. If required, correct this by loosening the loops and then tightening them
up again by pulling on the tie-up bar.
The warp has to be tied to the cloth beam after it has been slayed. To do this, first remove the cloth
protector on the breast beam by unscrewing the plastic knurled bolts at both sides.
After the tie-up bar has passed the breast beam, when you have started weaving, you can put the
cloth protector back in place.
When you tie-up the warp, you will need to block the breast beam, otherwise it will be impossible to
get an equal tension in all the warp threads. Take the spring cords off the spring arms and while
tying on the warp, the breast beam becomes blocked by the cords that are connected from the
spring arms to the front posts of the loom.
The moving breast beam
You use the moving breast beam to set the warp tension. As long as you do not change the settings,
you will weave the whole warp with the same tension. The warp tension can be adjusted by
shortening or lengthening the spring cords, or by using the lower or top screw head on the spring
arms, to which you can attach the cords. Fastened to the top screw heads, the springs exert less
tension onto the breast beam. You will reach the highest warp tension when you pull out the springs
and attach them with a small piece of the cord to the lower screw heads.
Adjusting the height of the beater
The hinges in the bottom of the uprights of the beater are threaded. You can turn these hinges in or
out (on both sides of the loom), which allows you to adjust the height of the beater very precisely.
The height of the beater has to be adjusted, so that the warp threads rest in the bottom of the reed
on the shuttle race. This allows the shuttle race to properly support the shuttle. The reed and lower
reed support should not push the warp threads up. This would result in the heddles eyes resting on
the warp, so that the shafts, which have to be kept down during a shed, would not be locked in the
lower position.
You can check the horizontal position of the beater by lowering your eye to a point, where you can
compare it with horizontal parts of the loom like the shaft bars.
Beaming up the cloth during weaving
Lightly push the brake pedal of the warp beam. The breast beam will, due to its spring supports, pull
a bit of warp from the warp beam and move it to the front.
Now crank the cloth beam up and when the spring arms of the breast beam are back in the same
position as before you released the brake, you will have the same amount of tension in the warp.
The first beatings after advancing the cloth always influences the warp tension a little and you may
have to correct this by cranking up the cloth beam by one tooth of the ratchet wheel. If you crank up
the warp too tight (the spring arms are pulling the springs too far), you can release it by pushing in
the brake pedal just a bit.
Содержание Octado
Страница 2: ......


