18
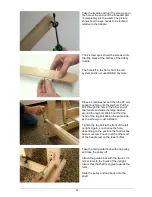
You can adjust the friction of the cable and make the warp beam run just light enough by
adjusting the length of the cord longer or shorter. It also makes a difference if the cord runs over
the nuts or just besides the eye.
You should hang the hook on the screw
eye when not in use; otherwise it can
damage the wood when the back beam
section goes up and down.
6. Assembly of the breast beam
Open hardware bag # 5 with the following
contents:
-
1 carriage bolts m8 x 55 mm with large
washer, 22 mm spacer bushing, small
washer and cap nut
-
6 screws 4 x 17 mm
-
4 screw eyes
-
2 springs, 12” (30 cm) long with a 15
½” (39 cm) long cord
-
2 cords, 8 ½” (21 cm) long
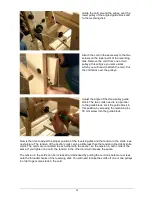
Take the wooden posts marked K and L
out of box B. These wooden posts will
support the moving breast beam.
Support the wooden posts, and tap the
carriage bolts into the holes. The markings
(K and L), need to be on the side where
the bolts stick through the holes.
Slide the large washer and spacer
bushing, over the carriage bolt and attach
the wooden posts to the front uprights of
the loom. Make sure to connect K-K and L-
L. This determines left and right.
Use the small washers and cap nuts to
finish the assembly.
Содержание Octado
Страница 2: ......


