background image

2


CHECK THE OIL TANK’S FILL LEVEL…DAILY 


The tank has a sight level gauge that is used to confirm 
the correct amount of hydraulic fluid is in the system. 


Checking procedure: 

1-


Retract the ejector blade fully forward towards cab. 

2-


Tailgate fully lowered closed and latched. 

3-


The slider cylinders must be fully retracted (slider fully up) 

and sweep cylinders fully retracted (sweep rotated up). 

4-


PTO disengaged (diesel can be on or off). 

5-


Now  read  the  tank’s  fill  level  gauge.  The  amber  colored 
hydraulic oil’s level should be visible 

6-


Fill to the upper black line (with all cylinders retracted).


DO NOT 

OVERFILL

 THE TANK. Oil will spray out of the 

tank’s filler/breather if overfilled. 
 
Be certain to position the ejector, tailgate, and compact 
blades  are  as  described  above 

before

  sighting  the 

gauge. This will position the “cylinders” to assure you do 

not overfill. 


Use  a  name  brand  hydraulic  fluid  in  an  AW46  grade 

whenever you add fluid. 


3


CHECK  THAT  THE  SUCTION  LINE  VALVE  (GATE 

VALVE) IS FULLY OPEN…DAILY 

 
The leverarm of the full-port ball valve must be “parallel” 

to its body to be fully open 
 

4


CHECK 

THE 

“PLUMBING” 

FOR 

EXTERNAL 

LEAKS…DAILY 

 
Hydraulic fluid is flammable and messy. When fluid is on 
the  shop  floor  or  on  the  LEGACY3  it  can  cause  injuries 

from slipping and falling. Inspect the LEGACY3’s various 
fittings,  hoses,  tubes  for  any  evidence  of  oil  escaping. 

Often by retorquing the hose end or fitting you can stop 
the leakage. Sometimes a hose or fitting will need to be 
replaced. 


5


CHECK  THE  PUMP  AND  VALVES  FOR  EXTERNAL 
LEAKAGE…DAILY 

 
The  LEGACY3  uses  “0-ring  boss”  ports  on  all  the  valve 

ports and the pump. Leakage here is usually going to be 
correctable  by  retightening  the  attached  fittings.  In 
some rare cases the o-ring may be nicked or extruded, 

replace the o-ring or install fresh fitting. The valves have 
a  group  of  o-rings  seals  between  their  cast  sections.  If 

oil seems to be weeping out between sections, try to re-
torque  (evenly)  the  valve  tie-rod  bolts  first  (loosen 

valve’s mounting foot  bolts first). The pump  has  a seal 
on  its  input  shaft  that  could  eventually  weep  oil.  This 
must be replaced if this is happening. 

 
The most difficult job in fixing a leak is identifying where 

the oil is 

really


escaping. Gravity, road travel blow-age, 

etc  can  fool  you  into  misidentifying.  If  in  doubt,  wash 
area and keep looking until confident. 

 
6


CHECK  THE  ROD  CYLINDERS  FOR  EXTERNAL 

LEAKAGE…DAILY 


Rod cylinders have a bearing and seal system where the 
rod  itself  leaves  the  barrel.  Repair  if  leakage  occurs 
here. 

 
7


INSPECT THE STEEL TUBE RUNS FOR DAMAGE AND 

LOOSE CLAMPING…DAILY 

 
If  a  tube  is  impacted,  it  may  become  damaged.  Check 

for this. Replace damaged  tube so they do not  rupture 
later. 

 
8


CHECK  FOR  A  FULLY  CHARGED,  ACCESSIBLE  FIRE 
EXTINQUISHER…DAILY 

 
Hydraulic fluid is flammable and could ignite if it sprays 

upon the diesel’s hot exhaust surfaces. 
 

9


INSPECT  THE  HOSES  FOR  ABRASIONS,  RUB 
SPOTS,ETC…DAILY 


Identifying  possible  hose  weaknesses  and  repairing 
them promptly will reduce the possibility of a hose burst 
later on. 
 
10


REPLACE 

THE 

IN-TANK 

SUCTION 

STRAINER…YEARLY 


Near the floor of the oil-tank (submersed) is the suction 
filter/strainer. Whenever the tank has been drained of oil 

(for  whatever  reason),  remove  this  filter  and  replace  it 
(or  clean  it  if  in  otherwise  good  condition).  Make  sure 
the  3-PSI  bypass  valve  is  “free”  and  will  fully  seat 

closed. 


[Sec02-pg12] 

Содержание LEGACY 3 Series

Страница 1: ...CY 3 SERIES PREVENTIVE MAINTENANCE MANUAL LOADMASTER 100 W ELEVENTH AVENUE PO BOX 186 NORWAY MICHIGAN 49870 PHONE 906 563 9226 TOLL FREE 800 433 2768 FAX 906 563 9800 EMAIL loadmaster loadmaster org R...

Страница 2: ...u sec01 pg06 Section 02 PREVENTIVE MAINTENANCE Sec02 pg01 thru sec02 pg14 Section03 SCHEMATICS AND DIAGRAMS Sec03 pg01 thru Sec03 pg02 AND 4 PAGE FOLDOUT OF ELECTRICAL SCHEMATIC Apr2006 This is the Op...

Страница 3: ...ter Models Be aware different model Loadmasters are considerably different For example do NOT adjust the pressures of a Loadmaster EXCEL rearloader using this manual s LEGACY3 listed specifications an...

Страница 4: ...gned a mentor trainer who will read and explain to such individual the entire contents of this manual as well as the safety precautions and the danger warning caution and notice decals and placards af...

Страница 5: ...IN THE REPAIR SECTION OF THIS MANUAL FOR A DETAILED EXPLANATION OF BLOCKING AND PROPPING OF TAILGATE BEFORE BEGINNING SEAL REPLACEMENT NEVER WORK BENEATH A RAISED TAILGATE THAT HAS A HYDRAULIC CYLINDE...

Страница 6: ...INCLUDED THE OUTLINE OF A SKELETON BARE BONES LOCKOUT TAGOUT PROCEDURE IN THIS MANUAL IT IS THE RESPONSIBILITY OF THE OWNERS SUPERVISORS MAINTAINERS AND OPERATORS OF THE LEGACY3 TO FULLY DEVELOP A DET...

Страница 7: ...AINING THE LEGACY3 OR CHASSIS OPERATORS SHOULD WEAR VESTING THAT HAS A BRIGHT COLORATION ORANGE AND REFLECTIVE CHARACTERISTICS FOR DAY NIGHT VISIBILITY FOLLOW ALL OF YOUR EMPLOYER S REQUIREMENTS FOR P...

Страница 8: ...EES FAIRENHEIGHT OR LESS BEFORE DOING ANY HYDRAULIC MAINTENANCE OR REPAIR ACTIVITIES WHEN REPLACING A HYDRAULIC PLUMBING COMPONENT SUCH AS A HOSE TUBE OR A FITTING BE CERTAIN YOU USE ONLY AN EQUIVALEN...

Страница 9: ...OR STOPS ONTO THE PACKER CALL LOADMASTER IF YOU HAVE ANY DOUBTS ABOUT THE CORRECT AND SAFEST METHODS OF DOING THIS HYDRAULIC HOSES AND TUBING MUST BE INSPECTED ON A DAILY BASIS FOR LEAKS CUTS ABRASION...

Страница 10: ...ice maintenance procedures The service maintenance people must also have a thorough understanding of correct Legacy3 OPERATION methods and follow all of the operational safety precautions and those th...

Страница 11: ...LEGACY3 TO FULLY DEVELOP A DETAILED LOCKOUT TAGOUT PROCEDURE AND POLICY THAT SUITS YOUR SHOP S SPECIFIC CIRCUMSTANCES NEVER OPERATE MAINTAIN OR REPAIR THE VEHICLE OR THE LEGACY WHILE UNDER THE INFLUEN...

Страница 12: ...THE TRUCK CHASSIS TO BE CLEAN AND FREE OF DEBRIS PRESSURE WASH ONCE A MONTH Check wash at least MONTHLY 13 CHECK THAT THE IN CAB PTO ENGAGED PILOT LITE BECOMES ILLUMINTATED WHEN PTO IS ENGAGED Check D...

Страница 13: ...Sec02 pg04 1 2 3 5 6 6 7 9 17 16 18 20 21 8 11 15 19...

Страница 14: ...parts 9 CHECK THE INFORMATIONAL DECALS THE SAFETY DECALS AND OTHER LABELS TO BE READABLE CLEAN AND IN GOOD CONDITION EVERY DAY Make a photocopy of the decals shown in this manual Walk around the LEGA...

Страница 15: ...r patterns like notching and undercutting Check pin cap retainer bolts are still in place and snug 19 CHECK THE WEAR PATTERN OF SLIDER BLADE SHOEING MONTHLY rev Apr 2006 to polymer The uppermost surfa...

Страница 16: ...TION MULTIPLE GREASE ZERKS Grease MONTHLY 14 ROLL BAR OPTION MULTIPLE GREASE ZERKS Grease MONTHLY OTHER LUBRICANTS OVERHAUL THE HYDRAULIC FLUID ONCE EVERY TWO YEARS OR SOONER IF CONDITIONS REQUIRE USE...

Страница 17: ...Sec02 pg08 1 5 8 7 9 6 13...

Страница 18: ...ANK S FILLER BREATHER Yearly 12 REPLACE THE HYDRAULIC FULID Every two years 13 PRESSURE WASH THE ENTIRE UNIT Monthly 14 GREASE THE CONTROL RODS PLASTIC BEARINGS Weekly 15 IF PTO EQUIPPED CHECK THAT TH...

Страница 19: ...sec02 pg10 1 2 3 4 9 10 12 14...

Страница 20: ...ow be replaced If it is not replaced it will continue to load up with contaminants and the pressure drop will rise to 25 PSI The bypass valve built into the head casting will open and the filter is sa...

Страница 21: ...he valve ports and the pump Leakage here is usually going to be correctable by retightening the attached fittings In some rare cases the o ring may be nicked or extruded replace the o ring or install...

Страница 22: ...n filter and suction filter Replace your hydraulic fluid if you had a contamination experience such as a seized valve spool or if it has a milky water contaminated appearance 13 PRESSURE WASH THE UNIT...

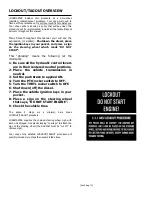
Страница 23: ...minimum 1 Be sure all the hydraulic control levers are in their centered neutral positions 2 Place the vehicle transmission in neutral 3 Set the park brake to applied ON 4 Turn the PTO rocker switch t...

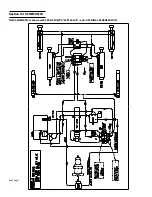
Страница 24: ...Section 03 SCHEMATICS THIS SCHEMATIC is shown with FRONT PUMP S WET VALVE and OPTIONAL REGENERATION Sec03 pg01...

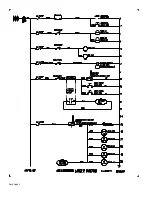
Страница 25: ...Sec03 pg02...

Отзывы: