LINDY ELECTRONICS LTD
Installation & Use – English Guide
Page 21
digits on the CPU 16 OSD model (adding a leading 0 if necessary). ). If you are using cascaded
LINDY CPU Switches, the cascade routing will need to be entered (see section 3.10 for more
details). To specify port 5 on a LINDY CPU Switch that is cascaded off port 3 you would enter port
number 35 (CPU 4 OSD & CPU 8 OSD models) or 0305 (CPU 16 OSD model). Units can be
cascaded three levels deep. Now press <ENTER> again to complete the entry and store it in the
menu memory.
Note that you can add another Computer to the menu list at any time. If you just use the
<INSERT> key, the entry will be placed after the current line. To place an entry before the current
line use <SHIFT> and <INSERT> together, then edit the new name as already described.
Deleting a computer from the menu list
With the menu visible on the screen, highlight the computer to be deleted and press the
<DELETE> key. To confirm deletion press <ENTER>. To abandon deletion press <ESC>.
Editing a computer on the menu list
With the menu visible on the screen, highlight the computer to be edited and press the <SHIFT>
and <DELETE> keys together. Type in the new Computer name and port then press <ENTER>.
To abandon editing press <ESC>.
Selecting a computer on the menu list
With the menu visible on the screen, highlight the computer to be selected using the cursor
p
/
o
or <PAGEUP> / <PAGEDOWN> keys as required. Press the <ENTER> key to switch to the
highlighted computer. LINDY CPU Switch has an advanced ‘connection confirmation’ facility which
is particularly useful in systems where many computers are displaying the same or very similar
video. The selected computer name and port number will briefly flash up on the screen to confirm
the selection has been made. If it is not possible to make the connection, perhaps because a
cascaded unit is not switched on or is in use locally, the menu will flash ‘computer unavailable’ until
the <ESC> key is pressed.
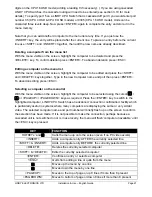
KEY
FUNCTION
HOTKEYs’ and
0
Calls the menu up onto the screen (even if no PC video exists)
<INSERT>
Adds a computer entry AFTER the currently selected line
<SHIFT> & <INSERT>
Adds a computer entry BEFORE the currently selected line
<DELETE>
Deletes the currently selected computer
<SHIFT> & <DELETE>
Edits the currently selected computer
<ENTER>
Confirms an entry or selects a computer
<ESC>
Quits from editing a line or quits from the menu
p
Moves up the menu by one line
o
Moves down the menu by one line
<PAGEUP>
Moves to the top of page or up 8 lines if more than 8 present
<PAGEDOWN>
Moves to bottom of page or down 8 lines if more than 8 present


