background image

System Set-Up      

ENGLISH

Hydro Kit

Installation Manual 

43

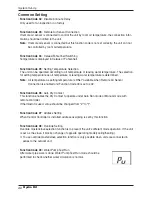
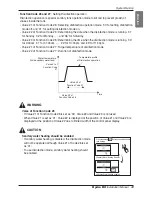
• Function Code 26 and 27

: Setting Disinfection operation

Disinfection operation is special sanitary tank operation mode to kill and to prevent growth of
viruses inside the tank. 

- Value #1 of Function Code 26 : Selecting disinfection operation mode. ʻ00ʼ for setting disinfection

mode off, and ʻ01ʼ for setting disinfection mode on.

- Value #2 of Function Code 26 : Determining the date when the disinfection mode is running. ʼ01ʼ

for Sunday, ʼ02ʼ for Monday, … , and ʼ06ʼ for Saturday.

- Value #3 of Function Code 26 : Determining the time when the disinfection mode is running. ʼ00ʼ

for 0:00am, ʼ01ʼ for 01:00am, … , ʼ22ʼ for 10:00pm, and ʼ23ʼ for 11:00pm.

- Value #1 of Function Code 27 : Target temperature of disinfection mode.
- Value #2 of Function Code 27 : Duration of disinfection mode.

WARNING 

Vales of Function Code 26

• If Value #1 of Function Code 26 is set as ʼ00ʼ, Value #2 and Value #3 is not used. 
• When Value #1 is set as ʼ01ʼ, Value #2 is displayed at the position of Value #1 and Value #3 is

displayed at the position of Value #2 due to limited width of the control panel display.

CAUTION 

Sanitary water heating should be enabled

• If sanitary water heating is disabled, the disinfection mode

will not be operated although Value #1 of Code 26 is set
as ʼ01ʼ.

• To use disinfection mode, sanitary water heating should

be enabled.

Time

Value #2 of

Function Code 26

Value #1 of

Function Code

27

Value #2 of

Function Code 27

Water temperature

(Inside sanitary water tank)

Temperature profile

of Disinfection operation

Press repeatedly         Button to enable sanitary 
tank heating

<Sanitary Water Heating Disable>

<Sanitary Water Heating enable>

Содержание ARNH08GK3A2

Страница 1: ...uct Installation work must be performed in accordance with the national wiring standards by authorized personnel only Please retain this installation manual for future reference after reading it thoroughly TYPE For High Temperature Hydro Kit P NO MFL67212810 ENGLISH ITALIANO ESPAÑOL FRANÇAIS DEUTSCH PORTUGUESE NEDERLANDS ...

Страница 2: ... TANK KIT 14 INSTALLATION SCENES 16 REFRIGERANT PIPING 18 HOW TO CONNECT WIRINGS 20 WIRING CONNECTION 20 CONNECTING CABLES 21 5 ACCESSORIES INSTALLATION 22 LOCATION OF ACCESSORIES AND EXTERNAL PARTS CONNECTION 22 MAIN PUMP CONNECTION 25 WATER TANK TEMPERATURE SENSOR CONNECTION 25 THERMOSTAT 26 REMOTE TEMPERATURE SENSOR 29 3WAY VALVE 30 DRY CONTACT 32 6 SYSTEM SET UP 33 DIP SWITCH SETTING 33 GROUP ...

Страница 3: ...to observe the cautions specified here as they include important items related to safety n Incorrect operation due to ignoring instruction will cause harm or damage The seriousness is classified by the following indications n Meanings of symbols used in this manual are as shown below This symbol indicates the possibility of death or serious injury This symbol indicates the possibility of injury or...

Страница 4: ...isk of electric shock or fire Stop operation and close the window in storm or hurricane If possible re move the unit from the window before the hurricane arrives There is risk of property dam age failure of unit or electric shock Do not open the front cover of the unit while operation Do not touch the electrostatic filter if the unit is so equipped There is risk of physical injury electric shock o...

Страница 5: ...re frigerant leakage after in stallation or repair of unit Low refrigerant levels may cause failure of unit Keep level even when in stalling the unit To avoid vibration or water leak age Use two or more people to lift and transport the unit Avoid personal injury Safety Precautions n Operation Do not use the unit for special purposes such as preserving foods works of art etc There is risk of damage...

Страница 6: ...ALLATION MANUAL AIR CONDITIONER Please read this installation manual completely before installing the product Installation work must be performed in accordance with the national wiring standards by authorized personnel only Please retain this installation manual for future reference after reading it thoroughly TYPE For High Temperature Hydro Kit P NO MFL67212802 OWNER S MANUAL AIR CONDITIONER Plea...

Страница 7: ...ion ENGLISH Hydro Kit Installation Manual 7 Model name and related information 1 Tested under Eurovent Heating condition Water temperature 55 131 65 149 at outdoor ambient temperature 7 44 6 42 Type Hydro Kit For High Temperature Model Unit Power Supply Ø V Hz Capacity Heating kW kcal h Btu h Net Weight kg lbs Refrigerant Type Quantity kg lbs Noise Level dB ARNH08GK3A2 ARNH04GK3A2 1 220 240 50 25 ...

Страница 8: ...when installing Sub line 40º or less Line supporter CAUTION Be very careful while carrying the unit Do not have only one person carry the unit if it is more than 20 kg 44 1 lbs PP bands are used to pack some products Do not use them as a mean for transportation because they are dangerous Tear plastic packaging bag and scrap it so that children cannot play with it Otherwise plastic pack aging bag m...

Страница 9: ...nit shall be connected to the outdoor unit The place where the unit is not affected by an electrical noise The place where there should not be any heat source or steam near the unit Installation Space The following values are the least space for installation If any service area is needed for service according to field circumstance obtain enough service space The unit of values is mm Unit mm 400 52...

Страница 10: ...cur from the floor or wall since vibration is transferred through the in stallation part depending on installation status Thus use anti vibration materials cushion pad fully The base pad shall be more than 200 mm 7 7 8 inch 75 Flat washer Anchor bolt Spring washer Nut Anti vibration material Concrete base Support 3 or more screw threads of the 2 bolts must be shown Unit mm 354 392 ...

Страница 11: ...e with pipe cap to avoid dust entering When cutting or welding the pipe always be careful that inner section of the pipe should not be defective For example no weldments or no burrs are found inside the pipe Pipe fittings e g L shape elbow T shape tee diameter reducer etc should be tightened strongly to be free from water leakage Connected sections should be leakage proof treatment by applying tef...

Страница 12: ...t diameter of 0 4mm or less Exclude other net Always install the strainer on the horizontal pipe When dirt trash rusted pieces get into the water pipe system it can cause problems to the product by corroding the metallic material 6 Install the air vent 5 at the top of the water pipe 7 Install a thermometer 6 and pressure gauge 7 at the inlet and outlet of the water pipe 8 Install the drain valve 8...

Страница 13: ...r supply valve 6 and sup ply the water 7 When installing the water tank insert the water tank temperature sensor 7 to measure the tem perature of the water inside the tank For the water tank temperature sensor use the sensor supplied on the product When heating the floor measure the temperature by using the remote controller or remote tem perature sensor Separately sold 8 Use the water tank 9 with...

Страница 14: ...should be water supply and water drain for easy access and maintenance Sanitary Water Tank and Sanitary Water Tank Kit Sanitary Water Tank Water Tank Temperature Sensor Water In Water Out Installation 14 Hydro Kit Strainer Use the 50 mesh strainer Exclude scale diameter of 0 4mm or less and other net Check the strainer direction and assemble on the inlet hole Refer to picture Wrap the Teflon tape ...

Страница 15: ...f hot water supply flooding out and to stabilize the water temperature inside the sanitary water tank The recirculation pump should be operated when sanitary water demand is not required Therefore external time scheduler to determine when the recirculation pump should turn on and turn off is required The operating duration time of the recirculation pump is calculated as follow Duration time minute...

Страница 16: ...ing to the installation conditions 1 Floor Heating only Without mixing tank 3 Floor Heating Hot water 4 Hot water only Floor heating loop Fan coil unit Radiator 2 Floor Heating only With mixing tank Floor heating loop Fan coil unit Radiator Floor heating loop Fan coil unit Sanitary water tank Hot water City water Radiator Sanitary water tank Hot water City water Pump 3way valve Bypass valve ...

Страница 17: ...ticides 0 10 μg l Pesticides Total 0 50 μg l Polycyclic aromatic hydrocarbons 0 10 μg l Selenium 10 μg l Tetrachloroethene and Trichloroethene 10 μg l Trihalomethanes Total 100 μg l Vinyl chloride 0 50 μg l CAUTION If the unit is installed at existing hydraulic water loop it is important to clean hydraulic pipes to remove sludge and scale Installing sludge strainer in the water loop is very import...

Страница 18: ...t can generate a thick oxidized coating within the pipe to interfere with normal operation of valve and compressor etc Insulation Use rubber foamed insulation material EPDM NBR with high thermal resistance When installed in humid environment use thicker insulation material than usual Insert the insulation material within the prod uct as deep as possible h The thickness of the above insulation mate...

Страница 19: ...Indoor Unit Indoor Unit Hydro kit Hydro kit Hydro kit Indoor Unit Indoor Unit Indoor Unit Indoor Unit 1 2 3 4 1 2 3 4 1 2 3 4 1 2 3 4 1 2 3 4 Gas pipe Ø15 88 Liquid pipe Ø9 52 Welding type Hydro kit Gas pipe Ø22 2 Liquid pipe Ø9 52 When two Hydro Kit are installed One connection of refrigerant pipe for HR unit is insufficient for the flow of refrigerant Join two pipes with a branch pipe when conne...

Страница 20: ...vibration generated during the trans portation Make sure to check again and fasten them tightly If they are loose it may cause fire 4 Make sure to check power specification 5 Electrical capacity shall be sufficient 6 The initial voltage shall be maintained at 90 of the rated voltage on the name plate 7 The thickness of the power cable complies with the designated specification length and thickness...

Страница 21: ...ine Power cables and communication lines shall not be tied together Classification types Cable cross section Power cable CV mm2 x cores 4 0 x 3 Communication cable VCTF SB mm2 x cores 1 0 1 5 x 2 WARNING Are all of the indoor units and outdoor units grounded If grounding is not properly done there is a risk of electric shock Grounding must be done by a qualified technician Consider the surrounding...

Страница 22: ...rring to the attached installation manual 3way valve thermostat and pump are external parts for installation which are not supplied by LG After checking each part carefully install external parts respectively Connect the cable of each accessory to the terminal block of the control box in the Hydro Kit Check the label attached on the terminal block to prevent wrong connection Use the pump of 220 24...

Страница 23: ...ntroller cable into upper and right side please set up after removing remote controller cable guide groove h Remove guide groove with long nose Reclamation to the surface of the wall Upper part guide groove Right part guide groove 3 Please fix remote controller upper part into the setup board attached to the surface of the wall as the picture below and then con nect with setup board by pressing lo...

Страница 24: ...temperature sensor Do not install the cable to be 50m or above It can cause communication error When installing the extension cable check the connecting direction of the connector of the remote controller side and the product side for correct installation If you install the extension cable in the opposite direction the connector will not be connected Specification of extension cable 2547 1007 22 2...

Страница 25: ...acity to guarantee the loss of entire water pressure and to supply the Hydro Kit with water Select a suitable relay for pump capacity when connecting the pump to the unit Connect the relay to the terminal block 11 and 12 of the control box Connect sensor housing to PCBʻCN TH4ʼ connector red 1 2 L N Pump main Relay Pump Water tank thermistor Housing CN TH4 CAUTION Make sure to supply external power...

Страница 26: ...influence may be applied such as above heating radiator or open window CAUTION 1 USE 1 230 V Thermostat 2 Some electro mechanical type thermostat has internal delay time to protect compressor In that case mode change can takes time more than user s expectation Please read thermostat manual carefully if the unit does not response quickly 3 Setting temperature range by thermostat can be different wi...

Страница 27: ...over front cover of the unit and open the control box Step 2 Identify the power specification of the thermostat 1 230V thermostat is used in the Hydro Kit For High Temperature Step 3 If it is Heating Only Thermostat go to step 4 Step 4 Find terminal block and connect wire as below WARNING Mechanical type Thermostat Do not connect wire N as mechanical type thermostat does not re quire electric powe...

Страница 28: ...water heating button The unit is not turned on off according to the setting temperature at the remote controller It is turned on off according to the thermostat signal Following features are NOT permitted when thermostat is installed Operating mode heating weather dependent selection Time scheduling Operation On Off NOTICE 58 78 0 16 57 58 78 0 16 57 58 78 0 16 0 16 57 58 78 78 0 16 57 57 58 78 0 ...

Страница 29: ...ttached controller on the indoor unit In detail refer to installer setting mode Step 4 The Connection wire does not matter if you change the color of the wire because of non polar Fixing screws 60mm Fixing the Remote Sensor 2 1 CAUTION 1 Choose the place where the average temperature can be measured for the indoor unit oper ates 2 Avoid direct sunlight 3 Choose the place where the heating devices ...

Страница 30: ...consist of Live for selecting Flow A Live 1 for selecting Flow B and Neutral for common 2 Flow A means ʻwater flow from the unit to sanitary water tankʼ 3 Flow B means ʻwater flow from the unit to under floor water circuitʼ How to Wire 3Way Valve Follow below procedures Step 1 Step 2 Step 1 Uncover front cover of the unit and open the control box Step 2 Find terminal block and connect wire as belo...

Страница 31: ...red these temperatures should be almost equivalent if thermal insulation of water pipe is well performed Noise or water pipe vibration while 3way valve operation Due to surging effect or cavitation effect noise or water pipe vibration can be occurred while 3way valve is operating In that case check followings Is water circuit both under floor water loop and sanitary water tank loop fully charged I...

Страница 32: ...Install Dry Contact Connect CN_DRY with Control Unit To apply power source through Dry Contact PCB Dry Contact Dry contact Controller CN CC DRY CONTACT PCB DRY CONTACT PCB INPUT 220 240V LG does not supply this section LG does not supply this section 4 4 3 3 2 2 1 1 2 2 1 1 RY1 RY2 CN_DRY N L Operation Display Error Check Display Dry contact Controller CN_DRY 4 3 2 4 3 2 1 1 2 2 1 1 L N 220 240V R...

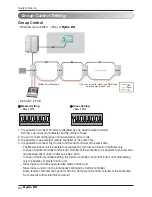
Страница 33: ...is turned on when pulled right Always set dip switch 6 to ON and 7 to OFF Do not set dip switch 2 to ON and 3 to OFF If dip switch is not set as below the unit may not operate properly x OFF On Description Dip switch setting Function Default 1 2 3 4 5 6 7 8 Group Control x Master Slave Installation Scene x x Floor heating only x Floor heating Hot water Hot water only Emergency operation x High tem...

Страница 34: ...roller only In case of Central controller and Group controller at the same time it is possible to connect stan dard 2series indoor units or later since Sep 2012 In case of Central controller setting the Central controller can control indoor units after setting only the address of master indoor unit Slave indoor unit will be operated like master indoor unit Slave indoor unit can not be individually...

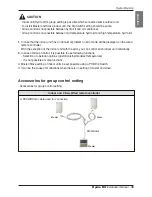
Страница 35: ... setting of indoor units be set possible using a PCB Dip Switch h It can be the cause of malfuctions when there is no setting of master and slave Accessories for group control setting Accessories for group control setting Slave Master Master PZCWRCG3 Indoor unit 2 EA Wired remote controller PZCWRCG3 cable used for connection CAUTION Indoor unit Hydro Kit ʼs group setting is possible which connecte...

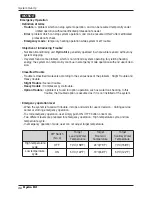
Страница 36: ...e is classified two levels according to the seriousness of the problem Slight Trouble and Heavy trouble Slight Trouble Sensor trouble Heavy trouble Compressor cycle trouble Option Trouble a problem is found for option operation such as water tank heating In this trouble the troubled option is assumed as if it is not installed at the system Emergency operation level When the system is faced with tr...

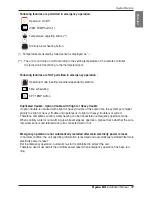
Страница 37: ...the same time the system puts higher priority to slight or heavy trouble and operates as if slight or heavy trouble is occurred Therefore sometimes sanitary water heating can be impossible in emergency operation mode When sanitary water is not warming up while emergency operation please check whether the sani tary water sensor and related wiring are connected well or not Emergency operation is not...

Страница 38: ... installer and any installation or change that is carried out by a non certificated person should be responsible for the results In this case free service cannot be provided 58 58 78 78 0 16 0 16 57 57 1 Function Code Value Press Function Setting button for 3 seconds to enter the installer setting mode When you enter the installer setting mode ini tially function code is displayed on the bottom of...

Страница 39: ...8 30 86 Upper Limit of setting range 16 60 19 66 Lower Limit of setting range Setting leaving water Temp Weather dependent operation 25 080 046 65 149 80 176 Upper Limit of setting range 40 104 54 129 Lower Limit of setting range Setting start maintain time Disinfection Operation 26 000 00 Disable 01 Enable 26 006 023 01 07 Starting Date 01 Sun 02 Mon 07 Sat 00 23 hours Starting Time in 24 hours S...

Страница 40: ...determined Note Air temperature as setting temperature is ONLY available when Remote Air Sensor Connection is enabled and Function Code 03 is set as 02 Function Code 06 Auto Dry Contact This function enables the Dry Contact to operate under Auto Run mode or Manual mode with remote controller If thermostat is used value should be changed from 2 to 1 Function Code 07 Address Setting When Central Con...

Страница 41: ...lso Function Code 03 should be set properly Function Code 14 Setting Leaving Water Temperature in Heating Mode Determine heating setting temperature range when leaving water temperature is selected as set ting temperature Function Code 15 Setting Sanitary Tank Leaving Water Temperature Determine heating setting temperature range of water tank leaving water Only available when sanitary water tank t...

Страница 42: ...23 range of outdoor air temperature Value 1 and Value 2 of Function Code 24 range of auto adjustable target room air temperature Value 1 and Value 2 of Function Code 25 range of auto adjustable target leaving water tem perature Note Weather dependent operation is applied for heating mode only Value 2 of Function Code 23 Auto Adjustable Target Temperature Outdoor air temperature Temperature profile...

Страница 43: ...mperature of disinfection mode Value 2 of Function Code 27 Duration of disinfection mode WARNING Vales of Function Code 26 If Value 1 of Function Code 26 is set as ʼ00ʼ Value 2 and Value 3 is not used When Value 1 is set as ʼ01ʼ Value 2 is displayed at the position of Value 1 and Value 3 is displayed at the position of Value 2 due to limited width of the control panel display CAUTION Sanitary wate...

Страница 44: ...tarted when the water tank temperature is below 75 C 167 F Value 1 of Function Code 29 temperature gap from target sanitary water temperature Value 2 of Function Code 29 Determining heating demand priority between sanitary water tank heating and under floor heating Example If userʼs target temperature is set as ʼ50ʼ and Value 1 is set as ʻ3ʼ then water tank heating will be turned off when the wate...

Страница 45: ...ature gap Function Code 34 and 35 Setting control parameter for Water flow temperature Descriptions for each parameters are as following Function Code 34 Select entering leaving water Temp in Heating Mode Function Code 35 Select entering leaving water Temp in Cooling Mode Th On Th Off 0 0 5 C 1 5 C 1 4 C 6 C 2 2 C 4 C 3 1 C 1 C 2E Room Air temperature Th On Th Off 0 2 C 2 C 1 6 C 4 C 2 2 C 4 C 3 1...

Страница 46: ...stance between the terminal block and ground is measured with DC mega tester DC 500V Never check insulation resistance for the connector of the control board Caution before Operation Test Operation Test of Water Pipe Category Status Checkpoint Flow Switch Error CH14 Check whether operation of water pipe is normal Check for the block inside water pipe Strainer cleaning valve locked valve malfunctio...

Страница 47: ...controller indoor unit The remote controller does not receive the signal from indoor unit during specific time 05 Indoor unit outdoor unit communica tion error No signal communication between indoor unit outdoor unit 06 Liquid side temperature sensor error Liquid side temperature sensor disconnection or short circuit 08 Water tank temperature sensor error Water tank temperature sensor disconnectio...

Страница 48: ...re of inverter compressor causing compressor OFF 35 Excessive drop of low pressure of inverter compressor Excessive drop of low pressure of inverter compressor causing compressor OFF 36 Low pressure ratio error of inverter com pressor High pressure low pressure ratio of inverter compressor is maintained at below 1 8 for 3 min or more 40 Inverter compressor CT sensor defect Inverter compressor CT s...

Страница 49: ......
Отзывы: