Securing the printer
Note:
The hard disk is supported only in some printer models.
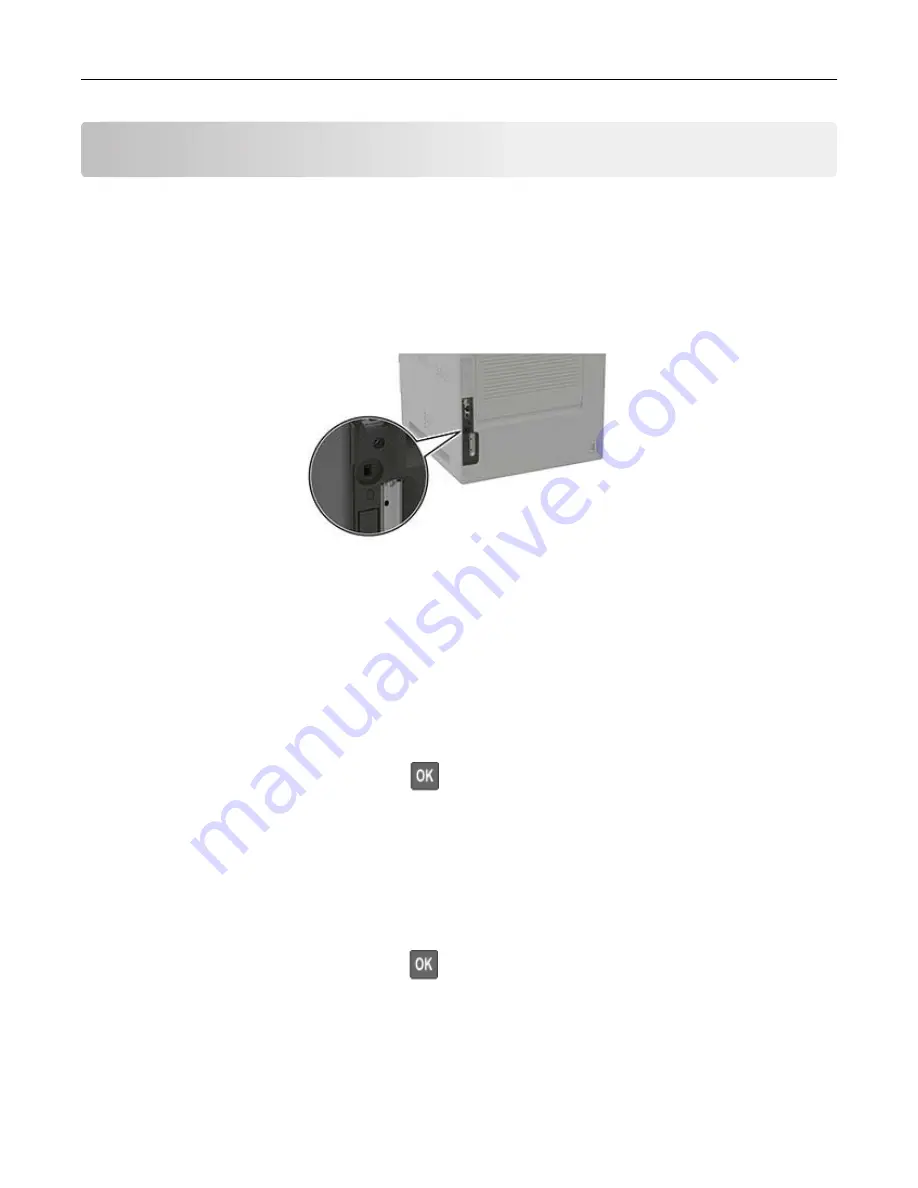
Locating the security slot
The printer is equipped with a security lock feature. Attach a security lock compatible with most laptop
computers in the location shown to secure the printer in place.
Erasing printer memory
To erase volatile memory or buffered data, turn off the printer.
To erase non
‑
volatile memory or individual settings, device and network settings, security settings, and
embedded solutions, do the following:
1
From the control panel, navigate to:
Settings
>
Device
>
Maintenance
>
Out of Service Erase
>
Sanitize all information on nonvolatile memory
For non
‑
touch
‑
screen printer models, press
to navigate through the settings.
2
Select either
Start initial setup
or
Leave printer offline
.
Erasing printer hard disk memory
1
From the control panel, navigate to:
Settings
>
Device
>
Maintenance
>
Out of Service Erase
>
Sanitize all information on hard disk
For non-touch-screen printer models, press
to navigate through the settings.
2
Depending on your printer model, select
ERASE
or
Continue
.
3
Follow the instructions on the display.
Note:
This process can take from several minutes to more than an hour, making the printer unavailable
for other tasks.
Securing the printer
91
Содержание MX-B557P
Страница 1: ...LASER PRINTER MX B557P MX B707P User s Guide October 2021 Machine type 4064 Models 29H 69H ...
Страница 5: ...Upgrading and migrating 176 Hardware 176 Software 200 Firmware 202 Notices 204 Index 213 Contents 5 ...
Страница 90: ...For non touch screen printer models press to navigate through the settings Understanding the printer menus 90 ...
Страница 103: ...5 Insert the pick roller 6 Close the multipurpose feeder 7 Turn on the printer Maintaining the printer 103 ...
Страница 109: ...2 Unlock the fuser 3 Remove the used fuser 4 Unpack the new fuser Maintaining the printer 109 ...
Страница 110: ...5 Insert the new fuser until it clicks into place 6 Lock the fuser 7 Close the door Maintaining the printer 110 ...
Страница 114: ...3 Remove the used hot roll fuser wiper Maintaining the printer 114 ...
Страница 120: ...2 Remove the used pick roller 3 Unpack the new pick roller Maintaining the printer 120 ...
Страница 121: ...4 Install the new pick roller 5 Close the multipurpose feeder Maintaining the printer 121 ...
Страница 142: ...2 Remove the staple cartridge holder 3 Remove the loose staples Clearing jams 142 ...
Страница 146: ...5 Insert the staple cartridge holder until it clicks into place 6 Close the door Clearing jams 146 ...
Страница 193: ...b Insert the tabs of the guide bar into the output expander Upgrading and migrating 193 ...


