Upgrading and migrating
Hardware
Available internal options
•
Memory cards
–
DDR3 DIMM
–
Flash memory
•
Optional cards
–
Font cards
–
Firmware cards
•
Forms and Bar Code
•
PRESCRIBE
•
IPDS
•
Printer hard disk
•
Internal solutions port
–
Parallel 1284
‑
B Interface Card
–
RS
‑
232C Serial Interface Card
–
Fiber Interface Card
–
N8370 802.11a/b/g/n/ac Wireless Print Server Interface Card
Accessing the controller board
CAUTION—SHOCK HAZARD:
To avoid the risk of electrical shock, if you are accessing the controller
board or installing optional hardware or memory devices sometime after setting up the printer, then turn
the printer off, and unplug the power cord from the electrical outlet before continuing. If you have any
other devices attached to the printer, then turn them off as well, and unplug any cables going into the
printer.
1
Turn off the printer.
2
Unplug the power cord from the electrical outlet, and then from the printer.
3
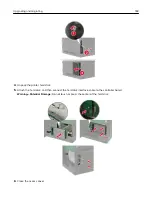
Using a flat-head screwdriver, open the controller board access cover.
Warning—Potential Damage:
Controller board electronic components are easily damaged by static
electricity. Touch a metal surface on the printer before touching any controller board components or
connectors.
Upgrading and migrating
176
Содержание MX-B557P
Страница 1: ...LASER PRINTER MX B557P MX B707P User s Guide October 2021 Machine type 4064 Models 29H 69H ...
Страница 5: ...Upgrading and migrating 176 Hardware 176 Software 200 Firmware 202 Notices 204 Index 213 Contents 5 ...
Страница 90: ...For non touch screen printer models press to navigate through the settings Understanding the printer menus 90 ...
Страница 103: ...5 Insert the pick roller 6 Close the multipurpose feeder 7 Turn on the printer Maintaining the printer 103 ...
Страница 109: ...2 Unlock the fuser 3 Remove the used fuser 4 Unpack the new fuser Maintaining the printer 109 ...
Страница 110: ...5 Insert the new fuser until it clicks into place 6 Lock the fuser 7 Close the door Maintaining the printer 110 ...
Страница 114: ...3 Remove the used hot roll fuser wiper Maintaining the printer 114 ...
Страница 120: ...2 Remove the used pick roller 3 Unpack the new pick roller Maintaining the printer 120 ...
Страница 121: ...4 Install the new pick roller 5 Close the multipurpose feeder Maintaining the printer 121 ...
Страница 142: ...2 Remove the staple cartridge holder 3 Remove the loose staples Clearing jams 142 ...
Страница 146: ...5 Insert the staple cartridge holder until it clicks into place 6 Close the door Clearing jams 146 ...
Страница 193: ...b Insert the tabs of the guide bar into the output expander Upgrading and migrating 193 ...


