


Menu item
Description
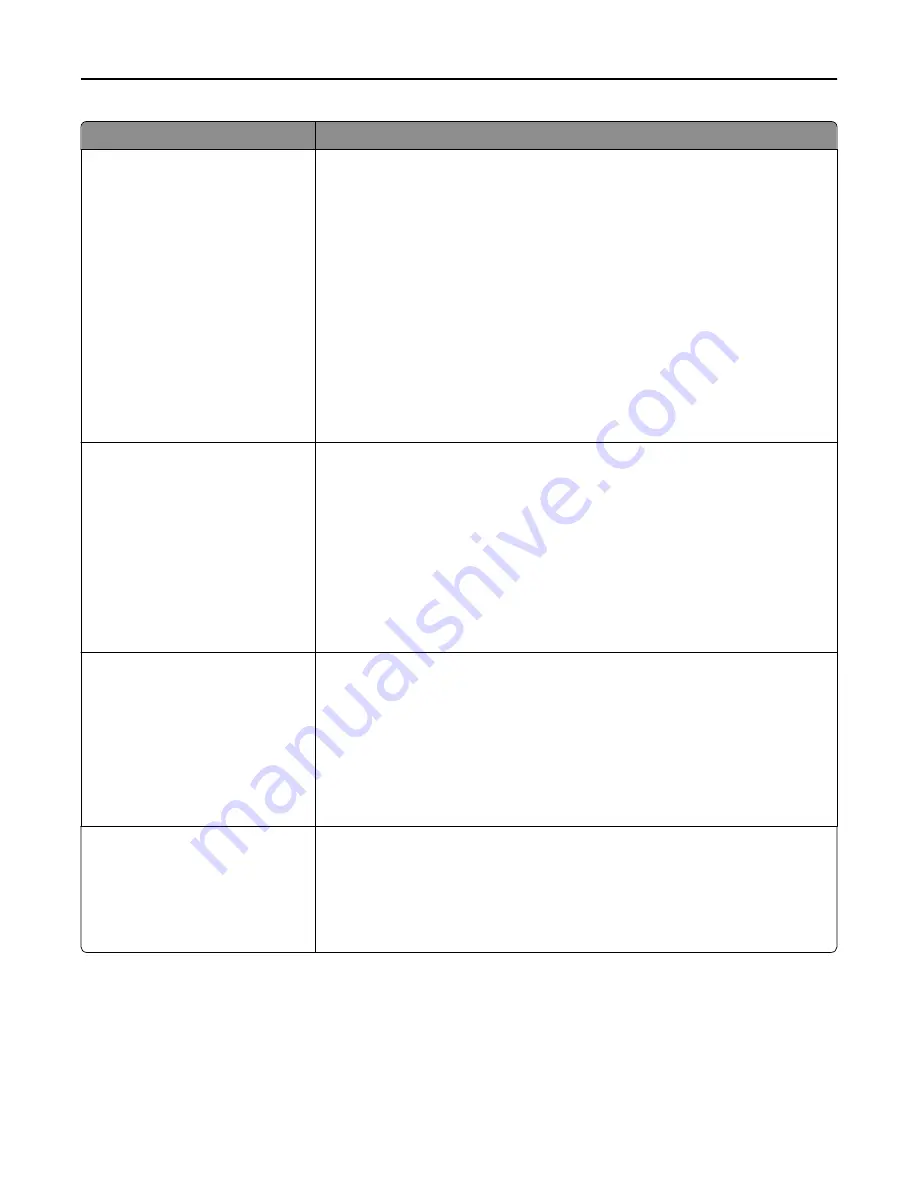
Serial Buffer
Auto
3KB to [maximum size allowed]
Disabled
Sets the size of the serial input buffer
Notes:
•
Auto is the factory default setting.
•
Disabled turns off job buffering. Any jobs already buffered on the disk are
printed before normal processing is resumed.
•
The serial buffer size setting can be changed in 1
‑
KB increments.
•
The maximum size allowed depends on the amount of memory in the scanner,
the size of the other link buffers, and whether Resource Save is set to On or
Off.
•
To increase the maximum size range for the Serial Buffer, disable or reduce
the size of the parallel, serial, and network buffers.
•
Changing this setting from the scanner control panel and then exiting the
menus causes the scanner to restart. The menu selection is then updated.
Job Buffering
Off
On
Auto
Temporarily stores print jobs on the scanner hard disk before printing
Notes:
•
Off is the factory default setting. The scanner does not buffer print jobs on the
scanner hard disk.
•
On buffers print jobs on the scanner hard disk.
•
Auto buffers print jobs only if the scanner is busy processing data from
another input port.
•
Changing this setting from the scanner control panel and then exiting the
menus causes the scanner to restart. The menu selection is then updated.
Protocol
DTR
DTR/DSR
XON/XOFF
XON/XOFF/DTR
XONXOFF/DTRDSR
Selects the hardware and software handshaking settings for the serial port
Notes:
•
DTR is the factory default setting.
•
DTR/DSR is a hardware handshaking setting.
•
XON/XOFF is a software handshaking setting.
•
XON/XOFF/DTR and XON/XOFF/DTR/DSR are combined hardware and
software handshaking settings.
Robust XON
Off
On
Determines whether the scanner communicates availability to the computer
Notes:
•
Off is the factory default setting.
•
This menu item applies only to the serial port if Serial Protocol is set to
XON/XOFF.
Understanding printer menus
170


