


29
ENGLISH
TAKING PHOTOS (Capture Mode)
Turn the camera on and press the DOWN/MODE button (15) until the Capture icon
is displayed. You are now in camera mode and can take photos.
Taking a photo
Using the LCD screen (8) to frame your subject, hold the camera steady. Press the
SHUTTER button (6) to take a photo. The Busy indicator (9) lights up and the image taken
will appear briefly on the LCD screen.
Note:
• The number of photos left to shoot at this resolution will be displayed on the bottom right
of the LCD screen in Capture mode.
• When the SD card inserted in the camera is full, the camera will beep twice if you try
to take a photo and ‘Memory Full’ will appear on screen. Make sure you transfer your
photos to your computer.
Zoom
The camera has a digital zoom.
1. To zoom in, press ‘T’ on the ZOOM button (11) for a telephoto shot.
2. To zoom out, press ‘W’ for a wide-angled shot.
When the zoom button is pressed, an icon shows the zoom level on the left side of
the LCD screen.
Flash function
1. To use the flash, repeatedly press the RIGHT/FLASH button (14) in Capture mode until
your desired setting is shown by the icon on the screen:
- When the camera is on Photoshooting mode, press the “Menu” button and go to “Capture”.
- Press “Frame” and “Select”. Choose the frame you prefer by pressing “ok”.
- You can now use your fun photo frames to take amazing pictures!
Deleting Images
1. To delete images, enter Playback mode by pressing the PLAYBACK button (12) and
then the DELETE button (18).
2. Use the DOWN/MODE (15) button to scroll through the options :
Single – to delete the shot showing on the LCD screen
All – to delete all shots
Select – to delete a single shot of your choice. Use the LEFT/SELF-TIMER (16) and
RIGHT/FLASH (14) buttons to move the yellow outline over the shot you wish to delete
and press the OK button (17) to set your choice.
3. Press the OK button (17) to confirm.
Note:
images can also be deleted via the ‘Play Menu’ when in Playback mode. See
‘Settings Menu (Playback Mode) >Play’ on page 28 for further details on how to do this.
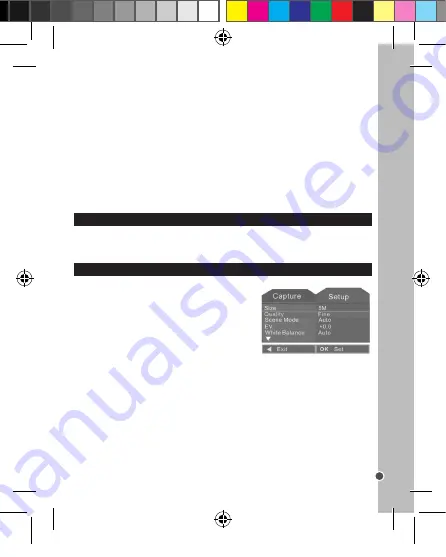
SETTINGS MENU (Capture Mode)
HOW TO USE YOUR PRE-INSTALLED PHOTO FRAMES
Changing the settings
1. Turn on the camera and make sure it is in Capture
mode.
2. Press the MENU button (19) to display the Capture/
Setup categories. The Capture menu is automatically
selected.
3. Use the DOWN/MODE (15) button to select an item.
4. Press the OK button (17) to enter the sub-menu.
5. Use the DOWN/MODE (15) button to select the desired item.
6. Press the OK button (17) to confirm the setting.
7. Press the LEFT/SELF-TIMER button (16) to close the menu and return to Capture mode.
Capture Menu
1.
Size
There are five options: [1.3M] / [3M] / [5M] / [8M] / [12M]
2.
Quality
Adjusts the resolution. Select a lower image quality to decrease the image size in order to
capture more images: [Fine]/ [Standard]/ [Economy].
3. Scene Mode
Adjusts shutter speed and colour according to scene conditions: [Auto]/ [Sport]/ [Night]/
[Portrait]/ [Landscape]/ [Backlight].
DJ052seriesIM1242_15Jun_V09.indb 29
15/06/2012 11:03 AM


