128
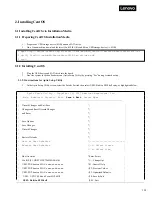
Aptio Setup Utility - Copyright (C) 2017 American Megatrends, Inc.
Main Advanced Security Boot
Save & Exit
Server Mgmt
Save as
Restore
User
User
Defaults
Defaults
*|-------------------------|
*|><: Select Screen
*|^v: Select Item
2. Installing CentOS
2.1 Installing CentOS via Installation Media
2.1.1 Preparing CentOS Installation Media
1.
Prepare one USB storage device (8GB) and one SATA drive.
2.
On a Linux machine, download the latest CentOS ISO file and dd to a USB storage device (>= 8GB)
2.1.2 Installing CentOS
1.
Plug the USB device and SATA disk into the board.
2.
Boot the system to the bootloader menu (Aptio Setup Utility) by pressing “Esc” during system boot-up.
2.1.2.1 Instructions for Aptio Setup Utility
3.
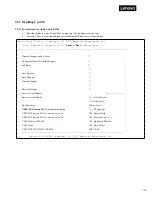
In the Aptio Setup Utility screen, select the Save & Exit tab then select UEFI: Built-in EFI Shell entry, as highlighted below.
|
|
|
Discard Changes and Exit Save
Changes and Reset Discard Changes
and Reset
^|
*|
*|
|
|
|
|
*|
|
|
Save Options
*|
|
|
Save Changes
*|
|
|
Discard Changes
*|
|
|
*|
|
|
Restore Defaults
*|
|
|
Boot Override
*|Enter: Select
|
|
CentOS (P1: HGST HUS726020ALE610)
*|+/-: Change Opt.
|
|
UEFI: PXE boot on MAC: xx:xx:xx:xx:xx:xx
*|F1: General Help
|
|
UEFI: PXE boot on MAC: xx:xx:xx:xx:xx:xx
+|F2: Previous Values
|
|
UEFI: PXE boot on MAC: xx:xx:xx:xx:xx:xx
+|F3: Optimized Defaults
|
|
UEFI: UFD 3.0 Silicon-Power8G PMAP
+|F4: Save & Exit
|
|
UEFI: Built-in EFI Shell
|ESC: Exit
|
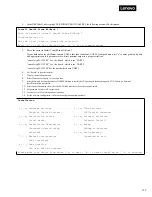
$ wget http://mirror.centos.org/altarch/7/isos/aarch64/CentOS-7-aarch64-Everything-1804.iso
$ dd if= CentOS-7-aarch64-Everything-1804.iso of=/dev/sdX
$ sync
Содержание ThinkSystem HR350A
Страница 37: ...37 ...
Страница 55: ...55 3 4 7 2 PCI Express GEN 2 Settings ...
Страница 59: ...59 ...
Страница 62: ...62 ...
Страница 66: ...66 Entering this menu item will allow users to configure the device parameters ...
Страница 71: ...71 Patrol Scrub Enable disable Patrol Scrub for DDR controller ...
Страница 85: ...85 3 9 3 View FRU Information ...
Страница 89: ...89 ...
Страница 90: ...90 3 9 6 BMC User Settings This section allows users to Add Delete and Set Privilege levels for BMC users ...
Страница 97: ...97 Figure 2 Configuring IE ESC step 2 Figure 3 Configuring IE ESC step 3 ...
Страница 107: ...107 4 9 3 Event Log 4 9 4 Images Redirection This page is used to configure the images into BMC for redirection ...
Страница 115: ...115 4 9 19 Virtual Media 4 9 20 IPMI Configuration 4 10 Remote Control This page is used to launch KVM ...
Страница 118: ...118 3 Select Restore Configuration and upload the downloaded backup files ...
Страница 120: ...120 ...
Страница 123: ...123 Select OK to continue ...

