background image

b. In the

Enter New Password

field, enter a new supervisor password.

c. In the

Confirm New Password

field, reenter the new supervisor password and tap

OK

.

d. In the

Changes have been saved

window, tap

OK

.

• To remove a password, do the following:

a. Tap

Enter

. A window opens. In the

Enter Current Password

field, enter the current supervisor

password.

b. Leave the

Enter New Password

and

Confirm New Password

fields blank. Tap

OK

.

c. In the

Changes have been saved

window, tap

OK

.

Attention:

It is recommended that you record your password and store it in a safe place. If you forget

your supervisor password, Lenovo cannot reset your password. You must take your tablet to a Lenovo
reseller or a Lenovo marketing representative to have the system board replaced. Proof of purchase is
required, and a fee will be charged for parts and service.

7. Save configuration changes and exit.

The next time you open the ThinkPad Tablet Setup program, you will be prompted to enter your password
to proceed.

Using the security chip

Strict security requirements are imposed on network client computers that transfer confidential information
electronically. You can set the security chip in your tablet to enhance computing security. Some models
are equipped with one security chip called the firmware TPM (displayed as “Trusted Platform Module
2.0” in Device Manager). Some models are equipped with two security chips called the discrete TPM
(displayed as “Trusted Platform Module 1.2” in Device Manager) and the firmware TPM. For models with two
security chips, you can select which one you want to use in the ThinkPad Tablet Setup program by using
the instructions in this topic.

Note:

Ensure that the supervisor password has been set in the ThinkPad Tablet Setup program; otherwise

anyone can change the settings for the security chip.

About the Security Chip menu

The

Security Chip

menu provides the following items for you to configure the embedded security chip. You

can find the

Security Chip

menu from the

Security

menu of the ThinkPad Tablet Setup program.

Security Chip Selection

: Select the security chip you want to use. This item is displayed only on some

tablet models.

Security Chip

: Enable or disable the security chip.

Clear Security Chip

: Clear the encryption key. This option is not displayed when the security chip is

inactive or disabled. To clear the security chip, ensure that you activate or enable the security chip first
so that this option can be displayed.

Setting the security chip

To set the security chip through the

Security Chip

menu, do the following:

1. Print these instructions.

2. Save all open files and exit all applications. Then, turn off your tablet.

3. Press the power button and the volume-up button at the same time when you turn on the tablet. The

ThinkPad Tablet Setup program menu opens.

4. Tap

Security

.

5. Tap

Security Chip

.

56

User Guide

Содержание ThinkPad 10

Страница 1: ...User Guide ThinkPad 10 ...

Страница 2: ... page 95 The latest Safety Warranty and Setup Guide and the Regulatory Notice are available on the Lenovo Support Web site at http www lenovo com UserManuals Fifth Edition April 2015 Copyright Lenovo 2014 2015 LIMITED AND RESTRICTED RIGHTS NOTICE If data or software is delivered pursuant a General Services Administration GSA contract use reproduction or disclosure is subject to restrictions set fo...

Страница 3: ... a mobile network 30 Sharing your Internet connection 31 Using Bluetooth devices 31 Using the NFC connection 32 Chapter 4 You and your tablet 37 Comfort and accessibility 37 Using your tablet more comfortably 37 Accessibility information 37 Getting updates 40 Traveling with your tablet 40 Travel tips 40 Travel accessories 41 Care and maintenance 41 Chapter 5 ThinkPad 10 options 43 ThinkPad 10 Ultr...

Страница 4: ...etic Compatibility Directive 84 German Class B compliance statement 84 Korea Class B compliance statement 85 Japanese VCCI Class B statement 85 Japan compliance statement for products which connect to the power mains with rated current less than or equal to 20 A per phase 85 Japan notice for ac power cord 85 Lenovo product service information for Taiwan 85 Eurasian compliance mark 85 Brazil regula...

Страница 5: ...power adapters If you have such a product this information applies to your product Conditions that require immediate action Products can become damaged due to misuse or neglect Some product damage is serious enough that the product should not be used again until it has been inspected and if necessary repaired by an authorized servicer As with any electronic device pay close attention to the produc...

Страница 6: ...y in contact with a hot section of the tablet for any extended time Protect yourself from the heat generated by the ac power adapter When the ac power adapter is connected to an electrical outlet and your tablet it generates heat Extended contact with your body even through clothing may cause a skin burn Do not place the ac power adapter in contact with any part of your body while it is in use Nev...

Страница 7: ... touch the broken glass or attempt to remove it from the tablet Stop using the tablet immediately and contact Lenovo technical support for repair replacement or disposal information Take care when using your tablet in a motor vehicle or on a bicycle Always prioritize your safety and the safety of others Follow the law Local laws and regulations might govern how you can use mobile electronic device...

Страница 8: ...e any power adapter that shows corrosion at the ac input pins or shows signs of overheating such as deformed plastic at the ac input pins or anywhere on the power adapter Do not use any power cords where the electrical contacts on either end show signs of corrosion or overheating or where the power cord appears to have been damaged in any way To prevent possible overheating do not cover the power ...

Страница 9: ... from the electrical outlet Power supply statement DANGER Never remove the cover on a power supply or any part that has the following label attached Hazardous voltage current and energy levels are present inside any component that has this label attached There are no serviceable parts inside these components If you suspect a problem with one of these parts contact a service technician External dev...

Страница 10: ... installing all other electrical cables connected to the tablet The power cord may be reconnected to the wall outlet or receptacle only after all other electrical cables have been connected to the tablet DANGER During electrical storms do not perform any replacement and do not connect the telephone cable to or disconnect it from the telephone outlet on the wall General battery notice DANGER Batter...

Страница 11: ...ion around the charging device Unplug the charging device if any of the following occurs The charging device has been exposed to rain liquid or excessive moisture The charging device shows signs of physical damage You want to clean the charging device Lenovo is not responsible for the performance or safety of products not manufactured or approved by Lenovo Keep your tablet and accessories away fro...

Страница 12: ...sociated with accessories sold with this product will expose you to lead a chemical known to the State of California to cause cancer and birth defects or other reproductive harm Wash hands after handling Dispose according to local laws and regulations When your tablet reaches the end of its useful life do not crush incinerate immerse in water or dispose of your tablet in any manner contrary to loc...

Страница 13: ...ic information you need to start using the tablet Front view and side view 1 Microphones 2 Ambient light sensor 3 Front facing camera 4 Screen rotation lock button 5 Power button 6 Combo audio connector 7 Volume control buttons 8 Emergency reset hole 9 NFC logo on some models 10 Micro SIM card slot 11 Micro SD card slot 12 Micro HDMITM connector 13 Windows Start screen control 14 Keyboard connecto...

Страница 14: ...y reset hole to reset the tablet You also can program the power button so that by pressing the power button you can shut down the tablet or put it into sleep mode To achieve this you must change your power plan settings To access power plan settings do the following 1 From the desktop tap the battery status icon in the Windows notification area 2 Tap More power options 3 In the navigation panel ta...

Страница 15: ...ad 10 Ultrabook Keyboard The ThinkPad 10 Touch Case and the ThinkPad 10 Ultrabook Keyboard are available as options from Lenovo at http www lenovo com accessories services index html For more information see ThinkPad 10 Ultrabook Keyboard on page 43 and ThinkPad 10 Touch Case on page 47 15 Dock connector Use this connector to connect a ThinkPad Tablet Dock The ThinkPad Tablet Dock is available as ...

Страница 16: ... on the backside of the tablet works as a system status indicator Blinks three times The tablet is connected to a power source On The tablet is on and in use Off The tablet is off or in sleep mode 4 Speakers The integrated speakers provide audio output for video and music playback 5 Fingerprint reader on some models Fingerprint authentication technology provides simple and secure user access by as...

Страница 17: ... Pen Use the Tablet Digitizer Pen to input text or draw graphics in a natural manner and perform other operations without tapping the screen with your finger For more information see Using the Tablet Digitizer Pen on page 14 For more information about other options available for your tablet see Chapter 5 ThinkPad 10 options on page 43 Features Processor Intel Atom quad core processor Operating sys...

Страница 18: ...t on some models Wireless features Bluetooth 4 0 Wireless LAN 802 11a g n Wireless WAN on some models NFC on some models Global Positioning System GPS satellite receiver Security features Fingerprint reader on some models Specifications Size Width 256 5 mm 10 1 inches Depth 177 mm 7 0 inches Height For models without a smart card slot 8 95 mm 0 35 inch For models with a smart card slot 16 95 mm 0 ...

Страница 19: ... understand With Lenovo Companion they are Use Lenovo Companion to register your computer access your user manual manage system health and update check the warranty status and see accessories customized for your computer You also can read hints and tips explore Lenovo forums and stay up to date on technology news with articles and blogs from trusted sources This app is filled with exclusive Lenovo...

Страница 20: ...date Lenovo Solution Center and so on System Update Keep the software on your tablet up to date by downloading and installing software packages including Lenovo programs device drivers Unified Extensible Firmware Interface UEFI basic input output system BIOS updates and other third party programs 8 User Guide ...

Страница 21: ...e ac power adapter to the power connector on the tablet 2 2 Plug the power cord into a standard ac power outlet 3 3 Press and release the power button to turn on the tablet 4 Follow the instructions on the screen to complete the initial setup Using the multi touch screen This topic provides instructions on how to use the multi touch screen that is available on some models Notes Your computer scree...

Страница 22: ...h Drag an item to the desired location Mouse action Click hold and drag an item Function Move an object Supported operating systems Windows 7 Windows 8 and Windows 8 1 Touch Move two fingers closer together Mouse action Press the Ctrl key while scrolling the mouse wheel backward Function Zoom out Supported operating systems Windows 7 Windows 8 and Windows 8 1 Touch Move two fingers farther apart M...

Страница 23: ...inter to the top left corner of the screen and then move the pointer downward along the left edge To make a selection click the desired app Function View the recently used apps or select an active app from the list Supported operating system Windows 8 and Windows 8 1 Touch Swipe up to the top edge Mouse action Click the downward arrow located near the bottom left corner of the Start screen Functio...

Страница 24: ...ght damage the touch panel or cause it to malfunction Do not use fingernails gloved fingers or inanimate objects for input on the screen Regularly calibrate the accuracy of the finger input to avoid a discrepancy Tips on cleaning the multi touch screen Turn off the computer before cleaning the multi touch screen Use a dry soft and lint free cloth or a piece of absorbent cotton to remove fingerprin...

Страница 25: ...option from Lenovo go to http www lenovo com accessories services index html Extending the battery life between charges When you are traveling with your tablet and ac power is not available you can extend the battery life by doing the following Turn off Wi Fi mobile network and Bluetooth when not in use To turn off Wi Fi mobile network and Bluetooth do the following 1 Swipe in from the right edge ...

Страница 26: ...from the right edge of the screen to display the charms 2 Tap Settings Power Shut down Checking the battery status Get the approximate status of your battery at any time by checking the desktop battery status icon in the Windows notification area To check for the accurate status and adjust your tablet power settings to achieve the best balance between performance and power saving do the following ...

Страница 27: ...n Screen Keyboard or the touch keyboard and handwriting panel automatically rotates to the corresponding portrait or landscape view To open the On Screen Keyboard do the following 1 Swipe in from the right edge of the screen to display the charms 2 Tap the Search charm to search for On Screen Keyboard 3 Tap On Screen Keyboard To open the touch keyboard and handwriting panel do one of the following...

Страница 28: ...or games and mobile applications To download or buy an application or a game from Windows Store tap Store from the Start screen and then follow the instructions on the screen Using the fingerprint reader Depending on the model your tablet might have a fingerprint reader Fingerprint authentication can replace your Windows password In this way you can log on to your tablet simply and securely To ena...

Страница 29: ...and swipe your finger toward you across the reader in one smooth motion Do not lift your finger when you are swiping it Maintaining the fingerprint reader The following actions could damage the fingerprint reader or cause it not to work properly Chapter 2 Using your tablet 17 ...

Страница 30: ...ough dry or injured Your finger is stained with dirt mud or oil The surface of your finger is different from when you enrolled your fingerprint Your finger is wet A finger is used that has not been enrolled To improve the situation try the following Clean or wipe your hands to remove any excess dirt or moisture from the fingers Enroll and use a different finger for authentication If your hands are...

Страница 31: ...e tablet into sleep mode or wake up the tablet If the cover is open and the tablet is on the tablet by default enters sleep mode automatically after you close the cover If the cover is closed and the tablet is in sleep mode the tablet by default resumes normal operation when you open the cover Chapter 2 Using your tablet 19 ...

Страница 32: ...r the magnetic tab of the cover as shown to launch the camera automatically This function is enabled by default If you want to disable this function do the following 1 From the Start screen tap Lenovo Settings Camera 2 In the Quickshot section slide the control to the left to disable the function Serve as a stand for the tablet The cover can serve as a stand for the tablet as shown In this way you...

Страница 33: ...rencing To download other applications tap Windows Store from the Start screen Then follow the instructions on the screen Using the micro SD card reader Your tablet has a micro SD card reader that provides a micro SD card slot for you to install a micro SD card Installing a micro SD card Attention Before handling a micro SD card touch a metal table or a grounded metal object This action reduces an...

Страница 34: ...nsure that you insert the card firmly until you hear a click Removing a micro SD card To remove a micro SD card do the following 1 Open the protective cover 2 Push the micro SD card inward a little until you hear a click 1 Then release it The micro SD card ejects 3 Gently slide the card out of the card slot 2 22 User Guide ...

Страница 35: ...slits as shown in figure B and figure C into the smart card reader Otherwise the smart card reader might get damaged The following illustrations show both sides of a correct smart card In illustration 1 the metal contacts a of the card are facing upward In illustration 2 the metal contacts a of the card are facing downward Note Your smart card might look slightly different from the following illus...

Страница 36: ...n type the password or provide confirmation 4 From the Action menu tap Add legacy hardware The Add Hardware Wizard starts 5 Follow the instructions on the screen Removing a smart card Attention Before removing a smart card stop the card first Otherwise data on the card might be damaged or lost Do not remove the smart card while the tablet is in sleep mode Otherwise the system might not respond whe...

Страница 37: ...on solutions By using synchronization solutions you can easily synchronize settings between your tablet and other personal computer Synchronizing settings by using the Windows synchronization solution To access Windows synchronization solution do the following 1 Swipe in from the right edge of the screen to display the charms 2 Tap Settings Change PC settings 3 In the navigation panel tap OneDrive...

Страница 38: ...1 Swipe in from the right edge of the screen to display the charms 2 Tap Settings Change PC settings 3 In the navigation panel tap Network Airplane mode 4 In the GNSS section slide the control to the left to disable the GPS satellite receiver 26 User Guide ...

Страница 39: ...ro SIM card If the tablet supports mobile network connection it might require a micro SIM card to connect to a mobile network Depending on the country or region of delivery the micro SIM card might be shipped with the tablet or you need to purchase one from the service carrier Attention When installing or removing the micro SIM card do not touch the micro SIM card metal connectors Always hold the ...

Страница 40: ...g down and then insert it firmly into the micro SIM card slot as shown until you hear a click 4 Close the protective cover and turn on your tablet To remove the micro SIM card do the following 1 Turn off the tablet 2 Open the protective cover 28 User Guide ...

Страница 41: ...played Connecting to a Wi Fi network Wi Fi is a wireless networking technology that provides network access at distances of up to 100 meters 328 feet depending on the Wi Fi router and your surroundings A Wi Fi connection requires access to a functioning Wireless Access Point WAP also called a hotspot Some hotspots are open to the public but some others implement security features to limit access t...

Страница 42: ...ier or SSID you must add that Wi Fi network before you can connect to it To add a Wi Fi network do the following 1 Swipe in from the right edge of the screen to display the charms 2 Tap the Settings charm 3 Tap the network icon A list of available Wi Fi networks is displayed 4 Tap Hidden network 5 Follow the instructions on the screen to add a Wi Fi network Adding a network profile Each location p...

Страница 43: ...over metered connections feature do the following 1 Swipe in from the right edge of the screen to display the charms 2 Tap Settings Change PC settings 3 In the navigation panel tap PC and devices Devices 4 In the Download over metered connections section slide the control to the left to turn it off Sharing your Internet connection You can share your mobile broadband Internet connection with multip...

Страница 44: ...FC feature the NFC logo is printed on the tablet By default the NFC feature is enabled If the NFC feature of your tablet is disabled do the following to enable the NFC feature 1 Swipe in from the right edge of the screen to display the charms 2 Tap Settings Change PC settings Network Radio devices 3 Slide the NFC control to the right to enable the NFC feature If you still cannot enable the NFC fea...

Страница 45: ...on your tablet as shown and ensure that the front side of the card is facing upward Align the left side edge of the card with the NFC logo on the tablet 2 Move the card left and right within 5 mm 0 20 inch as shown Then hold the card for about one second until you are prompted that the card has been successfully detected by the tablet Then you can transfer data to or from the card through NFC For ...

Страница 46: ...ait position 1 Position your tablet as shown and ensure that the screen of the smartphone is facing upward Align the left side edge of the smartphone with the NFC logo on the tablet 2 Move the smartphone left and right within 5 mm 0 20 inch as shown Then hold the smartphone for about one second until you are prompted that the smartphone has been successfully detected by the tablet Then you can tra...

Страница 47: ... and right within 5 mm 0 20 inch as shown Then hold the smartphone for about one second until you are prompted that the smartphone has been successfully detected by the tablet Then you can transfer data to or from the smartphone through NFC For more information about transferring data through NFC refer to the documentation that came with the smartphone Chapter 3 Wireless networks and devices 35 ...

Страница 48: ...36 User Guide ...

Страница 49: ... help you modify and expand your tablet to best suit your needs Access the Web site http www lenovo com essentials to view some of these options Explore your options for docking solutions and external products that can provide the adjustability and features that you want Accessibility information Lenovo is committed to providing people with disabilities greater access to information and technology...

Страница 50: ...ientific com jaws hq asp Using the NVDA screen reader http www nvaccess org Speech Recognition Speech Recognition enables you to control your tablet by voice Using only your voice you can start programs open menus tap buttons and other objects on the screen dictate text into documents and write and send e mails To open Speech Recognition do the following 1 Swipe in from the right edge of the scree...

Страница 51: ...llowing Customizable text size on page 38 Magnifier on page 38 Zoom on page 39 On Screen Keyboard On Screen Keyboard displays a visual keyboard with all the standard keys To open On Screen Keyboard do the following 1 Swipe in from the right edge of the screen to display the charms and tap Search 2 In the search filed enter On Screen Keyboard and then in the list of results tap On Screen Keyboard F...

Страница 52: ...om Lenovo Your tablet is preinstalled with System Update This program enables you to keep the Lenovo software on your tablet up to date by downloading and installing software updates To start System Update do the following 1 Swipe in from the right edge of the screen to display the charms 2 Tap the Search charm to search for System Update 3 Tap System Update 4 Follow the instructions on the screen...

Страница 53: ...ider the following items A ThinkPad ac power adapter for the country or region to which you are traveling A micro SIM card for the local mobile services in that country or region Other items you might want to consider ThinkPad headphones Additional storage devices or smart cards Tablet Digitizer Pen ThinkPad Tablet Dock ThinkPad 10 Touch Case ThinkPad 10 Quickshot Cover ThinkPad 10 Ultrabook Keybo...

Страница 54: ...e not going to use your tablet for an extended period of time remove the micro SIM card from your tablet and then pack your tablet with a protective case and store it in a well ventilated and dry area without direct exposure to sunshine 42 User Guide ...

Страница 55: ... the ThinkPad 10 Ultrabook Keyboard 1 2 Tablet Digitizer Pen slot cover and Tablet Digitizer Pen slot Some models come with a Tablet Digitizer Pen slot cover 1 To store the Tablet Digitizer Pen in the Tablet Digitizer Pen slot remove the Tablet Digitizer Pen slot cover from the slot first Note Ensure that you keep the Tablet Digitizer Pen slot cover Reattach it to the Tablet Digitizer Pen slot whe...

Страница 56: ...illustration Ensure that the tablet is secured in place Note Do not detach the tablet from the ThinkPad 10 Ultrabook Keyboard while using the ThinkPad 10 Ultrabook Keyboard otherwise the ThinkPad 10 Ultrabook Keyboard will be disabled Storing and removing the Tablet Digitizer Pen Some models are equipped with a Tablet Digitizer Pen as a standard feature You can store the pen in the slot on the rig...

Страница 57: ...several special keys Press a special key to quickly control the associated function Volume and mute control Mute the speakers Turn down the speaker volume Turn up the speaker volume Mute the microphone Screen control Turn down the brightness Turn up the brightness Application control Open the Settings charm Open the Search charm View all applications that you have opened View all applications Navi...

Страница 58: ...special function printed as an icon on each key press the function key directly To input F1 F12 press the Fn key and the corresponding function key To enable the Fn Lock function select Legacy The Fn Lock indicator turns on To input F1 F12 press the function keys directly To initiate the special function printed as an icon on each key press the Fn key and the corresponding function key Carrying or...

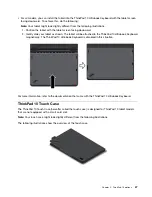
Страница 59: ...o the ThinkPad 10 Ultrabook Keyboard magnetically The ThinkPad 10 Ultrabook Keyboard is disabled in this situation For more information refer to the documentation that came with the ThinkPad 10 Ultrabook Keyboard ThinkPad 10 Touch Case The ThinkPad 10 Touch Case hereafter called the touch case is designed for ThinkPad 10 tablet models that are not equipped with a smart card slot Note Your touch ca...

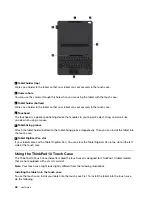
Страница 60: ...r bottom to the tablet fixing groove magnetically Then you can install the tablet into the touch case 6 Tablet Digitizer Pen slot If your tablet comes with a Tablet Digitizer Pen You can store the Tablet Digitizer Pen in the slot on the left side of the touch case Using the ThinkPad 10 Touch Case The ThinkPad 10 Touch Case hereafter called the touch case is designed for ThinkPad 10 tablet models t...

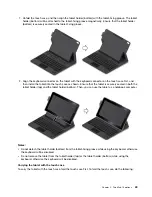
Страница 61: ... Ensure that the tablet is securely seated in both the tablet holder top and the tablet holder bottom Then you can use the tablet as a notebook computer Notes Do not detach the tablet holder bottom from the tablet fixing groove while using the keyboard otherwise the keyboard will be disabled Do not remove the tablet from the tablet holder top or the tablet holder bottom while using the keyboard ot...

Страница 62: ...h case which also serves as a protection case for the tablet For more information about the ThinkPad 10 Touch Case refer to the documentation that came the touch case ThinkPad Tablet Dock The ThinkPad Tablet Dock hereafter called the dock holds your tablet in an upright position and frees your hands to do other tasks The dock also provides you with easy access to connectors for USB devices file tr...

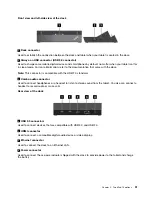
Страница 63: ...atible with the USB 2 0 standard 3 Combo audio connector Used to connect headphones or a headset to listen to stereo sound from the tablet You also can connect a headset to record audio or make calls Rear view of the dock 1 USB 3 0 connectors Used to connect devices that are compatible with USB 3 0 and USB 2 0 2 HDMI connector Used to connect a compatible digital audio device or video display 3 Et...

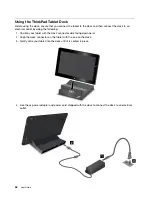
Страница 64: ...t by doing the following 1 Position your tablet with the dock connector side facing downward 2 Align the dock connector on the tablet with the one on the dock 3 Gently slide your tablet into the dock until it is seated in place 4 Use the ac power adapter and power cord shipped with the dock to connect the dock to an electrical outlet 52 User Guide ...

Страница 65: ...using an external USB keyboard Connect the dock to your personal USB storage device with the supplied USB cable to transfer files Connect the dock to a stereo system or speakers using a stereo audio cable to play music Connect the dock to an electrical outlet using the ac power adapter shipped with the dock to charge the tablet battery Chapter 5 ThinkPad 10 options 53 ...

Страница 66: ...54 User Guide ...

Страница 67: ... system information stored in ThinkPad Tablet Setup Without it no one can change the configuration of the tablet Note The system administrator can set the same supervisor password on many tablets to make administration easier Setting changing or removing a supervisor password Only a system administrator can set change or remove a supervisor password To set change or remove a supervisor password do...

Страница 68: ...in Device Manager Some models are equipped with two security chips called the discrete TPM displayed as Trusted Platform Module 1 2 in Device Manager and the firmware TPM For models with two security chips you can select which one you want to use in the ThinkPad Tablet Setup program by using the instructions in this topic Note Ensure that the supervisor password has been set in the ThinkPad Tablet...

Страница 69: ...comes with the program Protecting data against viruses Your tablet is preinstalled with an antivirus program so you can detect and eliminate viruses The antivirus program is designed to help you detect and eliminate viruses Lenovo provides a full version of antivirus software on your tablet with a free 30 day subscription After 30 days you must renew the license to continue receiving the antivirus...

Страница 70: ...58 User Guide ...

Страница 71: ... The ThinkPad Tablet Setup program main menu opens To start the ThinkPad Tablet Setup program from the operating system do the following 1 Swipe in from the right edge of the screen to display the charms 2 Tap Settings Change PC settings 3 In the navigation panel tap Update and recovery Recovery 4 In the Advanced startup section tap Restart now 5 The tablet restarts and a menu is displayed Tap Tro...

Страница 72: ...rmation UEFI BIOS Version UEFI BIOS Date Year Month Day Embedded Controller Version TXE Firmware Version Machine Type Model System unit serial number UUID System board serial number Asset Tag Processor Type Processor Speed Total memory Preinstalled operating system license UEFI secure boot System Date System Time Set the system date and system time If you need to set the current date and time of y...

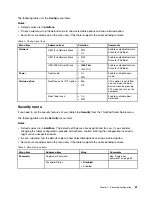
Страница 73: ...oot device menu by pressing F12 when you turn on the computer Startup option Boot Order Lock On Off Enable or disable boot order lock Security menu If you need to set the security features of your tablet tap Security from the ThinkPad Tablet Setup menu The following table lists the Security menu items Notes Default values are in boldface The default settings are already optimized for you If you co...

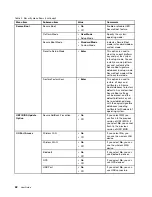
Страница 74: ...o restore all keys and certificates in Secure Boot databases to factory defaults Any customized Secure Boot settings will be erased and the default platform key will be re established along with the original signature databases including certificate for Windows 8 1 operating system UEFI BIOS Update Option Secure RollBack Prevention On Off If you select Off you can flash to the previous version of ...

Страница 75: ...n you can use USB connectors on ThinkPad Tablet Dock Security Chip Selection Firmware TPM Discrete TPM Configure the security chip This option is available only on models that have both the firmware TPM and the discrete TPM Security Chip On Off Enable or disable security chip feature Clear Security Chip Enter Clear the encryption key Note This item is displayed only if you have selected On for the...

Страница 76: ...ldface From each submenu tap the default value to show selectable options and select a desired option Some items are displayed on the menu only if the tablet supports the corresponding features Table 3 Startup menu items Menu item Value Comments Boot See Changing the startup sequence on page 64 Internal Storage On Off Change the Boot order by dragging and dropping the icon USB HDD On Off Change th...

Страница 77: ...ent This section is intended primarily for network administrators Your tablet is designed for manageability so that you can redirect more of your resources to better meet your business objectives This manageability or Total Cost of Ownership TCO enables you to remotely operate client tablets in the same way as you operate your own tablet such as turning on a client tablet formatting hard disk driv...

Страница 78: ...66 User Guide ...

Страница 79: ... files when you speak to a Lenovo technical support representative Troubleshooting The problems and solutions described in this section are meant only as a guide They are not definitive problem solving techniques For some problems you might need help from Lenovo your reseller or your service provider When you observe a problem stop operation immediately because taking further action might result i...

Страница 80: ... or other media file cannot be played Suggested solution Check and ensure that the media file is not corrupted External device connection problems Problem A connection is not established when you connect the tablet to a computer Suggested solution Ensure that the tablet USB cable you are using is the one that is shipped with your tablet Problem Bluetooth devices cannot be located Suggested solutio...

Страница 81: ...Have the tablet serviced Message 0190 Critical low battery error Solution The tablet turned off because the battery is low Connect the ac power adapter to the tablet and charge the battery Message 2200 Machine Type and Serial Number are invalid Solution Machine Type and Serial Number are invalid Have the tablet serviced Message 2201 Machine UUID is invalid Solution Machine UUID is invalid Have the...

Страница 82: ... serviced Problem When I turn on the tablet only a white pointer is displayed on a blank screen Solution Do the following 1 Turn off the tablet and then turn it on again 2 If you still see only the pointer on the screen use the recovery solutions to restore the system to the factory state If the problem persists have the tablet serviced Problem My screen goes blank while the tablet is on Solution ...

Страница 83: ...ll a new USB connector cover To replace the SIM card and SD card cover do the following 1 Open the SIM card and SD card cover 1 2 Pull out the SIM card and SD card cover 2 Chapter 8 Troubleshooting problems 71 ...

Страница 84: ...3 Install a new SIM card and SD card cover 72 User Guide ...

Страница 85: ...pdate and recovery Recovery 4 In the Refresh your PC without affecting your files section tap Get started 5 Follow the instructions on the screen to refresh your tablet Resetting your tablet to the factory default settings If you want to recycle your tablet or just start over you can reset your tablet to the factory default settings Resetting the tablet will reinstall the operating system reinstal...

Страница 86: ...the ThinkPad Setup program 4 Tap Startup On the Boot submenu drag USB CD DVD upward until USB CD DVD is shown as the first startup device 5 Tap Save and then tap Yes to save your configuration 6 Tap Restart and follow the on screen instructions to restart the tablet After the tablet restarts the recovery program opens automatically 7 Select the language you prefer in the drop down list box and tap...

Страница 87: ... tap Create a recovery drive 4 Tap Yes in the User Account Control window to allow the Recovery Media Creator program to start 5 Ensure that you select the Copy the recovery partition from the PC to the recovery drive option Then tap Next Important If you clear the Copy the recovery partition from the PC to the recovery drive option you will create recovery media without the recovery partition con...

Страница 88: ... opens 2 Tap Startup 3 In the Boot submenu drag the recovery drive to the first place to select it as the boot device 4 Save configuration changes and restart the tablet 5 Follow the instructions on the screen to recover the tablet For more information about the recovery solutions provided by the Windows 8 1 operating system go to http go microsoft com fwlink LinkID 263800 76 User Guide ...

Страница 89: ...nd manuals Knowledge base and frequently asked questions If you want to call the Lenovo Customer Support Center go to http www lenovo com support phone for the latest telephone numbers and hours of operation During the warranty period you can get the following services from the Customer Support Center Problem determination Trained personnel are available to assist you with determining if you have ...

Страница 90: ... numbers for the installed transmitter cards on the bottom of your tablet Note Depending on the model your tablet might look different Lenovo user forums Lenovo provides user forums on the World Wide Web to provide you with a place to search the community knowledge base for information about your tablet share information with other users make suggestions to Lenovo ask questions and get technical s...

Страница 91: ...o http www lenovo com essentials Purchasing additional services During and after the warranty period you can purchase additional services such as support for Lenovo and non Lenovo hardware operating systems and application programs network setup and configuration services upgraded or extended hardware repair services and custom installations services Service availability and service name might var...

Страница 92: ...80 User Guide ...

Страница 93: ...d by the Bluetooth SIG The following profiles are supported by your Bluetooth card Advanced Audio Distribution Profile A2DP A V Remote Control Profile AVRCP Dial Up Networking Profile DUN File Transfer Profile FTP Generic Access Profile GAP Generic A V Distribution Profile GAVDP Hardcopy Cable Replacement Profile HCRP Headset Profile HSP Hands Free Profile HFP Human Interface Device Profile HID Me...

Страница 94: ...ment where the risk of interference to other devices or services is perceived or identified as harmful If you are uncertain of the policy that applies on the use of wireless devices in a specific organization you are encouraged to ask for authorization to use integrated wireless cards prior to turning on the tablet Locating the UltraConnect wireless antennas ThinkPad 10 features an antenna system ...

Страница 95: ... in a particular installation If this equipment does cause harmful interference to radio or television reception which can be determined by turning the equipment off and on the user is encouraged to try to correct the interference by one or more of the following measures Reorient or relocate the receiving antenna Increase the separation between the equipment and receiver Connect the equipment into...

Страница 96: ...dieses sicherzustellen sind die Geräte wie in den Handbüchern beschrieben zu installieren und zu betreiben Des Weiteren dürfen auch nur von der Lenovo empfohlene Kabel angeschlossen werden Lenovo übernimmt keine Verantwortung für die Einhaltung der Schutzanforderungen wenn das Produkt ohne Zustimmung der Lenovo verändert bzw wenn Erweiterungskomponenten von Fremdherstellern ohne Empfehlung der Len...

Страница 97: ...ов и впервые выпущенные в обращение до 14 февраля 2013 года сертифицированы по требованиям Системы сертификации ГОСТ Р и или по требованиям единой системы сертификации Таможенного Союза действовавшим в момент сертификации и маркируются знаком соответствия ГОСТ Р Модели относящиеся к настоящей серии семейству продуктов и впервые выпущенные в обращение после 14 февраля 2013 года сертифицированы в ед...

Страница 98: ...te equipo estásujeta a las siguientes dos condiciones 1 es posible que este equipo o dispositivo no cause interferencia perjudicial y 2 este equipo o dispositivo debe aceptar cualquier interferencia incluyendo la que pueda causar su operación no deseada 86 User Guide ...

Страница 99: ...to them for the return recycle and recovery of WEEE and to minimize any potential effects of EEE on the environment and human health due to the presence of hazardous substances For additional WEEE information go to http www lenovo com recycling Recycling information for Japan Collecting and recycling a disused Lenovo computer or monitor If you are a company employee and need to dispose of a Lenovo...

Страница 100: ...loyee who uses a Lenovo notebook computer and need to dispose of a battery pack contact the proper person in Lenovo sales service or marketing and follow that person s instructions You also can refer to the instructions at http www lenovo com jp ja environment recycle battery If you use a Lenovo notebook computer at home and need to dispose of a battery pack you must comply with local ordinances a...

Страница 101: ...ctive 2006 66 EC batteries and accumulators are labeled to indicate that they are to be collected separately and recycled at end of life The label on the battery may also include a chemical symbol for the metal concerned in the battery Pb for lead Hg for mercury and Cd for cadmium Users of batteries and accumulators must not dispose of batteries and accumulators as unsorted municipal waste but use...

Страница 102: ...90 User Guide ...

Страница 103: ... January 2013 meet the requirements of Directive 2011 65 EU on the restriction of the use of certain hazardous substances in electrical and electronic equipment RoHS recast or RoHS 2 For more information about Lenovo progress on RoHS go to http www lenovo com social_responsibility us en RoHS_Communication pdf Copyright Lenovo 2014 2015 91 ...

Страница 104: ...S Turkish RoHS The Lenovo product meets the requirements of the Republic of Turkey Directive on the Restriction of the Use of Certain Hazardous Substances in Electrical and Electronic Equipment EEE 92 User Guide ...

Страница 105: ...Ukraine RoHS India RoHS RoHS compliant as per E Waste Management Handling Rules 2011 Appendix C Restriction of Hazardous Substances Directive RoHS 93 ...

Страница 106: ...94 User Guide ...

Страница 107: ...lication Lenovo might make improvements and or changes in the product s and or the program s described in this publication at any time without notice The products described in this document are not intended for use in implantation or other life support applications where malfunction might result in injury or death to persons The information contained in this document does not affect or change Leno...

Страница 108: ...and Intel Atom are trademarks of Intel Corporation in the U S and or other countries iPhone is a trademark of Apple Inc registered in the U S and other countries The terms HDMI and HDMI High Definition Multimedia Interface are trademarks or registered trademarks of HDMI Licensing LLC in the United States and other countries Other company product and service names may be trademarks or service marks...

Страница 109: ......

Страница 110: ......

Отзывы: