background image

DE/FR/IT/EN/ES/NL/CS/LT/PL/HU/RU/BG

7

DE 

Die Griffe werden definitiv in horizontaler 

Stellung eingeklinkt, wenn sich die Oberteile 

in der geschlossenen Stellung befinden. 

Für die endgültige Ausrichtung der 

Griffe siehe nächster Abschnitt.

Nach der endgültigen Montage des Dekors 

der Griffe kann es in bestimmten Fällen 

vorkommen, dass nach dem Einklinken des 

Griffes ein zu großes Spiel zwischen der 

Dekor-Hülse und dem Griff sichtbar ist:

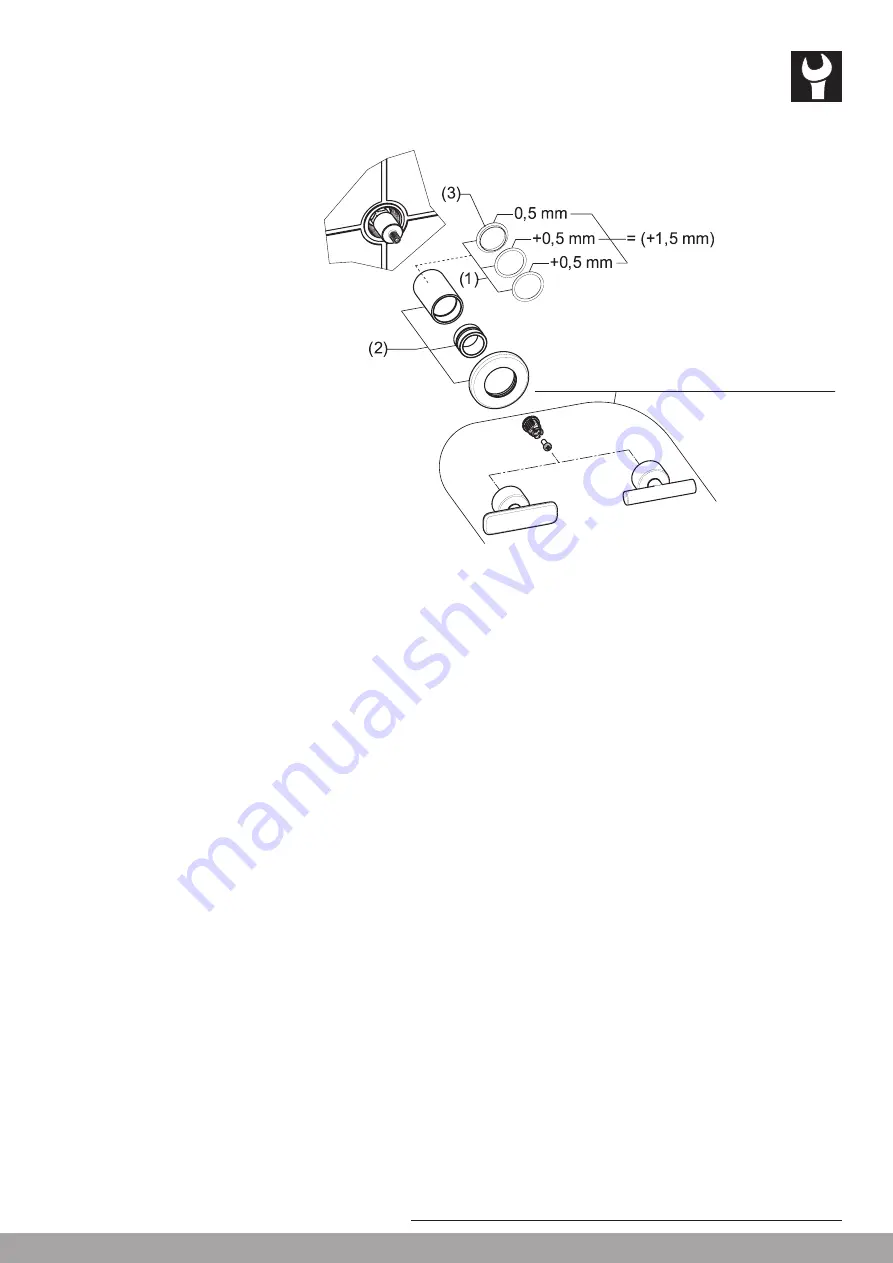
a) Schätzen Sie die Größe des Spiels mit 

Hilfe von Ausgleichsscheiben (1).

b) Nehmen Sie den Griff ab und entfernen 

Sie die Baugruppe (2) wieder.

c) Setzen Sie die erforderliche Anzahl 

Scheiben ein und montieren Sie die Bau-

gruppe erneut.

Wichtig:

 In jedem Fall muss mindestens 

die Bundscheibe (3) eingesetzt werden, 

bevor die Dekor-Hülse auf das Oberteil 

geschraubt wird. Mit jedem Ausgleichs-

scheiben-Set kann ein Spiel von mind. 

0,5 mm bis max. 1,5 mm ausgeglichen 

werden. Der eingeklinkte Griff darf nach 

dem Ausgleichen des Spiels auf keinen 

Fall am Dekor scheuern.

FR 

Les poignées sont encliquetées défini-

tivement en position horizontale lorsque les 

chapeaux sont en position fermée.

Pour le réglage final d’orientation des 

poignées, voir le chapitre suivant.

Après assemblage final des décors de 

poignées, dans certains cas, il se peut 

qu’après encliquetage de la poignée, un 

jeu trop important soit visible entre la douille 

décor et la poignée: 

a) Estimer ce jeu à l’aide des rondelles de 

compensation (1).

b) Démonter la poignée et dévisser à 

nouveau l’ensemble (2).

c) Insérer le nombre de rondelles néces-

saires et remonter l’ensemble. 

Important:

 Toujours insérer au minimum 

la rondelle épaulée (3) avant de visser la 

douille décor sur le chapeau. Chaque set 

de rondelles de compensation permet de 

réduire des jeux de 0,5 mm mini. à 1,5 

mm maxi. La poignée encliquetée ne doit 

en aucun cas frotter sur le décor après 

réglage du jeu.

IT 

Le manopole sono bloccate definitiva-

mente in posizione orizzontale quando i 

vitoni sono in posizione chiusa. 

Per la regolazione finale di orienta-

mento delle manopole, vedi il capitolo 

successivo.

Effettuato l’assemblaggio finale delle deco-

razioni delle manopole, è possibile che in 

alcuni casi, una volta bloccata la manopola, 

ci sia troppo giocco tra il porta-decorazione 

et la manopola: 

 a) Valutare l’entità del gioco con delle 

rondelle di compensazione (1).

 b) Smontare la manopola e svitare di 

nuovo il tutto (2).

 c) Inserire la quantita di rondelle necessa-

rie e rimontare tutto. 


Importante:

 inserire sempre la rondella 

di spallamento (3) prima di avvitare il 

porte-decorazione sui vitoni. Ogni set di 

rondelle di compensazione consente di 

ridurre il gioco da un minimo di 0.5 mm a 

un massimo di 1.5 mm. Una volta rego-

lato il gioco, la manopola accoppiata non 

deve sfregare contro la decorazione.

EN 

The handles are definitively clicked into 

the horizontal position when the headworks 

are in the closed position. 

For final adjustment of the handle ori-

entation, see the following chapter.

 In certain cases, after final assembly of the 

handles’ decorative trims and after clicking 

the handle into place, an excessive gap can 

be visible between the decor sleeve and the 

handle:

 a) Estimate this gap using the compensa-

tion washers (1).

 b) Remove the handle and unscrew the 

assembly again (2). 

 c) Insert the number of washers needed 

and refit the assembly.

 Important:

 Always insert the shouldered 

washer to the minimum (3) before screw-

ing the decor sleeve onto the headwork. 

Each set of compensation washers 

permits reduction in gap from 0.5 mm 

mini. to 1.5 mm max. There should be no 

friction between the snaped handle and 

the decor sleeve once the gap has been 

adjusted.   

DE 

Ausrichten der Griffe, siehe Seiten 10 –15

FR 

Alignement des poignées, voir pages 10 –15

IT 

Allineamento delle manopole, vedi pagine 10 –15

EN 

Alignment of the handles, see pages 10 –15

twinprime

curveprime

Montage der Griffe 

Montage des poignées 

Montaggio delle manopole 

Fitting of the handles

Montaje de las manetas

Montage van de grepen

Montáž ovládacích páček

Svirtelių montavimas

Montaż rączek

A kézikarok felszerelés

Монтаж рычага

Монтаж на ръкохватките

Содержание curveprime H3127060041201

Страница 1: ...uze při montáži prováděné dle návodu osobou odborně způsobilou s příslušnou koncesí a dle předpisů platných v místě LT Ši instrukcija turi būti perduota naudotojui Garantija turtinė atsakomybė suteikiama jei montavimą pagal instrukciją atlieka kvalifikuotas specialistas pagal vietinius reikalavimus PL Niniejsza instrukcja obsługi powinna zostać przekazana użytkownikowi Gwarancja odpowiedzialność p...

Страница 2: ...yć ci śnienie wody i przeprowadzić kontrolę działania Sprawdzić szczelność armatury i wszystkich po łączeń kontrola wzrokowa Korpus i wylot bate rii mogą być gorące Montaż i konserwację może przeprowadzać wyłącznie instalator uprawniony do tego na podstawie lokalnie obowiązujących prze pisów Gwarancja patrz Ogólne warunki sprzedaży igwa rancji Prawo do zmian technicznych zastrzeżone LT Rekomenduoj...

Страница 3: ... procedure Proceso de montaje Montageverloop Průběh montáže Montavimo tvarka Instrukcja montażu A szerelés menete Последовательность монтажа Последователност при монтажа DE Die drei Muffen vorsichtig absägen und die abgesägten Stücke entsorgen Den Kunststoff auf der Innenseite mit Gewinde sorgfältig entgraten Nach dem Absägen dürfen die Muffen auf keinen Fall hervorstehen da dies ein enges Anliege...

Страница 4: ...wy z 3 beżowymi złączkami G1 HU Falba beépíthető doboz 3 db beige színű G1 es karmantyúval RU Скрытый модуль с 3 бежевыми муфтами G1 BG Модул за монтиране на зидария с 3 бежови муфи G1 Montageablauf Exécution du montage Esecuzione del montaggio Assembly procedure Proceso de montaje Montageverloop Průběh montáže Montavimo tvarka Instrukcja montażu A szerelés menete Последовательность монтажа Послед...

Страница 5: ...а прах или мръсотия Montageablauf Exécution du montage Esecuzione del montaggio Assembly procedure Proceso de montaje Montageverloop Průběh montáže Montavimo tvarka Instrukcja montażu A szerelés menete Последовательность монтажа Последователност при монтажа CS Podomítkové vestavbové těleso se 3 závity G1 pískové barvy LT Po tinku montuojamas korpusas su 3 smėlio spalvos movomis G1 PL Element podty...

Страница 6: ... de uitloop moet de hoofdkraan weer worden geopend en de bouwgroep op lekkages worden gecon troleerd CS Zajistěte těsnost držáku výtoku a za šroubujte jej do uložení až na doraz Po montáži výtoku znovu zapojte vodu a ověřte těsnost celého montážního celku LT Patikrinkite ar snapo laikiklis sandarus ir užfiksuokite jį priverždami iki galo Sumontavę snapą vėl įjunkite vandens tiekimą ir patikrinkite...

Страница 7: ...do i vitoni sono in posizione chiusa Per la regolazione finale di orienta mento delle manopole vedi il capitolo successivo Effettuato l assemblaggio finale delle deco razioni delle manopole è possibile che in alcuni casi una volta bloccata la manopola ci sia troppo giocco tra il porta decorazione et la manopola a Valutare l entità del gioco con delle rondelle di compensazione 1 b Smontare la manop...

Страница 8: ...schuren CS Ovládací páčky jsou na trvalo zaklapnu ty ve vodorovné poloze pokud se horní díly nacházejí v uzavřené poloze Pro trvalé vyrovnání ovládacích páček viz následující oddíl Po konečné montáži dekoru ovládacích páček se v určitých případech může stát že je po zaklapnutí ovládací páčky viditelná velká vůle mezi objímkou dekoru a ovládací páčkou a Velikost vůle odhadněte pomocí vyrov návacích...

Страница 9: ...кончательного монтажа деко ративного элемента рычага в опреде ленных случаях может случиться что после защелкивания рычага будет виден большой зазор между декоративной втулкой и рычагом a Определите величину зазора при по мощи компенсационной прокладки 1 b Снимите рычаг и снова снимитеузел 2 c Установите необходимое количе ство прокладок и снова установите узел Важно В любом случае нужно использов...

Страница 10: ...o da incasso tipo A o B Questa operazione risulterà facilitata se il gruppo viene messo sott acqua per determinare il senso di apertura chiusura delle manopole EN To make this adjustment first check what type of ceramic headworks are fitted in your built in body Type A or B This operation will be easier if your mixer unit is connected to the water supply in order to determine the opening closing d...

Страница 11: ...ndles 1 Place the grooved insert 2 onto the cartridge 1 2 Tighten the screw 3 a turn and a half 3 Place the handle 4 on the insert 2 in any position without enga ging it on the ratchet 4 Turn the handle 4 up to the stop in the OFF direction cold water turns off anticlockwise hot water turns off clockwise Important Adjustment operations 5 to 10 are carried out without finally engaging the handles o...

Страница 12: ... tělese typ A nebo B Je jednodušší když je vodovodní baterie pod tlakem aby bylo možné určit kterým směrem se ovládací páčky otevírají zavírají LT Prieš nustatydami iš pradžių patikrinkite kokio tipo viršutinės keraminės detalės sumontuotos korpuse įmontuotame po tinku A ar B tipo Būtų paprasčiau jei čiaupą paveiktumėte slėgiu kad įsitikintumėte kokia valdymo kryptimi atsidaro užsidaro svirtelės M...

Страница 13: ...alen en horizontaal uitgelijnd er weer op zetten Let er op de warmwaterknop niet met 180 terug te draaien één enkele positie geldt als de juiste stand Als de hoek A niet juist is geschat de stappen 5 tot 9 herhalen totdat de knoppen 4 precies zijn uitgelijnd Zodra de knop 4 precies is uitgelijnd deze weghalen en de schroef 3 hele maal vast draaien en de knop 4 definitief bij het inzetstuk 2 vastkl...

Страница 14: ... установлен в скрытом модуле тип A или B Когда ваш смеситель находится под давлением будет проще определить в каком направлении открывать закрывать рычаг BG Преди монтажа проверете какви видове керамични горни конструктивни елементи са монтирани на Вашата зидария тип А или Б Ще Ви бъде по лесно да определите посоката на отваряне затваряне на ръкохватките когато арматурата Ви е под налягане Montage...

Страница 15: ...Если угол A был оценен неправильно следует повторять рабочие шаги с 5 по 9 до тех пор пока ручки 4 не будут выровнены точно После того как ручка 4 будет точно выровнена ее необходимо снять и полностью затянуть винт 3 а ручку 4 четко зафиксировать на встаке 2 BG Центроване на дръжките 1 Поставете оребрената вложка 2 върху горната част 1 2 Затегнете винта 3 на един и половина оборота 3 Поставете дръ...

Страница 16: ...atką Unikać korzystania ze środków szorujących lub roz puszczalników niszczących powierzchnię Szkody powstałe na skutek nieprawidłowego czyszczenia przez użytkownika nie są naprawiane na podstawie gwarancji udzielonej przez naszą firmę HU Kezelési útmutató A felület tisztítása és ápolása egyszerű A sima felü leten alig marad meg a szennyeződés A rendszeres ápoláshoz puha törlőkendőt szappanoldatot...

Отзывы: