4
DESCRIPTION
The T-NFC selector uses the Touch technology for the buttons and features a next-generation, high-
contrast display for clearer images.
It is used to interface with the door both during “standard” operation (by the user), and during the
installation and adjustment of functions and parameters (by the installer). It provides the same
adjustment and management functions as the ET-DSEL digital selector; in addition, it allows to manage
the door from a smartphone, thanks to the built-in NFC technology (for information about the door
management through the “ LabelTools” App, please refer to the specific instructions).
For faster installation and to eliminate the risk of connection errors, the selector is equipped with a
special cable (3,5 metres long), with a built-in connector at both ends.
INSTALLATION
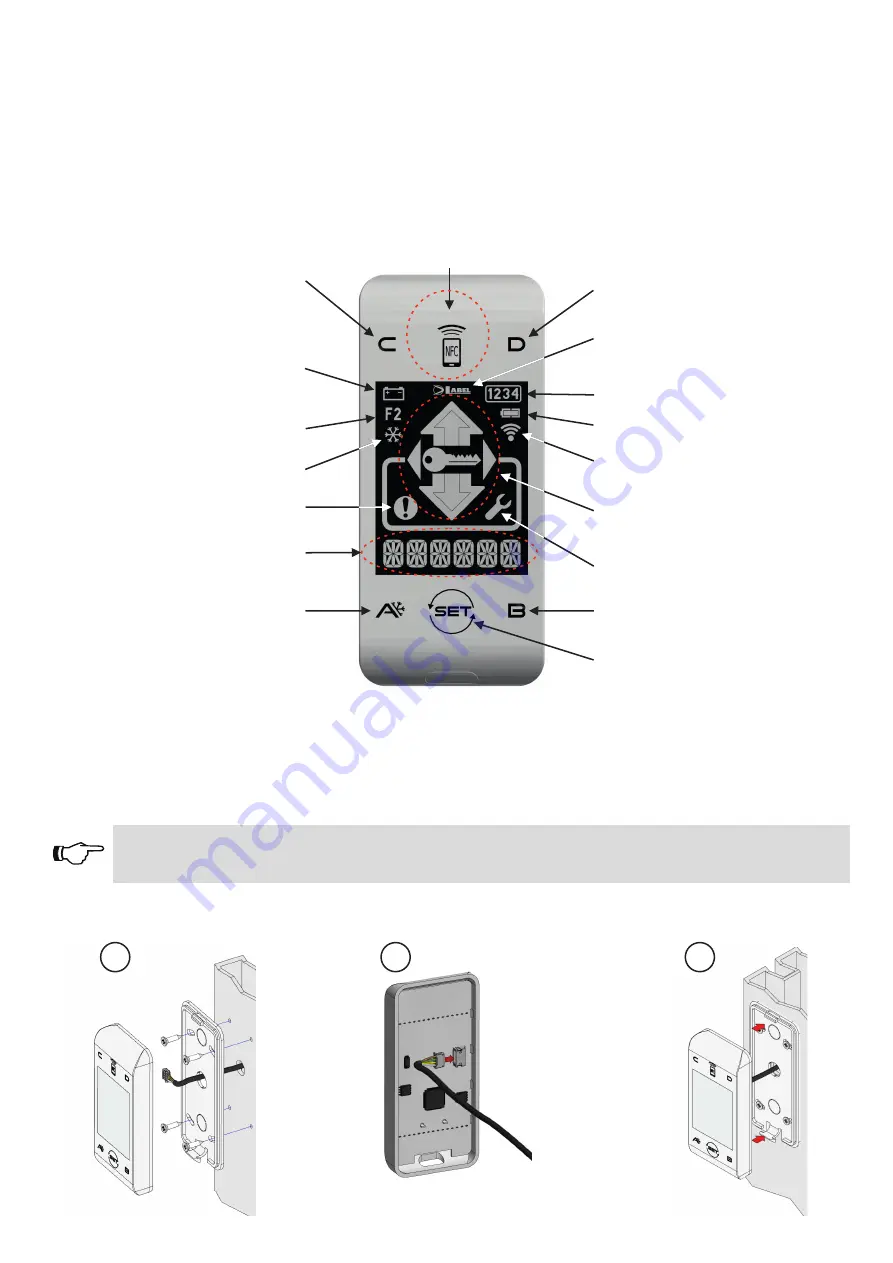
First of all fasten the bottom of the plastic casing to the wall or to the metal structure on which you
wish to install the selector, using the supplied screws (1). The supplied cable output shall be installed
in this location, on the wall or on the metal structure (if possible centred with respect to the selector
casing). Break one of the 3 cable passages on the casing bottom to ensure that the cable can reach
the connector located on the board.
Important!
At this stage make sure that the door power supply and the battery are off.
Connect the cable to the connector located on the electronic board fastened to the plastic casing cover
(2), then close the cover onto the previously installed plastic casing (3).
1
2
3
C button, used to type the passwords, to enable the “F2”
special functions, to access the input display and for other
uses in the technical area. (See the specific chapters)
D button, used to type the passwords, to select the active
door number, to access the user passwords and for other
uses in the technical area.
Label logo:
It goes off when a button is pressed
Selected door number (from 1 to 2)
Digital selector battery (for radio model)
Radio communication field (for radio model)
Operating program icons (see chapter 1.2) or input display
(see chapter 2.6)
Maintenance needed warning
B button, used to type the passwords, to control the door
opening and for other uses in the technical area (see the
specific chapters)
SET button, used to select the operating programs
and to access and leave the technical area.
Door battery:
If it is on, the door is not powered; if it blinks, the battery is
depleted or malfunctioning
Special functions activated through the C button
Winter reduced opening function enabled (A button)
Error warning
Alphanumeric text line for miscellaneous uses.
(see the specific chapters for each function)
A button, used to type the passwords, to enable the winter
reduced opening, to access the information area and for
other uses in the technical area. (see the specific chapters)


