PERIODIC SERVICE
52
EVERY 400 HOURS
B
Replacing Transaxle Oil Filter Cartridge
To avoid personal injury:
A
Park the machine on a firm and level surface.
A
Apply the parking brake.
A
Be sure to stop the engine and remove the key
before changing or checking the oil.
A
Allow transmission case to cool down
sufficiently; oil can be hot and may cause
burns.
1. Apply the bypass valve.
(See "Hydrostatic Transaxle Bypass Rods" in
"TRANSPORTING" in "OPERATING THE MACHINE"
section.)
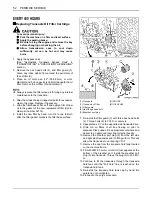
2. Remove the hex head bolts (4), and filter guard (3).
Clean any loose debris from around the perimeter of
the oil filter (2).
3. Place an oil drain pan (12" (304.8 mm) or more
diameter and 8 qt. capacity is optimal) beneath the oil
filter. Remove the oil filter (2) and discard it.
A
Always replace the filter when preforming any internal
maintenance to the transaxle.
4. After the oil has drained, inspect all parts for excessive
wear or damage. Replace if necessary.
5. Wipe the filter base surface off and apply a film of new
oil to the gasket of the new replacement filter (Hydro-
Gear part number 52114).
6. Install the new filter by hand, turn 3/4 to one full turn
after the filter gasket contacts the filter base surface.
7. Re-install the filter guard (3) with three hex head bolts
(4). Torque bolts (4) to 7.35 N-m securely.
8. Repeat steps 2-7 on the opposite side transaxle drive.
9. Drain old oil filters of all free flowing oil prior to
disposal. Place used oil in appropriate containers and
deliver to an approved recycling collection facility.
10. Remove the breather port plug (9) from the left side
and right side transaxles prior to filling with oil. This will
allow the transaxles to vent during oil fill.
11. Remove the cap from the transaxle fluid tank located
on the machine frame.
12. Fill with 20W-50 motor oil until oil just appears at the
bottom of the breather port. Install the breather port
plug (5) into transaxle. Torque the plug (5) to 20.34 N-
m.
13. Continue to fill the transaxles through the transaxle
fluid tank until the "Full Cold" line is reached on the
transaxle fluid tank.
14. Re-install the transaxle fluid tank cap by hand. Be
careful to not overtighten.
15. Proceed to the purge procedure.
(1) Transaxle
(2) Transaxle oil filter
(3) Filter guard
(4) Hex flange head bolt
(5) Breather port plug
(A) FRONT
(B) OIL LEVEL
Содержание ZG123S-AU
Страница 7: ......
Страница 12: ... 5 SAFE OPERATION 5 DANGER WARNING AND CAUTION LABELS ...
Страница 13: ...SAFE OPERATION 6 ...
Страница 14: ... 7 SAFE OPERATION ...
Страница 17: ...SERVICING OF MACHINE 2 1 Mower identification plate 2 Mower serial No 1 ROPS serial No ...
Страница 22: ...7 INSTRUMENT PANEL AND CONTROLS ILLUSTRATED CONTENTS 1 Anti scalp roller Front bolt shift type 22 ...

