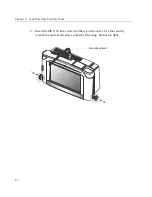


Appendix A Replace a Series 4000 Device with the InTouch
96
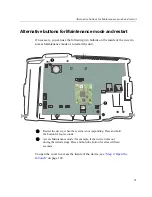
Step 1: Prepare the site and collect data
Location of the unit
•
If the Series 4000 is mounted over an AC outlet, you can install the InTouch
(Standard model only) in the same location, but you must drill different holes
for the screws.
•
To comply with the Americans with Disabilities Act (ADA), the top of the
InTouch cannot be greater than 48 inches (1219 millimeters) above the floor.
•
If the InTouch will be plugged into a wall outlet away from the device, the
unit cannot be more than 5 feet (1.5 meters) away from the outlet.
See
“Plan the installation”
on page 13 for additional information about
preparing the location.
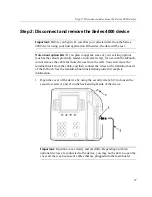
Caution:
If the Series 4000 device that you are replacing uses an internal AC
outlet, you must have a licensed electrician disconnect the power line from the
outlet.
Attention :
Si le InTouch de la série 4000 que vous remplacez est relié par une
prise c.a. interne, vous devez faire appel à un électricien agréé pour débrancher la
prise de la source d'alimentation.
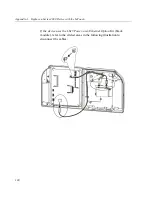
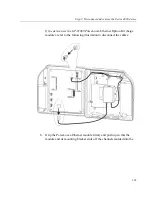
Use the host application software to collect data
Before you disassemble the device, use your host application software to collect
all data. Note that you can also use the Maintenance Mode > Database Report
feature on the device. If the report displays the following, then you do not need to
collect any data:
uncollectedFifos:0
.See the host application system
administrator guide and the online Help.
Содержание InTouch 9100 Slim Profile
Страница 4: ...Document Revision History Revision Release Date A June 2016 B December 2016 C March 2017 D April 2017 ...
Страница 9: ...Chapter 1 Before You Install the InTouch ...
Страница 21: ...Chapter 2 Install the Standard Model InTouch ...
Страница 50: ...Chapter 2 Install the Standard Model InTouch 50 c Tighten both screws ...
Страница 60: ...Chapter 2 Install the Standard Model InTouch 60 ...
Страница 61: ...Chapter 3 Install the Slim Profile InTouch ...
Страница 75: ...Step 6 Secure the cables with the strain relief clip 75 ...
Страница 84: ...Chapter 3 Install the Slim Profile InTouch 84 ...
Страница 85: ...Chapter 4 Troubleshooting and Preventive Maintenance ...
Страница 94: ...Chapter 4 Troubleshooting and Preventive Maintenance 94 ...
Страница 95: ...Appendix A Replace a Series 4000 Device with the InTouch ...