background image

19 


•  Low  voltage  detection  also  leads  to  a 

decreasing of motor RPM ending in a complete 
power-off of the motor. 

Once  the  KOLIBRI

’s  Heli  mode  has 

decreased the RPM, no immediate restart is 
possible.  Only  after  plugging  a  sufficiently 
charged  battery  pack  further  operation  is 
allowed.


4.9 Helicopter Mode


In helicopter mode, motor RPM control (Governor) 
is active. The motor RPM speed is kept constant in 
relation  to  flat  line  throttle  curve  programmed  in 
your transmitter. RPM control can compensate for 
load  fluctuations  and  decreasing  battery  voltage, 
as long as the battery and motor are capable of the 
requested  power  demands.  RPM  control  works 
only if the ESC is installed in the helicopter.  

Operating  your  helicopter  without  main 
blades may result in a jerking ESC.


It  is  recommended  to  set  0°  pitch  at  spool  up  to 
ensure relatively constant RPM during each flight.  

To start the motor, disengage throttle-hold while in 
any  flight  mode  with  a  straight  line  throttle  curve. 
The KOLIBRI ESC will smoothly increase the motor 
RPM  within  your  preselected  spool-up  time  (see 
3.3 for adjustment of spool-up). 

Once  the  designated  RPM  is  achieved,  the 
KOLIBRI  switches  over  automatically  to  RPM 
control mode (Governor). You may adjust the flat-
line  throttle  curve  in  each  of  your  flight  modes  to 
provide  you  with  different  head  speeds  for  each 
mode. 

If  you  select  Throttle  Hold  at  any  point  in  flight, 
please  note that  soft  start  will  engage  unless  you 
are  in  Mode  4  and  have  Autorotation  enabled.  If 
Autorotation  Bailout  is  enabled,  initial  spool  up 
speed is bypassed when disengaging throttle hold 
and reengaging a standard flight mode (see 3.3 for 
Autorotation Bail out). 

4.10 Autorotation (Bail out)


Due to the autorotation quick-start function, motor 
RPM returns to normal much faster. This provides 
the  opportunity  to  bail  out  of  an  unsuccessful  or 
interrupted  Autorotation.  In  order  to  have  the 
quickest 

available 

spool 

up 

time 

without 

mechanical overloading, the spool up time after bail 
out is calculated on the programmed spool up time 
and differs between 2 - 6 s. 

In order to enable Autorotation Mode (Bail out), you 
must  set  the  throttle-hold  value  to  25%  in  your 
transmitter (see 7.4). Switching to the AR (throttle 
hold)  position  during  an  active  flight,  the  motor  is 
switched off at once and the AR function (bail out) 
is activated. 

When  interrupting  the  active  AR  function  and  the 
motor  is  shut  off,  the  KOLIBRI  switches  to  the 
normal smooth start. 

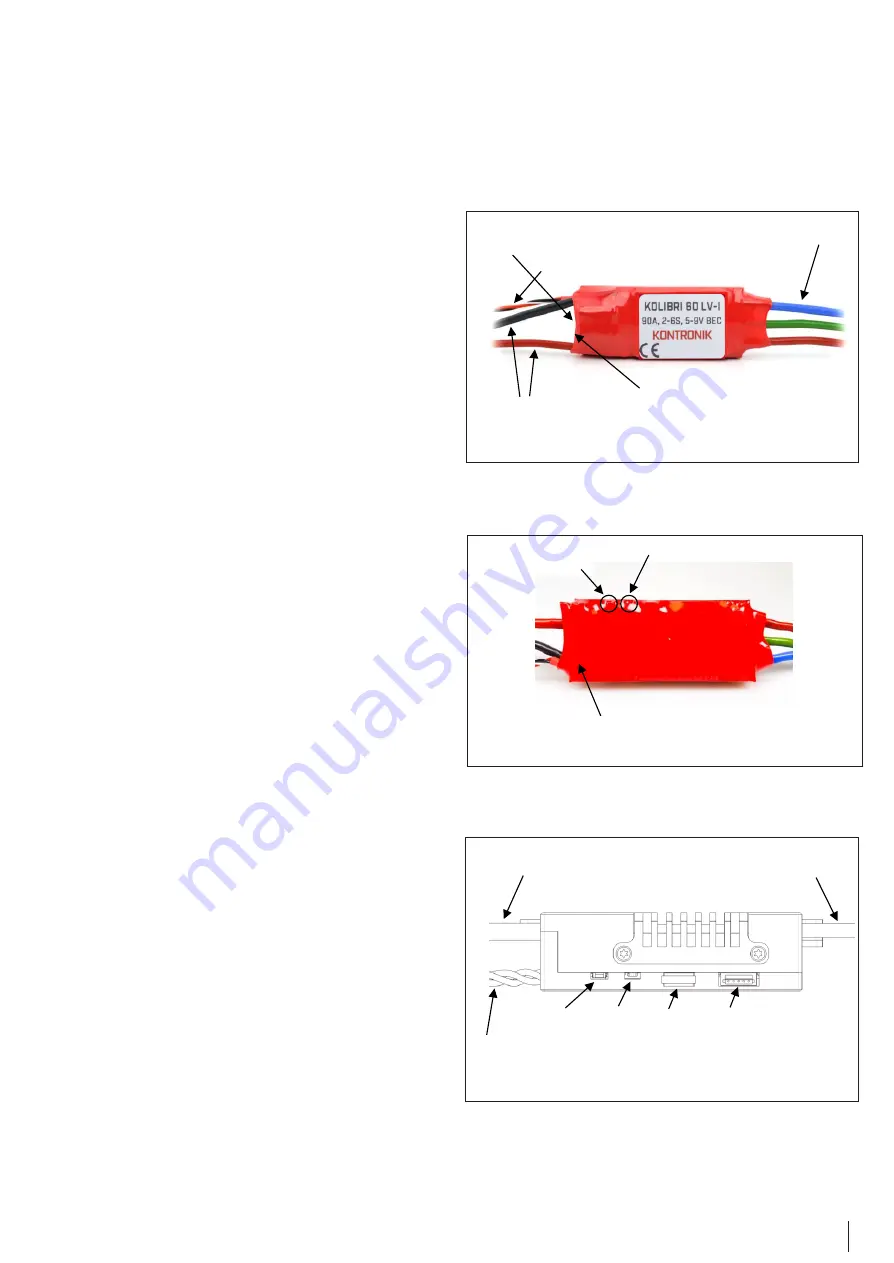
5. Connecting the cables 

 
KOLIBRI 60 LV-I &  
KOLIBRI 90 LV-I / HV-I 


KOLIBRI 140 LV-I / HV-I 


Motor cables 

Master cable with throttle function 


Slave cable port 


Sensorport (telemetry 
or bluetooth module) 


Battery cables 


Motor cables 

Press button 


LED 


Not used 


Sensorport or Fan 


Master cable with throttle function 


Battery cables 


Press button 

LED red/green 


The green color can look a little bit 
yellow through the red heat shrink. 


Slave cable polarity 

backside 

(polarity of the Slave cable is shown on the housing) 

Содержание KOLIBRI 140 HV-I

Страница 1: ...BRI 140 LV I Telemetrie integriert Telemetry integrated Bedienungsanleitung Operation Manual Stand Juni 2020 Effective June 2020 KONTRONIK eine Marke der SOBEK Drives GmbH KONTRONIK a brand of SOBEK Drives GmbH Am Oberfeld 9 D 72108 Rottenburg am Neckar Tel 07457 9435 0 Fax 07457 9435 90 E Mail info kontronik com ...

Страница 2: ...rt Programmparameter Pitch Blatt Anstellwinkel Rotor Oberseite siehe Abbildung unter Punkt 5 Unterseite siehe Abbildung unter Punkt 5 1 1 Lieferumfang KOLIBRI Regler 1 x BEC Kabel Slave Kabel 1 x Telemetriekabel mit JR Stecker 1 x Telemetriekabel mit mini JST Stecker 1 x Lüfter inkl Schrauben KOLIBRI 140 LV I HV I 1 x Anleitung 2 x Satz Aufkleber 2 Sicherheitshinweise Der KOLIBRI ist ein Produkt d...

Страница 3: ...nftanlauf erhöht der Regler beim Start innerhalb der eingestellten Zeit die Motordrehzahl Die Zeit für das Hochlaufen von 0 auf 100 kann über die Programmiereinheit zwischen 6 s und 60 s eingestellt werden voreingestellt ca 12 s Je höher der festgelegte Prozentsatz des Gaskanals am Sender ist desto höher ist die eingeregelte Drehzahl KONTRONIK empfiehlt für optimales Regel verhalten eine Regleröff...

Страница 4: ...sspannung Die Verwendung des BECs ist bei allen Betriebsspannungen möglich Es zeichnet sich durch eine hohe Störunterdrückung aus BEC Belastbarkeit der KOLIBRI Regler 10 A Dauerstrom 30 A Spitzenstrom BEC Spannung Voreinstellung 5 6 V Auf Wunsch kann die BEC Spannung mittels Programmiereinheit in 0 1 V Schritten von 5 V bis 9 V eingestellt werden Aus Sicherheitsgründen muss entweder ein 2 zelliger...

Страница 5: ...terlegte Prozentzahl für den Flugzustand siehe 3 1 desto höher ist die eingeregelte Drehzahl Wird die Gasvorwahl am Sender auf Motor Aus Stellung zurückgestellt schaltet der Motor aus Die Motor Aus Stellung sollte während des Fluges nicht angewählt werden da zum Wiederanfahren des Motors durch den Sanftanlauf die eingestellte Hochlaufzeit siehe Punkt 3 3 benötigt wird Eine Ausnahme stellt der Modu...

Страница 6: ...nsoranschluss Der Sensoranschluss dient dem Anschluss für die interne Telemetrie bzw externe Module wie das Bluetooth Modul o Ä 6 Inbetriebnahme An den BEC sowie den Akkukabeln sollten verpolungssichere Stecker verwendet werden Nach einer Verpolung muss der Regler eingeschickt werden 6 1 Übersicht und Funktionsumfang der programmierbaren Modi 7 Modusprogrammierung 7 1 Modus 1 APM Reset Die Program...

Страница 7: ...stätigungston 9 Um eine separate Motor Aus Stellung zu pro grammieren den Gashebel in die gewünschte Position bringen z B 50 der KOLIBRI bestätigt mit einem ansteigenden Dreiklang und den Modus mit 2 Einzeltönen Damit sind im KOLIBRI 3 Stellungen programmiert Vollgas z B 100 Motor Aus z B 50 und Bremse automatisch bei Gashebel auf Minimum Sollte die optionale Motor Aus Position nicht gesetzt werde...

Страница 8: ...12 s voreingestellt und kann über die Programmiereinheit von 8 60 s variiert werden Die BEC Spannung ist variabel und kann per Programmiereinheit in 0 1 V Schritten von 5 V bis 9 V eingestellt werden siehe 4 3 Sender für den Heliflug vorbereiten Auf dem Gaskanal können mit einem Flug phasenschalter unterschiedliche Drehzahlen abgerufen werden Abhängig von der Stellung des Schalters können untersch...

Страница 9: ...IBRI die Drehzahl im Schnellanlauf wieder auf die zuvor angewählte Drehzahl hoch Bleibt der Schalter länger als 90 s in der Autorotationsposition wird beim erneuten Hoch fahren der Drehzahl wieder der Sanftanlauf aktiviert 7 5 Modus 6 Vorwärts Rückwärts Der Vorwärts Rückwärts Modus ermöglicht es den Motor im Betrieb vorwärts und rückwärts laufen zu lassen Voreinstellung aus über Programmiereinheit...

Страница 10: ...schiedene Telemetrieprotokolle welche Sie aus der folgenden Tabelle entnehmen können Über Modus 8 kann das gewünschte Protokoll des Empfangssystems gewählt werden Modus 8 gilt für alle drei KOLIBRI Varianten Zu beachten ist dass bei dem KOLIBRI 140 LV I HV I die vordere Buchse verwendet werden muss Verbinden Sie das beiliegende Kabel mit dem Sensorport des Reglers und das gegenüberliegende Ende de...

Страница 11: ...Anzahl der Pieptöne entnehmen Sie bitte der Tabelle 10 Ist Ihr gewünschtes Protokoll erreicht z B 2x Einzeltöne Graupner Gasknüppel wieder auf Motor Aus 0 bringen 11 Der KOLIBRI bestätigt nun das gewählte Protokoll und gibt die dementsprechenden Einzeltöne erneut aus 7 9 Modus 10 BEC Spannung Der KOLIBRI wird serienmäßig mit einer BEC Ausgangsspannung von 5 6 V ausgeliefert Diese kann über die Upd...

Страница 12: ...dates erscheint eine Bestätigung des Updates mit dem Hinweis auf die erfolgreich installierte Softwareversion 11 Nach erfolgreich durchgeführtem Update können sämtliche Verbindungen getrennt werden ACHTUNG Nach dem Update muss am Regler ein Reset durchgeführt werden KONTRONIK Updateeinheit oder Modus 1 Ansonsten scheint der Regler tot Dabei werden sämtlich Voreinstellungen zurückgesetzt alle Progr...

Страница 13: ...Temperatur durch bessere Kühlanbindung verringern 4 Strom oder Spannung des BECs außerhalb des zulässigen Bereichs Servos prüfen 5 Eingestellte Kapazitätsgrenze erreicht 6 Empfängerimpuls ist zu lange ausgeblieben Verbindung zwischen Regler und Empfänger Masterkabel prüfen 7 Stromabbauzeit Limit erreicht Abregelung Regler erneut einschalten 8 PowerVoltageDetector des Prozessors hat angesprochen Re...

Страница 14: ...es gilt insbesondere für Schadenersatzansprüche die durch Ausfall oder Fehlfunktion ausgelöst wurden Für Personenschäden Sachschäden und deren Folgen die aus unserer Lieferung oder Arbeit entstehen können wir außer bei Vorsatz oder grober Fahrlässigkeit unsererseits keine Haftung übernehmen da uns eine Kontrolle der Hand habung und Anwendung nicht möglich ist Jegliche Gewährleistungsansprüche verf...

Страница 15: ...15 ...

Страница 16: ...ivery content 1 x KOLIBRI ESC 1 x BEC cable slave cable 1 x telemetry cable with JR connector 1 x telemetry cable with mini JST 1 x Cooling fan with screws KOLIBRI 140 LV I HV I 1 x Manual 2 x Sticker 2 Safety instructions The KOLIBRI is a product that is designed exclusively for radio controlled model applications Under no circumstances the KOLIBRI should be used in manned applications Always ens...

Страница 17: ...age protection which will automatically set the safe operational parameters for cell count and voltage Depending on the mode in use the motor speed will decrease lower head speed in helicopters or shut off when the adjusted battery discharge voltage is reached The time for slow down shut off in heli mode is fixed at approximately 60 s The low voltage protection is adjustable via the programming un...

Страница 18: ... LiFePo battery adjusted BEC voltage 6 6 V 7 V or a 2 cell LiPo battery adjusted BEC voltage 8 V or a 4 cell NiCd battery adjusted BEC voltage 5 6 V in parallel to the receiver ATTENTION please ensure the servos and receiver are compatible with the requested voltage Operation without BEC When operating without BEC the red receiver lead is to be disconnected or removed 4 4 Active freewheeling circu...

Страница 19: ...t any point in flight please note that soft start will engage unless you are in Mode 4 and have Autorotation enabled If Autorotation Bailout is enabled initial spool up speed is bypassed when disengaging throttle hold and reengaging a standard flight mode see 3 3 for Autorotation Bail out 4 10 Autorotation Bail out Due to the autorotation quick start function motor RPM returns to normal much faste...

Страница 20: ...or ports The sensor ports are to be used with the external module the Bluetooth module or for the telemetry cable 6 Getting started Always use polarized connectors for the battery cables Connecting the battery with reverse polarity will destroy the ESC 6 1 Table of function range for the programmable modes 7 Mode programming 7 1 Mode 1 APM Reset When programming the APM mode all previously made se...

Страница 21: ...single tones for the recognized number of battery cells see 4 1 6 After hearing the cell count push the button on the KOLIBRI on the shrinking tube versions you can find the button on the back near to the sensor slot then you will hear three descending tones and the mode 7 KOLIBRI starts monitoring the modes for each mode there is the equal number of single beeps the LED flashes in correspondence ...

Страница 22: ... demands Using different batteries with equal number of cells leads to steady RPM But Governor Store is not able to compensate for packs with different cell counts So with the governor store function it is not possible e g to program the ESC with 4 cells and then fly with 6 cells When changing the set up battery cell count motor gearing rotor blades etc mode 4 must be reprogrammed when governor st...

Страница 23: ...n accepted Warning after an interrupted autorotation resulting from the fast RPM spool up there are extreme mechanical loads on the heli copter Therefore please tighten the main rotor blades Using mode 4 Prepare the transmitter for flight see 3 5 Due to the auto rotation quick start the motor RPM returns in a much shorter time to normal RPM after an interrupted or unsuccessful autorotation see 4 1...

Страница 24: ...to the receiver s jack that is designated for throttle function Switch on the receiver 3 Connect the motor cables to the motor 4 Connect the main battery to the KOLIBRI 5 Mode LED flashes green You will hear an ascending triad of sounds monitoring the activation Ongoing you will hear single tones for the recognized number of cells see chap 4 1 6 Press the button on the ESC see chap 5 you will hear...

Страница 25: ...eceiver s port that is designated for throttle function Then switch on your transmitter 3 Connect the motor cables to the motor 4 Connect the main battery to the KOLIBRI 5 LED flashes You will hear an ascending triad of sounds monitoring the activation Ongoing you will hear single tones for the recognised number of battery cells see 4 1 6 After hearing the cell count push the button on the KOLIBRI...

Страница 26: ...pdate runs automatically During the update none of these existing connections must be separated 9 When the update is completed successfully a confirmation of the new software version appears on the programming unit s display 10 After a successful update all connections can be disconnected Attention after updating a reset has to be done KONTRONIK Programming unit or Mode 1 Otherwise the ESC looks d...

Страница 27: ...ge not in operation range Please check battery motor 2 Current not in operation range Please check battery motor 3 Overtemperature Please improve cooling 4 Voltage or current of the BEC out of the range Please check your servos 5 Limit of programmed capacity reached 6 No RC Signal Please check the connection between ESC Master Cable and receiver 7 Motor is not able to handle this power Please rest...

Страница 28: ...the unit to our original specifications As we have no control over the installation or use of these products in no case shall our liability exceed the original cost of the product All warranty claims terminate with opening or manipulation of the product To accept guarantee the original bill on which the product the date of purchase and the dealer is named must be sent together with the product app...

Отзывы: