922-20207011/1.0
31
Procedure
1
Observe the environment surrounding the aluminium Flexview installation.
Other devices made out of more noble metals, such as titanium for example, installed
in close proximity may greatly accelerate corrosion of the aluminium housing.
2
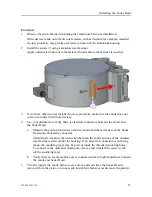
Install the anode (!) using a stainless steel fastener.
Apply underwater lubricant to the fastener threads before the fastener is inserted.
3
If you have other devices installed in close proximity, make sure the anode does not
come into contact with these devices.
4
Use your ohmmeter to verify there is electrical connection between the anode and
the Sonar Head.
a
Measure the connection between the new anode and the metal base of the Sonar
Head power/telemetry connector.
Alternatively, measure the connection between the anode and one of the stainless
steel fasteners screwed into the housing. If an electrical connection is not being
made, the anodizing layer may be present inside the threaded mounting holes.
To connect to the untreated aluminium, remove and reinstall the screw to rub
off the anodizing layer.
b
Verify that you are measuring near zero ohms (and not a high impedance) between
the anode and Sonar Head.
5
Visually inspect the anode before every survey and each time the Sonar Head is
removed from the water, or at one-week intervals (whichever occurs more frequently).
Содержание Flexview
Страница 1: ...Installation Manual Flexview Multibeam Sonar ...
Страница 2: ......
Страница 8: ...6 922 20207011 1 0 Flexview ...
Страница 95: ...922 20207011 1 0 93 Flexview Sonar Head 500 kHz outline dimensions Drawing file ...
Страница 96: ...94 922 20207011 1 0 Flexview Installation Manual ...
Страница 97: ...922 20207011 1 0 95 Drawing file ...
Страница 98: ...96 922 20207011 1 0 Flexview Sonar Head 950 1400 kHz outline dimensions Flexview Installation Manual ...
Страница 99: ...922 20207011 1 0 97 Drawing file ...
Страница 100: ...98 922 20207011 1 0 Flexview Installation Manual ...
Страница 126: ... 2019 Kongsberg Mesotech ...

