background image

A-61676   June  2010

A-1

Appendix A

Specifications

Contents

Specifications ..................................................................................A-1
System requirements ......................................................................A-2
Space requirements ........................................................................A-3

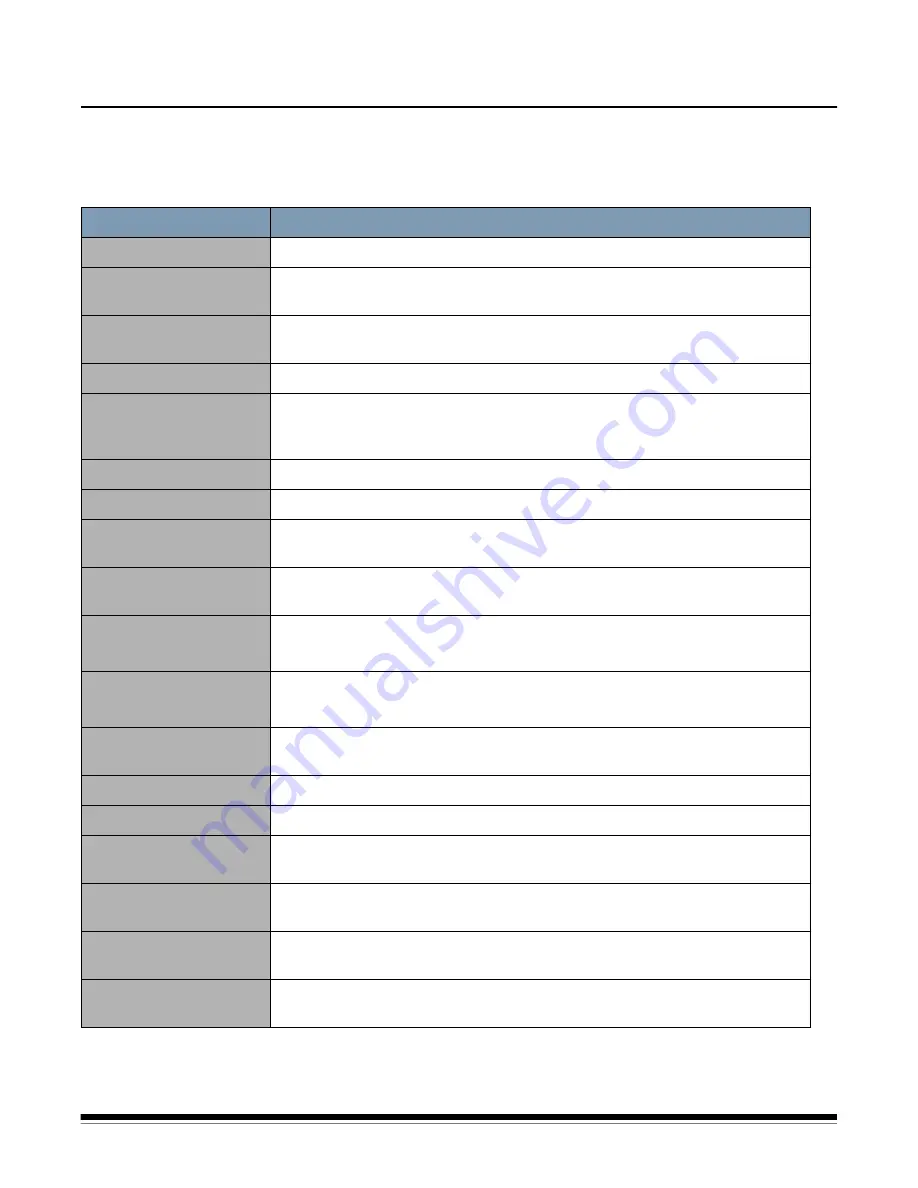
Feature

Specification

Scanning mode

Duplex

Scanning method

CIS (Contact-type color image sensor) Front and Back sides 
Background: Black sensor roller

Scanning speed

Black and White, 200 dpi: Simplex: 43 ppm; Duplex: 76 ipm
Lettersize, Color, 150 dpi: Simplex: 19 ppm; Duplex: 34 ipm

Multifeed detection

Ultrasonic

Resolution

Black and White/Grayscale

: 100 to 600 dpi 

Color (with VRS)

: 100 to 400 dpi

Optical

: 600 dpi

Output options

Black and White, Grayscale (8-bit) and Color (24-bit)

Image enhancement

VRS cropping, deskew, auto brightness, contrast control

Document size

Onionskin paper to card stock: 2.0 x 2.8 in. (50.8 x 70 mm) to 8.5 x 25 in.
(216 x 356 mm)

Paper thickness

Single paper feeding: 2.0 to 5.9 mils (0.05 to 0.15 mm)
Continuous paper feeding: 2.36 to 5.9 mils (0.06 to 0.15 mm)

Paper weight

Single paper feeding: 10.7 to 33.9 lbs. (40 g/m

2

 to 127 g/m

2

)

Continuous paper feeding: 13.3 to 33.9 lbs. (50 to 127 g/m

2

)

Feeder capacity

120 sheets (17-lb./64 g/m

2

) paper

100 sheets (20-lb./75 g/m

2

) paper

Scanner dimensions

14 x 12.5 x 9.25 in. (35.5 x 32 x 24.1 cm)
With tray extended: 14 x 19.75 x 10.6 in. (35.5 x 50 x 27 cm)

Scanner weight

20.1 lbs. (9.1 kg)

Interface

USB 2.0 (cable included)

Power requirements

AC 100-120 V, 50/60 Hz (US model)
AC 220-240 V, 50-60 Hz (EU model)

Power consumption
  Maximum (scanning)

1A 50W (100-120V)
0.5A 50W (200-240V)

  Minimum (standby)

0.3A 17W (100-120V)
0.2A 19W (200-240V)

  Sleep mode

0.1A 3.5W (100-120V)
0.1A 6W (200-240V)

Содержание Sidekick 1400U

Страница 1: ......

Страница 2: ...OVERVIEW 1 1 INSTALLATION 2 1 SCANNING 3 1 MAINTENANCE 4 1 USER UTILITY 5 1 TROUBLESHOOTING 6 1 APPENDICIES A C...

Страница 3: ...in the User s Guide Do not move the scanner with the power cord and interface cable attached This may cause damage to the cord cable Remove the power cord from the wall outlet before moving or relocat...

Страница 4: ...EACH Acoustic emission Maschinenl rminformationsverordnung 3 GSGV Der arbeitsplatzbezogene Emissionswert betr gt 70 dB A Machine Noise Information Ordinance 3 GSGV The operator position noise emission...

Страница 5: ...view at visual display workplaces To avoid incommoding reflections at visual display workplaces this device must not be placed in the direct field of view F r Benutzer in der BRD nur f r Deutschland M...

Страница 6: ...1400u Scanner scans up to 43 pages per minute includes ultrasonic multifeed detection and VRS image enhancement Supporting documentation The User s Guide for the Kodak Sidekick 1400u Scanner and VRS m...

Страница 7: ...Kit Welcome Folio which includes Installation Resource CD which includes the following User Utility ISIS TWAIN Driver VRS Software Kodak SideKick User s Guide languages VRS User Manual and Release No...

Страница 8: ...down in the exit tray Power switch press this button to turn the scanner on or off Business card guides allows you to scan smaller documents such as business cards When scanning lift up the business...

Страница 9: ...1 4 A 61676 June 2010 Rear view AC power input power cord connects the power cord to the scanner USB port connects the USB 2 0 cable to the scanner AC power input Power cord USB port...

Страница 10: ...ect your language and click OK Then click View Manuals Verify the system requirements Refer to Appendix A Specifications Connect the scanner See the next section entitled Making connections Install th...

Страница 11: ...ollow the Windows New Hardware detect wizard NOTE A compatibility message may be displayed Click Continue Anyway 5 Insert the Sidekick Resource Installation CD into the host PC NOTE The drive letter w...

Страница 12: ...cuments 3 3 Stop Start button operation 3 6 Making selections on the Advanced Settings dialog box 3 7 Turning the scanner on 1 Press the power switch 2 After the LED on the scanner is a steady green t...

Страница 13: ...d be placed in the feeder manually one sheet at a time When you scan an irregular or fragile document you should make a copy and then scan the copy Remove the documents from the exit tray after they a...

Страница 14: ...ause a paper jam and damage the scanner 2 Prepare the document set as shown below 3 Carefully align the documents 4 Adjust the document guides on the feeder tray so that they are slightly wider than t...

Страница 15: ...sion tray exit stopper and exit extension tray to accommodate the size of the documents you are scanning When scanning small documents such as business cards raise the business card guides and the bus...

Страница 16: ...per jam or skew 6 Lift the paper feed roller and insert the documents in the direction of the arrow until they stop under the paper feed roller You are now ready to scan Refer to the instructions for...

Страница 17: ...velopes documents with a Post It note attached documents with photographs or any other document that is comprised of two overlapping items When the scanner has been set up for Multifeed Ignore it only...

Страница 18: ...Click the More button to display the Advanced Settings dialog box and make any of the following settings NOTE If your scanning application supports the Advanced Scanner Settings you can configure the...

Страница 19: ...nt of sharpness of an image None no image sharpness will be performed Smooth blurs or softens the image slightly Low performs the lowest amount of sharpness Medium performs medium sharpness High perfo...

Страница 20: ...ns Off if you select this option you will need to load the documents in the scanner and click Start Batch or a button with similar name in the scanning application to start scanning On select On when...

Страница 21: ...ly the recommended cleaning supplies when cleaning the scanner If paper jamming marking or multiple sheet feeding occurs frequently clean the rollers sensors and imaging guides as described in this se...

Страница 22: ...ds Additional roller cleaning pads can be purchased See Supplies and consumables later in this chapter for ordering information NOTE Use the roller cleaning pads immediately after opening the bag Clea...

Страница 23: ...prevent it from rotating then horizontally wipe the roller from side to side Turn the roller as you continue to wipe until the entire roller has been cleaned If black or white lines appear on the sca...

Страница 24: ...remove any dirt from the surfaces of all of the rollers and reflector sheets A Waiting Sensor B Paper Feed Roller C Separation Roller D Free Rollers E Starting Position Sensor F Free Rollers Separatio...

Страница 25: ...upper and lower imaging guide and the sensor rollers with a roller cleaning pad NOTE If the sensor rollers are removed while cleaning reinstall them after cleaning A Front sensor roller B Upper imagi...

Страница 26: ...ies and consumables later in this chapter for more information regarding additional roller modules Replacing the paper feed roller module 1 Turn the scanner off 2 Push the ADF door release button to o...

Страница 27: ...r feed case along the groove of the feed cover to pull the pin out of the slot A Pin B Slot C Paper feed case 6 Install the new paper feed roller module with its gear on the right side 7 Slightly lift...

Страница 28: ...ler into the grooves at each end The white gear should be to the right 9 While holding the paper feed roller in place rotate the green levers up at both ends until they click into place 10 Gently clos...

Страница 29: ...DF door 3 Remove the separation roller cover by putting your finger tips underneath the tabs and lifting out of place 4 Remove the separation roller module 5 Install the new separation roller module b...

Страница 30: ...ack sensor roller the shorter roller Both rollers should be replaced at the same time 1 Turn the scanner off 2 Push the ADF door release button to open the ADF door 3 Front sensor roller Remove the fr...

Страница 31: ...k sensor roller shorter roller gently lift the right spring and insert the back sensor roller in place then lift the left spring and insert the other side of the roller in place The white gear should...

Страница 32: ...and consumables Contact your scanner supplier to order supplies or go to www scannerstore kodak com NOTE Items and catalog numbers are subject to change For the most up to date list of supplies and c...

Страница 33: ...tware installation If the User Utility icon is not on your desktop see the section entitled Installing the software in Chapter 2 Starting the User Utility Click the User Utility icon or click the Star...

Страница 34: ...r selection The wait time can be set from 1 to 60 minutes in 1 minute increments Clean Imprinter if you have the imprinter installed this option is available If the imprinter ink cartridge is clogged...

Страница 35: ...and these lines are not eliminated even after the imaging guides have been cleaned the shading has not been compensated properly Clean the parts again and perform the shading adjustment procedure aga...

Страница 36: ...e the counter displays Clear Counter buttons there are two Clear Counter buttons one to clear the After Clean Roller display and one to clear the After Replace Roller display After you clean the rolle...

Страница 37: ...s Operation Setup The User Utility Operation Setup window is displayed 2 Check Load User Utility to task tray to have the User Utility icon loaded to the task tray 3 Select any desired Load on start u...

Страница 38: ...document jams review the Document preparation and guidelines in Chapter 3 for best feeder performance IMPORTANT Only remove jammed documents from the ADF when the ADF door is open Removing documents...

Страница 39: ...B connection Verify that the scanner is connected with a USB 2 0 interface The ADF door does not open when the ADF door release button is pressed The ADF door is not closed properly Push the ADF door...

Страница 40: ...lity for more information The color of the scanned document is very different from the original document Adjust the computer display and monitor settings Dark spots or noise appear on the scanned docu...

Страница 41: ...are dirty Open the ADF and remove the jammed paper See Clearing a document jam earlier in this chapter Clean the rollers See Chapter 4 Maintenance for cleaning procedures U30 Scanner door is open Plea...

Страница 42: ...your problem The scanner model and serial number Computer configuration Software application you are using For updated drivers see www kodak com go scanners LED Status Steady green Ready to scan or s...

Страница 43: ...cument size Onionskin paper to card stock 2 0 x 2 8 in 50 8 x 70 mm to 8 5 x 25 in 216 x 356 mm Paper thickness Single paper feeding 2 0 to 5 9 mils 0 05 to 0 15 mm Continuous paper feeding 2 36 to 5...

Страница 44: ...USB 2 0 standard NOTES Do not connect the scanner to a USB hub There must be 1 GB or more of free space on the hard drive Depending on the computer system and the scanning application or document mana...

Страница 45: ...that are recommended to open and maintain the scanner The recommended clearance of the top and sides of the scanner will ensure that there is proper ventilation and provide the necessary area for sca...

Страница 46: ...ly B 6 Cleaning the print head manually B 6 Removing the ink cartridge B 7 Ink cartridge specifications B 7 Setting up the print string B 8 This appendix provides procedures for installing and using t...

Страница 47: ...e imprinter 1 Turn the scanner off 2 Open the imprinter door 3 Insert the upper pins to the guides by matching the grooves with the guides 4 Insert the lower pins to the guides until they are locked b...

Страница 48: ...A 61676 June 2010 B 3 6 Insert the cables in the clamp 7 Paste the ink cartridge exchange label provided inside the imprinter door 8 Gently close the imprinter door Ink cartridge exchange label...

Страница 49: ...affected Be sure that the storage temperature is between 32 F and 104 F 0 C and 40 C Store the ink cartridge away from direct sunlight Do not clean the ink cartridge with alcohol Do not let the ink c...

Страница 50: ...scan This chart shows the position of the imprint according to the document size selected when adjusting the printer position Move the carriage to align the tab on carriage with one of the marks that...

Страница 51: ...r Utility icon to open the User Utility 2 Click Clean Imprinter This option only improves the print quality This option is only available if the imprinter is installed Cleaning the print head manually...

Страница 52: ...er unit and replacement ink cartridges are available from resellers web merchants and from the Kodak on line store http scannerstore kodak com See the section entitled Supplies and consumables in Chap...

Страница 53: ...box The Imprinter Setting dialog box will be displayed 2 Click Enable 3 If you want bold type click Bold Font 4 In the Imprinter Text field type in the character string to be printed 5 Type in the pri...

Страница 54: ...ep number of the counter specified by the imprinter string 8 Select the printing orientation from the Orientation drop down list 9 If desired check the Starting Number Automatic Increment checkbox to...

Страница 55: ...lso need shipping tape and scissors Improper repacking of the scanner may cause damage during handling and shipment The scanner should always be handled in the horizontal position 1 Turn the scanner o...

Страница 56: ......

Отзывы: