background image

english 9

Manufacturer:

scheppach
Fabrikation von Holzbearbeitungsmaschinen GmbH
Günzburger Straße 69
D-89335 Ichenhausen

Dear customer,

we wish you a pleasant and successful working experience 
with your new Kity machine.
According to the applicable product liability law the manu-
facturer of this device is not liable for damages which arise 
on or in connection with this device in case of:
•  improper handling,
•  non-compliance with the instructions for use,
•  repairs by third party, non authorized skilled workers,
•  installation and replacement of non-original spare parts,
•  improper use,
• failures of the electrical system due to the non-com-

pliance with the electrical specifications and the 
VDE 0100, DIN 57113 / VDE 0113 regulations

Recommendations:

Read the entire text of the operating instructions prior to 
the assembly and operation of the device.
These operating instructions are intended to make it easier 
for you to get familiar with your device and utilize its in-
tended possibilities of use.
The operating instructions contain important notes on how 
to work safely, properly and economically with your ma-
chine and how to avoid dangers, save repair costs, reduce 
downtime, and increase the reliability and working life of 
the machine.
In addition to the safety regulations contained herein, you 
must in any case comply with the applicable regulations of 
your country with respect to the operation of the machine.
Put the operating instructions in a clear plastic folder to 
protect them from dirt and humidity, and store them near 
the machine. The instructions must be read and carefully 
observed by each operator prior to starting the work. Only 
persons who have been trained in the use of the machine 
and have been informed on the related dangers and risks 
are allowed to use the machine. The required minimum 
age must be met.
In addition to the safety notes contained in the present 
operating instructions and the special regulations of your 
country, the generally recognized technical rules for the 
operation of wood working machines must be observed.

General Notes

•  When you unpack the device, check all parts for possible 

transport damages. In case of complaints the supplier is 
to be informed immediately. Complaints received at a 
later date will not be acknow ledged.

•  Check the delivery for completeness.
•  Read the operating instructions to make yourself famil-

iar with the device prior to using it.

•  Only use original Kity parts for accessories as well as for 

wearing and spare parts. Spare parts are available from 
your specialized dealer.

•  Specify our part numbers as well as the type and year of 

construction of the device in your orders.

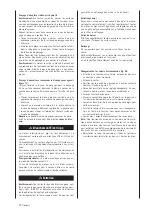
PAB800

Delivery Status

Belt/Disc Sanding machine

Sanding Disc

Disc Guard

Accessory Bag

Operation Manual

Technical Data
Dimensions  

L x W x H mm

475/365/325

ø Disc mm

150

RPM Disc

2850

Belt dimensions 

mm

100 x 914

Belt Speed m/s

7,5

Belt Tilt

0°-90°

Table Size mm

215 x 146

Table Tilt

0°-45°

Gewicht kg

21.9

Drive
Motor V~/Hz

230–240/50

Input P1 W

370

Subject to technical changes!

Noise

Total vibration values determined in accordance with 

EN 61029.

sound pressure level L

pA

85 dB(A)

uncertainty K

pA

3 dB

sound power level L

WA

96 dB(A)

uncertainty K

WA

3 dB

Wear hearing protection.

The effects of noise can cause a loss of hearing. Total 

vibration values (vector sum - three directions) deter-

mined in accordance with EN 61029.

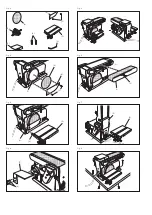
FEATURES

SANDING DISC:

 A round sanding disc located on the side of 

the belt/disc sander.

TRACKING KNOB: 

A tracking knob aids in centering the 

sanding belt.

WORK SUPPORT: 

Supports the workpiece on the sanding 

belt.

WORKTABLE: 

Equipped with a sturdy, worktable that pro-

vides a stable surface when using either the disc sanding 
or the belt sanding feature.

BEVEL GAUGE: 

The worktable comes equipped with a bevel 

gauge that indicates the degrees the worktable can be 
tilted up to 45°.

BELT TENSION LEVER: 

The belt tension lever releases the 

belt tension for easy belt replacement.

HORIZONTAL AND VERTICAL POSITION HOLES: 

The horizon-

tal and vertical position holes are used for changing the 
position of the belt from horizontal to vertical.

SANDING BELT: 

The sanding belt can be adjusted from hori-

zontal to vertical providing different positions for sanding 
workpieces of different shapes and sizes.

m


In these operating instructions we have marked the 
places that have to do with your safety with this 
sign.

Содержание 3403301901

Страница 1: ...aschine Original Anleitung 3 8 GB Belt and Disc Sander Translation from the original instruction manual 9 14 FR Ponceuse à Bande et à Disque Traduction des instructions d origine 15 21 Art Nr 3403301901 3403301850 11 2015 PAB800 ...

Страница 2: ...hold til det europæiske direktiv 2012 19 EU em bortskaffelse af elektriske og elektroniske produkter og gældende national lovgivning skal brugt elværktoj indsamles separat og bortskaffes på en måde der skåner miljøet mest muligt SK Kun for EU lande Elværktøj må ikke bortskaffes som allmindeligt affald I henhold til det europæiske direktiv 2012 19 EU em bortskaffelse af elektriske og elektroniske p...

Страница 3: ...Fig 2 Fig 3 Fig 4 Fig 5 Fig 6 Fig 7 Fig 8 Fig 9 A B C D H G E F A B C 1 3 1 2 5 4 D E D 4 5 E G ...

Страница 4: ...Fig 10 Fig 13 Fig 16 1 9 8 8 Fig 11 0 15 45 Fig 14 Fig 17 H max 1 6 mm 7 E W Fig 12 Fig 15 K 1 F ...

Страница 5: ...ectez les DE Schutzbrille tragen GB Wear safety goggles FR Portez des lunettes de protection DE Gehörschutz tragen GB Wear ear muffs FR Porter une protection de l ouïe DE Bei Staubentwicklung Atemschutz tragen GB Wear a breathing mask FR En cas de dégagement de poussière 2 2 DE Achtung Verletzungsgefahr Nicht in die laufende Schleifscheibe greifen GB Important Risk of injury Never reach into the r...

Страница 6: ...llgemeine Hinweise Überprüfen Sie nach dem Auspacken alle Teile auf even tu elle Transportschäden Bei Beanstandungen muss so fort der Zubringer verständigt werden Spätere Reklama tionen werden nicht anerkannt Überprüfen Sie die Sendung auf Vollständigkeit Machen Sie sich vor dem Einsatz anhand der Be die nungs anweisung mit dem Gerät vertraut Verwenden Sie bei Zubehör sowie Verschleiß und Er satzt...

Страница 7: ...ktrowerkzeug nicht zum Brennholzsägen 8 Tragen Sie geeignete Kleidung Tragen Sie keine weite Kleidung oder Schmuck sie könnten von beweglichen Teilen erfasst werden Bei Arbeiten im Freien ist rutschfestes Schuhwerk empfehlenswert Tragen Sie bei langen Haaren ein Haarnetz 9 Benutzen Sie Schutzausrüstung Tragen Sie eine Schutzbrille Verwenden Sie bei stauberzeugenden Arbeiten eine Atemmaske 10 Schli...

Страница 8: ... Produktes füh ren Verwenden Sie immer Schutzbrillen Diese Maschine ist nur für Innenarbeiten zu verwenden WICHTIG Montieren und verwenden Sie die Maschine nur auf einer horizontalen Fläche Die Montage an nicht horizontaler Fläche kann zu einer Beschädigung des Mo tors führen Falls eine Tendenz besteht daß die Maschine während des Betriebes insbesondere beim Schleifen von langen oder schweren Werk...

Страница 9: ...n Ziehen Sie den Band Spannhebel 3 zu sich um die Spannung zu lösen Stülpen Sie das Schleifband über die Antriebs und die Mitnahmewelle Die Richtungspfeile müssen gegen den Uhrzeigersinn zeigen Nun muss das Schleifband gerade ausgerichtet auf beiden Wellen liegen Schieben Sie den Band Spannhebel 3 nun wieder in die Ausgangsposition zurück um das Schleifband zu spannen Vorsicht Der Band Spannhebel ...

Страница 10: ...n voll einsetzbar Lösen Sie mit dem mitgelieferten Inbusschlüssel die Schrauben 8 im Antriebsgehäuse Heben Sie das Schleifband in die vertikale Position Mit der Vertikal Stellschraube 9 kann diese Position fein justiert werden Ziehen Sie die Schrauben 8 im Antriebsgehäuse ab schließend fest Hinweis Schleifen Sie lange Werkstücke in der verti kalen Position indem Sie das Werkstück gleichmäßig über ...

Страница 11: ...hine Allgemeine Wartungshinweise Nach jedem Einsatz muss die Schleifmaschine sorgfältig gereinigt werden Alle beweglichen Teile regelmäßig ölen Lassen Sie den Arbeitstisch mit einer dünnen Schicht au tomotive type paste wax ein dadurch erleichtern Sie sich das Reinigen des Arbeitstisches Reinigung Im Band und Tellerschleifer kann sich Staub sammeln Sehen Sie regelmäßig nach am besten nach jedem Ei...

Страница 12: ...unpack the device check all parts for possible transport damages In case of complaints the supplier is to be informed immediately Complaints received at a later date will not be acknow ledged Check the delivery for completeness Read the operating instructions to make yourself famil iar with the device prior to using it Only use original Kity parts for accessories as well as for wearing and spare p...

Страница 13: ...workpiece Use the clamping devices or a vice to hold the workpiece in place In this manner it is held more securely than with your hand An additional support is necessary for long work pieces table trestle etc in order to prevent the machine from tipping over Always press the workpiece firmly against the working plate and stop in order to prevent bounc ing and twisting of the workpiece 13 Avoid ab...

Страница 14: ...n Switch the machine off and pull the power plug from the socket when fitting or removing accessories Never leave the working area of the sanding machine while the tool is running or as long as it has not come to an absolute standstill m Proper Use The machine meets the currently valid EU machine directive The manufacturer s safety operation and maintenance instructions as well as the technical da...

Страница 15: ...in belt disc sander base and material the belt disc sander is being mounted to If machine bolts are used make sure bolts are long enough to go through holes in belt disc sander the material being mounted to and the lock washers and hex nuts Adjustments WARNING Before performing any adjustment make sure the belt disc sander is unplugged from the power supply and the switch is in the OFF position Fa...

Страница 16: ...ed firmly against the sanding disc moving work evenly on the left side of the sanding disc m Electrical connection The installed electric motor is factory connected ready for operation The connection meets the applicable VDE and DlN regulations The connection made by the customer as well as any exten sion cables used must comply with all relevant regulations Connection and repair work on the elctr...

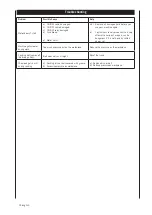
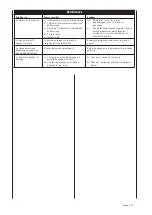
Страница 17: ...rvice centre Every attempt to carry out a repair can be dangerous if it is not done by skilled personnel Machine gets slower during work Too much pressure put on the workpiece Reduce the pressure on the workpiece Sanding belt comes off the drive pulleys Belt does not run straight Reset the track The wood gets burnt during sanding a Sanding disc or belt covered with grease b Excessive pressure on w...

Страница 18: ...e dans une enveloppe plastique pour le protéger contre la saleté et I humidité Chaque personne utilisatrice en pren dra con naissance avant le début de son travail et respec tera scru puleusement les instructions qui y sont données Seules pourront travailler sur la machine les personnes instruites sur son maniement et informées des dangers inhérents à celui ci L âge minimum autorisé doit être res ...

Страница 19: ...de travail 5 Conserver les outils électriques non utilisés en sécu rité Les outils électriques non utilisés doivent être conservés dans un lieu sec en hauteur ou fermé hors de portée des enfants 6 Ne pas forcer l outil électrique Il fonctionne en effet de manière plus satisfaisante et plus sûre dans sa plage de performances 7 Utiliser le bon outil électrique Ne pas utiliser d outils électriques de...

Страница 20: ...x instructions et de l avoir installée Si vous n êtes pas familiarisé avec l utilisation de cette machine demandez des informations complémentaires à votre supérieur hiérarchique ou à une autre personne com pétente Attention Cette machine n est construite que pour le pon çage du bois et de matériaux analogues L utilisation de cette machine pour poncer d autres matériaux peut pro voquer un incendie...

Страница 21: ...onçage avec la plaque d appui appliquez fermement pour l adhésion Positionnez le carter contre le 1 3 inférieur du disque alignez les trous comme l illustre la figure 4 Avec deux vis Phillips fixez solidement le carter en place Installation remplacement de la bande de ponçage Fig 5 Sur la face lisse de la bande de ponçage il y a des flèches directionnelles qui indiquent la direction de mouvement d...

Страница 22: ...age Note Utilisez la vis de réglage située au dessous de la table de travail pour ajuster la distance entre la table et le disque de ponçage Cet interstice devrait toujours être de 1 6 mm Avertissement Avant d utiliser votre ponceuse à bande disque familiarisez vous avec toutes les caractéristiques de fonctionnement et les consignes de sécurité Verrouillage de l interrupteur Fig 13 Mettez l interr...

Страница 23: ...gnes importantes Le moteur électrique est conçu pour le mode de fonctionnement S 1 En cas de surcharge du moteur celui ci s éteint automa tiquement Le moteur peut à nouveau être mis en route après un temps de refroidissement durée variable m Entretien Avertissement Pour éviter le risque de blessure grave veil lez à ce que la ponceuse à bande et à disque soit en posi tion OFF ARRÊT et débranchez la...

Страница 24: ...risque s il n est pas réalisé par un spécialiste qualifié La machine ralentit pendant le travail La pression exercée sur la pièce à travailler est trop importante Exercez une pression moindre sur la pièce à poncer La bande abrasive se décentre par rapport au disque d entraînement Elle ne tourne pas corectement Régler de nouveau le déplacement de la bande abrasive Le bois brûle pendant le ponçage a...

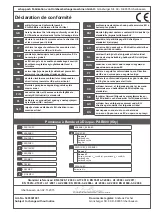
Страница 25: ...tikel voldoet aan de daarop betrekking hebbende EG richtlijnen en normen RUS заявляет о соответствии товара следующим директивам и нормам ЕС PT declara o seguinte conformidade com a Directiva da UE e as normas para o seguinte artigo ES declara la conformidad siguiente según la directiva la UE y las normas para el artículo DK erklærer hermed at følgende produkt er ioverens stemmelse med nedenståend...

Страница 26: ......

Страница 27: ...ste plazo se torne inútil a causa de fallas de material o de fabricación Las piezas que no son fabricadas por nosotros mismos serán garantizadas hasta el punto que nos corresponda garantía del suministrador anterior Los costes por la colocación de piezas nuevas recaen sobre el comprador Están excluidos derechos por modificaciones aminoraciones y otros derechos de indemnización por daños y perjuici...

Отзывы: