background image

6

INSTALLAZIONE - INSTALLAZIONE DEI PIATTI DOCCIA


INSTALLATION - SHOWER TRAY PREPARATION
ΕΓΚΑΤΑΣΤΑΣΉ - ΤΟΠΟΘΕΤΉΣΉ ΝΤΟΥΖΙΕΡΑΣ

3

.1

1. Τοποθετήστε τη ντουζιέρα στο 
σημείο που να συμπίπτει με την 
οπή αποχέτευσης, αφού εγκα-
ταστήσετε την αποχέτευση και 
ελέγξετε ότι εφαρμόζει τέλεια

2. Για τέλεια τοποθέτηση της 
ντουζιέρας τρίψτε με γυαλόχαρ-
το την κάτω επιφάνεια για να 
απόκτηση πόρους έτσι ώστε να 
μπορεί να στερεωθεί πιο εύκολα 
αργότερα

3. Μόλις ετοιμαστεί η βάση, το-
ποθετήστε την αποχέτευση στη 
τελική θέση και συνδέστε το με 
την αποχέτευση του σπιτιού. Σε
αυτό το βήμα είναι πολύ σημα-
ντικό να τηρηθόυν οι οδηγίες 
συναρμολόγησης του κατασκευ-
αστή. Βεβαιωθείτε ότι δεν υπάρ-
χουν διαρροές και ότι όλα έχουν 
εγκατασταθεί σωστά.

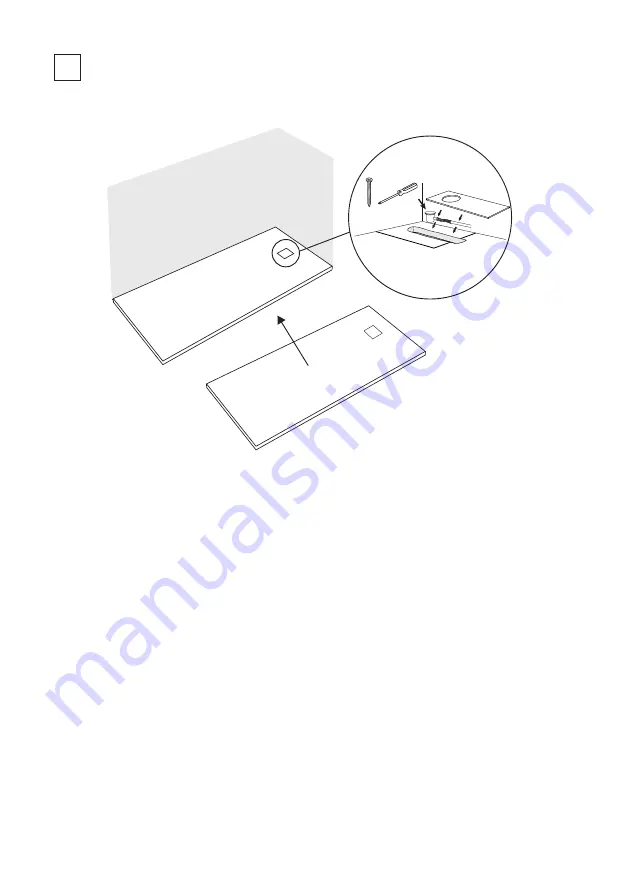
1. Place the shower tray coin-
ciding with the drain hole, after 
installing the drain and checking 
that it fits perfectly

2. For a perfect installation of 
the shower-tray sand the inferi-
or surface for acquiring porosity 
so then it can be hold easier

3. Once we have prepared the 
base, we will place the siphon 
in its definitive position and 
connect it to the “downpipe” of 
the house. To do this, it is very 
important to follow the drain 
assembly instructions provided 
by the manufacturer. It is neces-
sary to check that there are no 
leaks and the elements we have 
placed do not protrude from 
the spaces we have made for 
them, as in this case the shower 
tray would not seat correctly.

1. Posizionare il piatto doccia in 
coincidenza con il foro di scari-
co, dopo aver installato la val-
vola e controllare che si adatti 
perfettamente

2. Per una corretta installazione 
del piatto doccia, carteggiare la
superficie inferiore del piatto 
doccia in modo che acquisti po-
rosità e possa essere fissata più 
facilmente in seguito

3. Una volta preparata la base, 
posizionare lo scarico nella po-
sizione definitiva e connetterlo 
allo scarico della casa. In questo 
passaggio risulta molto impor-
tante attenersi alle istruzioni di 
montaggio per ottenere un cor-
retto passaggio dell’aqua. Accer-
tarsi che non ci siano perdite e 
che tutto sia stato corretamente 
installato.

Содержание PIETRA

Страница 1: ...Manuale di installazione dei piatti doccia Shower tray installation guide PIETRA...

Страница 2: ...wer tray Valvola scarico Drain Griglia Grid Istruzioni Instructions guide Nastro Metrico Measuring Tape Listello Batten Livella Level Measure Matita Pencil Nastro Impermeabile Waterproof Tape Adesivo...

Страница 3: ...shower tray is kept in a horizontal position and on a flat until the moment of installation 3 They are no flaws or anoma lies on its surface NOTE In the event of anomalies or deficien cies DON T INSTA...

Страница 4: ...and the wall 3 Mark the center of the drain on the floor 4 Install the drain valve supplied in accordance with the manu facturer s instructions 1 Misura il centro dello scarico 2 Si devono lasciare g...

Страница 5: ...ciare uno spazio come indicato nella pre installazione per lo scarico For a perfect installation of the shower tray the floor must be PERFECTLY LEVELED and dry The concrete has to be com pletely dry b...

Страница 6: ...no leaks and the elements we have placed do not protrude from the spaces we have made for them as in this case the shower tray would not seat correctly 1 Posizionare il piatto doccia in coincidenza c...

Страница 7: ...is LEVEL 2 Remove the drain valve 3 Fix the shower tray to the base with adhesive 4 Reassemble the drain valve making sure that there are no leaks 1 Controllare che il piatto doc cia scarichi corrett...

Страница 8: ...silicone 3 Allow to dry 24 hours 4 Protect the tray with the packaging cardboard until the entire installation and bathroom works are completed 1 Proteggere il piatto con del nastro e procedere alla s...

Страница 9: ...SI SEALING AND FINISHING DETAIL 5 1 2 3 5 4 6 2 3 4 5 5 1 Pavimento Floor tile 2 Silicone Silicone 3 Piatti doccia Shower tray 4 Nastro impermeabilizzante Waterproof tape 5 Materiale di presa Bonding...

Страница 10: ...e after cleaning with a cloth soft is sufficient Clean with liquid soap and water and soft non abrasive dumps or sponges Rub gently with a circular motion and rinse with plenty of water Never clean wi...

Страница 11: ...sti due materiali varier questa percentuale sar indicata quando il kit viene fornito Repair small scratches or bumps on shower trays If for any reason the surface of the shower tray has deteriorated d...

Страница 12: ...12 GARANZIA WARRANTY PIETRA...

Страница 13: ...rantiamo inoltre all acquirente e all utente i cui dati appaiono nel Documento di Garanzia la riparazione del prodotto se ha subito un guasto a causa di un difetto del materiale o di fabbricazione a c...

Страница 14: ...so di calcare dall eccessiva umidit ambientale Installazione errata non conforme alle norme locali in vigore e al manuale dell installatore fornito con il prodotto Intervento o manipolazione da parte...

Страница 15: ...ained damage due to a defect in material or workmanship provided it is intended for private use and that has been handled properly and in accordance with instructions for assembly connection commissio...

Страница 16: ...stallation not in accordance with local regulations and the manual supplied with the right editor Intervetion or manipulation by unauthorized staff or not covered by The Ofi cial Service even such int...

Страница 17: ...17 23 2003 10 KARAG S A 3rd km N Road Serres Drama P C 621 00 Serres Greece el 30 2321054113 info karag gr...

Страница 18: ...18 12 30...

Страница 19: ...tono e dimensioni richieste Nell installazione pratica si devono seguire le istruzioni di posa fornite da KARAG The content of this catalogue is protected by the Intellectual Property law Royal Decree...

Страница 20: ...41051 Castelnuovo Rangone MO Italy Tel 0039 0595332125 info karag it KARAG SCANDINAVIA AB Industrigatan 14 18 2012 14 Malm Sweden el 46 0 40 549494 info karag se KARAG S A 3rd km N Road Serres Drama...

Отзывы: