background image

Operation 

                              FineLine 200PC User’s Manual 


4-6 


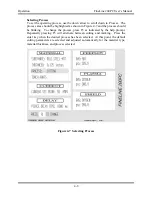
Selecting Material Type


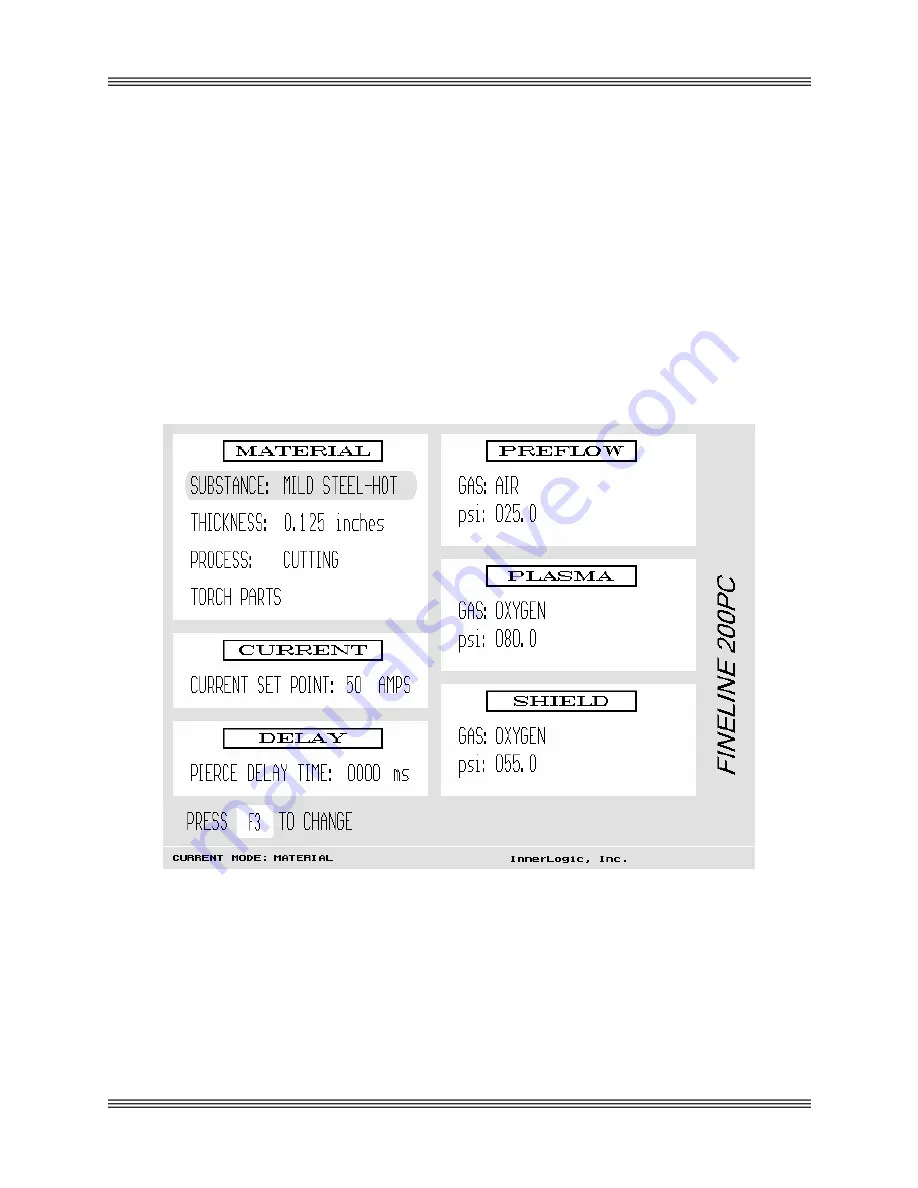
From the status mode, press the down arrow once to scroll down to substance, or 
press Menu, then Material.  The substance area should be highlighted as shown in 
Figure 4-5 and the substance type should be blinking.  To change the substance 
type, press F3 as indicated by the help prompt.  Pressing F3 repeatedly will scroll 
through the list of possible substance choices.  The available substance types are 
as follows: 


Mild Steel - Cold Rolled 


Mild Steel - Hot Rolled 


Stainless Steel 


Aluminum 


Other 


Figure 4-5  Selecting Material Substance


Содержание FineLine 200PC

Страница 1: ...Line 200PC High Density Plasma Cutting System With Automatic Gas Console Revision H 7 12 07 Manual Part Number 718059 455 Fleming Road Charleston SC 29412 USA 800 252 2850 Toll Free 843 795 4286 Phone 843 795 8931 Fax www kaliburn net ...

Страница 2: ...This page intentionally left blank ...

Страница 3: ...urn of the product for repair or replacement of any non conforming product or part at the sole discretion of KALIBURN No freight charges of any kind are covered under this warranty All returned goods shall be at the buyer s risk and expense Beyond this remedy KALIBURN will not be responsible for any special incidental or consequential damages or injury to the person or property of anyone by reason...

Страница 4: ...00PC plasma cutting systems are manufactured to comply with the European standards EN 60974 Arc welding equipment Part 1 Welding power sources and EN 50199 Electromagnetic compatibility EMC Product standard for arc welding equipment Information about the EMC standard EN 50199 can be found in Appendix B ...

Страница 5: ...Airborne Noise Emissions 2 7 Section 3 Installation 3 1 Initial Inspection 3 1 System Interconnection 3 1 Power Supply Installation 3 3 Remote High Frequency Installation 3 3 Torch Installation 3 3 Primary Power Connection 3 3 Power Supply Output Connections 3 5 RHF Console Ground Connection 3 6 Torch Leads to RHF Console Connections 3 8 Torch Connections 3 10 Automatic Gas Console Input Connectio...

Страница 6: ...5 16 Communication Node 5 17 Inova Parameter Transmit 5 18 Viewing Serial Communication 5 19 Configuring the Optional Hydrogen Manifold 5 20 Setting an Arc Off Delay 5 21 Software Updates 5 22 Section 6 Serial Communication 6 1 Initializing the FineLine System 6 1 Transmitting Parameters to the FineLine System 6 1 Communication Error Checking 6 2 Default Cutting Parameters 6 2 Troubleshooting Seri...

Страница 7: ... Supply Microprocessor P C Board 8 22 A C Detect P C Board 8 23 Relay P C Board 8 24 Power Supply I O P C Board 8 25 Automatic Gas Console I O P C Board 8 26 Automatic Gas Console Interface P C Board 8 27 Consumable Spare Parts Kit 8 28 Appendix A Propylene Glycol MSDS A 1 Appendix B Electromagnetic Compatibility EMC B 1 Background B 1 Installation and Use B 1 Assessment of Area B 2 Methods of Red...

Страница 8: ... Altering Gas Pressures 5 4 Figure 5 5 Altering Arc Voltage Control and X Y Machine Parameters 5 5 Figure 5 6 User Created Cutting Conditions 5 6 Figure 5 7 Maintenance Screen 5 7 Figure 5 8 Message Screen 5 8 Figure 5 9 Cut Errors Screen 5 9 Figure 5 10 Error Selection Screen 5 10 Figure 5 11 Actual Cut Errors Screen 5 11 Figure 5 12 Pressure Diagnostics Screen 5 13 Figure 5 13 Default Pierce Del...

Страница 9: ...utting H17 Plasma 8 16 Figure 8 14 Torch Consumables Aluminum Cutting 8 17 Figure 8 15 Torch Consumables Marking 8 18 Figure 8 16 Gas Console Exterior 8 20 Figure 8 17 Gas Console Interior 8 21 Figure 8 18 Power Supply Microprocessor P C Board 8 22 Figure 8 19 A C Detect P C Board 8 23 Figure 8 20 Relay P C Board 8 24 Figure 8 21 Power Supply I O P C Board 8 25 Figure 8 22 Automatic Gas Console I ...

Страница 10: ...This page intentionally left blank ...

Страница 11: ...or a welding helmet with an AWS No 12 shade or ISO 4850 No 13 shade which provides protection up to 400 amperes All exposed skin areas should be covered with flame retardant clothing The cutting area should also be prepared in such a way that ultraviolet light does not reflect Walls and other surfaces should be painted with dark colors to reduce reflected light Protective screens or curtains shoul...

Страница 12: ...the FineLine system if the power cord is damaged in any way Make sure the primary power ground wire is connected to the input power ground stud on the FineLine power supply Make sure the connection is securely tightened Make sure the positive output work ground of the FineLine power supply is connected to a bare metal area on the cutting table A driven ground rod should be placed no further than f...

Страница 13: ... gas cylinders and other compressed gas equipment Observe the following guidelines to protect against explosion Never operate the FineLine system in the presence of explosive gases or other explosive materials Never cut pressurized cylinders or any closed container When using a water table and cutting aluminum under water or with water touching the underside of the aluminum plate hydrogen gas is p...

Страница 14: ...serving maintaining or servicing the FineLine system Observe the following guidelines to minimize exposure to these electric and magnetic fields Stay as far away from the FineLine power supply torch torch leads and remote high frequency console as possible Route the torch leads as close as possible to the work ground cable Never place your body between the torch leads and work ground cable Keep th...

Страница 15: ...fe Practices For Occupation and Educational Eye and Face Protection obtainable from the American National Standards Institute 11 West 42nd Street New York NY 10036 10 ANSI Standard Z88 2 Respiratory Protection obtainable from the American National Standards Institute 11 West 42nd Street New York NY 10036 11 OSHA Standard 29CFR 1910 252 Safety and Health Standards obtainable from the U S Government...

Страница 16: ...rrestors obtainable from the Compressed Gas Association 1725 Jefferson Davis Highway Suite 1004 Arlington VA 22202 18 CSA Standard W117 2 Safety in Welding Cutting and Allied Processes obtainable from Canadian Standards Association 178 Rexdale Boulevard Toronto Ontario M9W lR3 Canada 19 Canadian Electrical Code Part 1 Safety Standard for Electrical Installations obtainable from the Canadian Standa...

Страница 17: ...em via RS 422 serial communication The RS 422 port also allows for full control of the cutting parameters from an x y machine controller The gas console also tracks the number of cuts made with a particular set of consumables and keeps a detailed record of errors that may occur during the cutting sequence To aid in troubleshooting a message screen on the gas console displays all power supply and g...

Страница 18: ...Hose Package Work Ground Lead System Manual Consumable Spare Parts Kit see Section 8 for details Power Supply Specifications Stock Number 208 VAC 3Ø 60Hz 200411 230 460 VAC 3Ø 60Hz 200412 380 VAC 3Ø 50Hz 200415 415 VAC 3Ø 50Hz 200414 575 VAC 3Ø 60Hz 200413 Input Current at Maximum Output 208 VAC 3Ø 60Hz 115 amps 230 460 VAC 3Ø 60Hz 104 52 amps 380 VAC 3Ø 50Hz 63 amps 415 VAC 3Ø 50Hz 58 amps 575 VA...

Страница 19: ...48 in 1219 mm Depth 43 in 1092 mm Weight including AGC 700 lb 317 kg Torch Cooling System Discharge pressure 150 psi 10 2 bar Flow rate 1 gal min 3 8 liters min Coolant fluid Propylene glycol deionized water Coolant tank capacity 3 2 gal 12 liters QUICK DATA Figure 2 1 Power Supply Dimensions 2 3 ...

Страница 20: ... hour Inlet gas pressures Oxygen 120 psi 8 3 bar Nitrogen 120 psi 8 3 bar Air 120 psi 8 3 bar H17 120 psi 8 3 bar Oxygen and nitrogen should be supplied with a purity of at least 99 5 A potential fire hazard exists when cutting with oxygen Flashback arrestors must be supplied to prevent a possible fire from propagating back to the gas supplies Compressed air must be clean dry and oil free and may ...

Страница 21: ... High Frequency Console Specifications Stock Number 205500 Height 5 35 in 136 mm Width 13 5 in 343 mm Depth 10 in 25 mm Weight 22 lb 10 kg Spark gap distance 025 in 635 mm Innerlogic Inc Figure 2 2 Remote High Frequency Console Mounting Dimensions 2 5 ...

Страница 22: ...cations Stock Number Torch main body 277000 Torch handle assembly 820134 Diameter 2 in 50 8 mm Length Torch main body 4 65 in 118 mm Torch main body handle assembly 13 85 in 352 mm Weight including handle and valves 4 lb 1 8 kg Figure 2 3 Torch Dimensions 2 6 ...

Страница 23: ...tion should be used as defined by local or national codes The following chart gives the noise levels generated by the FineLine 200PC when operating at 200 amps 135 arc volts The measurements were made with a sound level meter Distance From Torch A Weighted Sound Pressure Level C Weighted Sound Pressure Level 1 meter horizontal 1 6 meters above the workpiece 110 dB 107 dB The maximum noise level is...

Страница 24: ...This page intentionally left blank ...

Страница 25: ...ur system was damaged during shipment you will have to file a claim with the shipping company Next it will be necessary to contact KALIBURN so replacement parts can be ordered If you need additional assistance please contact KALIBURN System Interconnection The FineLine 200PC system interconnection diagram Figure 3 1 will assist you in identifying cables and hoses upon receipt of your system Electr...

Страница 26: ...Installation FineLine 200PC User s Manual Innerlogic Inc PRECISION ARC VOLTAGE CONTROL Figure 3 1 System Interconnection Diagram 3 2 ...

Страница 27: ... operation of certain control systems The RHF console is usually mounted on the gantry of the cutting machine or on the cutting table See Figure 2 2 for RHF console mounting dimensions Torch Installation The FineLine 200PC torch must be installed on the positioner of an arc voltage control capable of maintaining the cutting arc voltage within 1 arc volt The arc voltage must be adjustable in 1 arc ...

Страница 28: ...ineLine power supply The power cable should have a 600 volt minimum rating and should be sized according to local and national codes Route the power cable through the lower strain relief on the rear of the power supply and connect it to the input terminal block TB5 as shown in Figure 3 2 TB5 is located on the base of the power supply behind the left side cover Be sure to connect the primary ground...

Страница 29: ...erminal on the RHF console printed circuit board Power Supply CTP Sensor Lead 3 1 Route the end of the 14AWG Power Supply CTP Sensor Lead with the ring terminal through the middle strain relief on the rear of the power supply and connect it to the CTP terminal 2 Route the end of the Power Supply CTP Sensor Lead with the fast on terminal through the strain relief on the RHF console and connect it t...

Страница 30: ...ere all subsystems of the machine are grounded This point is then connected to a driven earth ground rod that should be as close as possible to the star ground The ground rod should have no other wires connected to it The ground rod should be at least 3 4 inches in diameter and should be driven into the earth s permanent moisture layer The length of the ground rod varies from installation to insta...

Страница 31: ...Installation FineLine 200PC User s Manual Figure 3 3 Power Supply Output Connections 3 7 ...

Страница 32: ...ad it onto the brass shield connector and tighten firmly The shield connector should ground the braided shield to the case of the RHF console in order to help reduce high frequency noise emission Using an ohmmeter measure for zero ohms between the braided shield and the ground stud located on the outside of the RHF console Torch Electrode Coolant Supply Lead 10 Connect the Torch Electrode Coolant ...

Страница 33: ...Installation FineLine 200PC User s Manual Figure 3 4 Torch Leads to RHF Console Connections 3 9 ...

Страница 34: ...ble attaches at the power supply and P15 attaches to the torch solenoid assembly Torch Handle Installation 1 Route the torch leads through the torch handle Note that the threaded end of the torch handle mates with the torch 2 Route the Shield Gas Hose through the torch handle 3 Route the 15 Torch Plasma Gas Hose through the torch handle Note that the larger fitting on the Torch Plasma Gas Hose mat...

Страница 35: ...Hose 17 Connect the Preflow Gas Hose to the solenoid preflow inlet port as shown Note that the Preflow Gas Hose fitting has left hand threads Plasma Gas Hose 18 Connect the Plasma Gas Hose to the solenoid plasma inlet port as shown Postflow Gas Hose 19 Connect the Postflow Gas Hose to the solenoid postflow inlet port as shown Torch Solenoid Control Cable 20 Connect the Torch Solenoid Control Cable...

Страница 36: ...Installation FineLine 200PC User s Manual Figure 3 5 Torch Connections 3 12 ...

Страница 37: ...t pressurized hoses may cause damage to the system Note When making hose connections only tighten the brass fittings enough to make gas seals The fittings are subject to damage if over tightened Air Inlet 21 Air must be supplied to the unit at all times regardless of the cutting current or material type Oxygen Inlet 22 Oxygen must be supplied to the unit when mild steel is being cut Nitrogen Inlet...

Страница 38: ...25 Connect the Preflow Hose to the preflow outlet as shown Note that the preflow outlet has left hand threads Shield Outlet 26 Connect the Shield Hose to the shield outlet as shown Note that the shield outlet has right hand threads Plasma Outlet 27 Connect the Plasma Hose to the plasma outlet as shown Note that the plasma outlet has right hand threads Postflow Outlet 28 Connect the Postflow Hose t...

Страница 39: ...torch and the workpiece The motion contacts are rated for 6A 125VAC 6A 110VDC 2A 30VDC RS 422 Serial Communication Link An RS 422 serial communication link can be connected between the plug on the rear of the automatic gas console and a CNC machine or automatic height control system All cutting parameters can be controlled via the RS 422 communication link Also cutting information such as pierce h...

Страница 40: ...d for the application 100 propylene glycol can be ordered in one gallon containers PN 500720 Failure to use the proper propylene glycol deionized water solution may result in cooling system and or torch damage The torch coolant should be flushed out of the FineLine system every six months and replaced with new coolant The water filter deionization cartridge should also be changed at the same time ...

Страница 41: ...ank The coolant pump will turn off if the coolant level drops below the minimum level inside the reservoir If this happens add more coolant solution to the reservoir and return to Step 3 6 When the Coolant Flow LED illuminates release the green ON switch The FineLine system should remain energized and continue pumping coolant through the system 7 Locate the small red push button on top of the cool...

Страница 42: ...This page intentionally left blank ...

Страница 43: ...or has been energized and D C current is flowing through the torch Status Indicators RHF Door Indicator Illuminates when the RHF console door is closed securely Remains extinguished when the RHF console door is open Gas Console Indicator Illuminates when the automatic gas console is operational Remains extinguished when there is a problem with the gas system Check the message screen on the automat...

Страница 44: ...ed when the coolant temperature is too hot If the torch coolant indicator goes out leave the unit energized until it illuminates Automatic Gas Console Display Shows all of the power supply and gas console settings errors and sequencing Automatic Gas Console Keypad Operator interface to automatic gas console QUICK DATA Figure 4 1 Front Panel Controls 6 7 ...

Страница 45: ...ey again will clear the icon and return to the previous mode Pressing a split level key while the menu icon is visible will enter the specified mode The following is a list and description of menu key functions Menu Material Enters the material editing mode Menu Current Enters the current editing mode Menu Voltage Displays the voltage screen Menu Preflow Gas Enters the preflow gas editing mode Men...

Страница 46: ... maintenance modes The help prompt instructs the user on the use of the Function keys Numerical Keys The Numerical keys are used for entering and editing parameters Automatic Gas Console Help Prompt Help prompts are displayed on the automatic gas console screen to assist the user Different screens may have more than one help prompt but the help prompts will always appear near the bottom of the scr...

Страница 47: ...pper right hand corner of the screen as shown To return to the status mode from another mode press the Menu key then the Status key The status screen also displays the Please Wait icon while the gas pressures are being adjusted or when an error occurs with the gas system Figure 4 4 Status Screen Setting up a Cut The automatic gas console makes it very simple to set up the machine to make a cut Sel...

Страница 48: ...ld be highlighted as shown in Figure 4 5 and the substance type should be blinking To change the substance type press F3 as indicated by the help prompt Pressing F3 repeatedly will scroll through the list of possible substance choices The available substance types are as follows Mild Steel Cold Rolled Mild Steel Hot Rolled Stainless Steel Aluminum Other Figure 4 5 Selecting Material Substance ...

Страница 49: ...down to Thickness The material thickness should be highlighted as shown in Figure 4 6 and the editing cursor should be blinking Use the numerical keypad to enter the material thickness Use the CLR key to backspace if an error is made Press the enter key when the correct value has been entered Figure 4 6 Setting Material Thickness ...

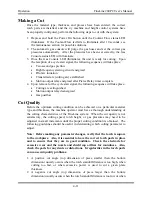
Страница 50: ...d the process should be blinking To change the process press F3 as indicated by the help prompt Repeatedly pressing F3 will alternate between cutting and marking Press the enter key when the desired process has been selected At this point the default cutting parameters are selected and adjusted automatically for the material type material thickness and process selected Figure 4 7 Selecting Process...

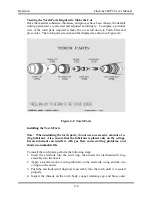
Страница 51: ...en installing the torch parts do not use an excessive amount of o ring lubricant Also ensure that the lubricant is placed only on the o rings Excess lubricant can interfere with gas flow cause starting problems and shorten consumable life To install the torch parts perform the following steps 1 Insert the electrode into the swirl ring then insert the electrode swirl ring assembly into the nozzle 2...

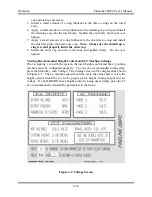
Страница 52: ...he outer cap 8 Install the outer cap onto the torch body and tighten firmly Do not over tighten Viewing Recommended Height Control and X Y Machine Settings Prior to making a cut with the system the torch height control and the x y cutting machine must be configured properly To view the recommended cutting data press the Menu key then Voltage The voltage screen will be displayed as shown in Figure ...

Страница 53: ...hed Motion output relay deenergized Gas postflow Cut Quality Before the optimum cutting condition can be achieved on a particular material type and thickness the machine operator must have a thorough understanding of the cutting characteristics of the FineLine system When the cut quality is not satisfactory the cutting speed torch height or gas pressures may need to be adjusted in small increments...

Страница 54: ...that the torch standoff distance is too high or the shield gas pressure is too low 7 Note that different material compositions have an effect on dross formation Consumable Life Use the following guidelines to maximize consumable parts life 1 Use the recommended pierce height given in the cutting charts A pierce height that is too low will allow molten metal that is ejected during the piercing proc...

Страница 55: ...g 200 Amps Oxygen Air 4 19 Stainless Steel Cutting 30 Amps Air Air 4 20 Stainless Steel Cutting 50 Amps Air Nitrogen 4 21 Stainless Steel Cutting 70 Amps H17 Nitrogen 4 22 Stainless Steel Cutting 70 Amps Air Nitrogen 4 23 Stainless Steel Cutting 100 Amps H17 Nitrogen 4 24 Stainless Steel Cutting 100 Amps Air Nitrogen 4 25 Stainless Steel Cutting 150 Amps H17 Nitrogen 4 26 Stainless Steel Cutting 1...

Страница 56: ...ce Height Motion Delay Kerf Width ga in psi psi psi psi volts ipm in in msec in 20 036 120 105 080 18 048 121 97 090 062 16 060 125 78 14 075 126 65 065 12 105 127 55 105 110 11 120 129 50 10 135 35 85 6 2 131 40 120 125 100 070 Metric Material Thickness Preflow Air Plasma Oxygen Shield Oxygen Postflow Air Arc Voltage Travel Speed Cutting Height Pierce Height Motion Delay Kerf Width mm psi psi psi...

Страница 57: ...ravel Speed Cutting Height Pierce Height Motion Delay Kerf Width ga in psi psi psi psi volts ipm in in msec in 14 075 200 12 105 190 075 125 106 180 100 10 135 110 170 110 135 100 080 3 16 113 105 145 200 085 1 4 25 74 19 1 117 75 140 165 250 087 Metric Cold Rolled Steel Oxygen Shield Swirl Ring 277140 Material Thickness Preflow Air Plasma Oxygen Shield Oxygen Postflow Air Arc Voltage Travel Speed...

Страница 58: ...Travel Speed Cutting Height Pierce Height Motion Delay Kerf Width in psi psi psi psi volts ipm in in msec in 1 8 35 110 190 3 16 113 130 100 100 100 080 1 4 116 120 110 125 200 3 8 25 80 25 2 122 75 140 150 250 085 Metric Material Thickness Preflow Air Plasma Oxygen Shield Air Postflow Air Arc Voltage Travel Speed Cutting Height Pierce Height Motion Delay Kerf Width mm psi psi psi psi volts mm m m...

Страница 59: ...ight Pierce Height Motion Delay Kerf Width in psi psi psi psi volts ipm in in msec in 1 4 125 150 090 125 150 3 8 100 130 175 200 1 2 130 65 155 400 090 5 8 143 47 600 3 4 25 94 26 0 145 35 185 200 900 095 Metric Material Thickness Preflow Air Plasma Oxygen Shield Air Postflow Air Arc Voltage Travel Speed Cutting Height Pierce Height Motion Delay Kerf Width mm psi psi psi psi volts mm m mm mm msec...

Страница 60: ...Width in psi psi psi psi volts ipm in in msec in 5 8 127 70 275 600 130 3 4 130 55 140 900 135 1 134 40 150 1200 1 25 145 25 200 1 5 20 74 45 0 155 15 225 300 500 140 Edge start or moving pierce recommended Metric Retaining Cap 277151 Material Thickness Preflow Air Plasma Oxygen Shield Air Postflow Air Arc Voltage Travel Speed Cutting Height Pierce Height Motion Delay Kerf Width mm psi psi psi psi...

Страница 61: ...100 130 250 500 152 3 4 140 75 150 700 153 1 147 50 175 300 1000 1 25 155 25 240 350 1400 155 1 5 165 17 300 1 75 175 12 350 158 2 0 20 82 58 0 185 7 500 300 400 160 Edge start or moving pierce recommended Metric Material Thickness Preflow Air Plasma Oxygen Shield Air Postflow Air Arc Voltage Travel Speed Cutting Height Pierce Height Motion Delay Kerf Width mm psi psi psi psi volts mm m mm mm msec...

Страница 62: ...ow Air Arc Voltage Travel Speed Cutting Height Pierce Height Motion Delay Kerf Width ga in psi psi psi psi volts ipm in in msec in 20 036 200 020 18 048 71 165 065 16 060 74 125 035 068 14 075 30 80 30 14 75 90 025 050 100 070 Metric Material Thickness Preflow Air Plasma Air Shield Air Postflow Air Arc Voltage Travel Speed Cutting Height Pierce Height Motion Delay Kerf Width mm psi psi psi psi vol...

Страница 63: ...Height Pierce Height Motion Delay Kerf Width ga in psi psi psi psi volts ipm in in msec in 14 075 87 105 12 105 88 75 11 120 89 65 105 10 135 90 55 035 060 100 3 16 94 50 040 075 200 110 1 4 30 70 40 4 100 40 060 085 300 115 Metric Material Thickness Preflow Air Plasma Air Shield Nitrogen Postflow Air Arc Voltage Travel Speed Cutting Height Pierce Height Motion Delay Kerf Width mm psi psi psi psi ...

Страница 64: ... Preflow Nitrogen Plasma H17 Shield Nitrogen Postflow Nitrogen Arc Voltage Travel Speed Cutting Height Pierce Height Motion Delay Kerf Width in psi psi psi psi volts ipm in in msec in 3 16 35 60 36 13 135 80 100 200 200 090 Metric Material Thickness Preflow Nitrogen Plasma H17 Shield Nitrogen Postflow Nitrogen Arc Voltage Travel Speed Cutting Height Pierce Height Motion Delay Kerf Width mm psi psi...

Страница 65: ...Nitrogen Postflow Air Arc Voltage Travel Speed Cutting Height Pierce Height Motion Delay Kerf Width ga in psi psi psi psi volts ipm in in msec in 10 135 132 120 060 150 3 16 134 100 070 175 200 085 1 4 140 75 090 200 300 3 8 25 80 25 2 148 50 120 225 450 090 Metric Material Thickness Preflow Air Plasma Air Shield Nitrogen Postflow Air Arc Voltage Travel Speed Cutting Height Pierce Height Motion De...

Страница 66: ...itrogen Postflow Nitrogen Arc Voltage Travel Speed Cutting Height Pierce Height Motion Delay Kerf Width in psi psi psi psi volts ipm in in msec in 3 16 138 115 105 200 200 100 1 4 140 100 125 225 300 3 8 28 67 46 13 152 65 180 250 400 105 Metric Material Thickness Preflow Nitrogen Plasma H17 Shield Nitrogen Postflow Nitrogen Arc Voltage Travel Speed Cutting Height Pierce Height Motion Delay Kerf W...

Страница 67: ...a Air Shield Nitrogen Postflow Air Arc Voltage Travel Speed Cutting Height Pierce Height Motion Delay Kerf Width in psi psi psi psi volts ipm in in msec in 1 4 141 100 135 200 250 092 3 8 147 80 170 225 350 1 2 25 94 35 0 154 55 210 250 450 095 Metric Material Thickness Preflow Air Plasma Air Shield Nitrogen Postflow Air Arc Voltage Travel Speed Cutting Height Pierce Height Motion Delay Kerf Width...

Страница 68: ...tage Travel Speed Cutting Height Pierce Height Motion Delay Kerf Width in psi psi psi psi volts ipm in in msec in 1 4 165 95 250 250 400 3 8 75 150 500 135 1 2 60 165 275 600 5 8 155 50 185 800 140 3 4 25 81 75 13 165 40 250 300 1000 145 Metric Material Thickness Preflow Nitrogen Plasma H17 Shield Nitrogen Postflow Nitrogen Arc Voltage Travel Speed Cutting Height Pierce Height Motion Delay Kerf Wi...

Страница 69: ...ting Height Pierce Height Motion Delay Kerf Width in psi psi psi psi volts ipm in in msec in 1 4 145 150 160 225 400 3 8 150 115 180 500 125 1 2 155 85 210 275 600 5 8 160 60 220 800 130 3 4 25 75 70 0 168 45 240 300 1000 135 Metric Material Thickness Preflow Air Plasma Air Shield Nitrogen Postflow Air Arc Voltage Travel Speed Cutting Height Pierce Height Motion Delay Kerf Width mm psi psi psi psi...

Страница 70: ...Height Pierce Height Motion Delay Kerf Width in psi psi psi psi volts ipm in in msec in 3 8 156 80 195 250 300 1 2 148 75 130 500 150 5 8 155 60 190 275 700 3 4 160 50 200 300 900 155 1 0 37 68 85 13 170 35 240 325 1300 160 Metric Material Thickness Preflow Nitrogen Plasma H17 Shield Nitrogen Postflow Nitrogen Arc Voltage Travel Speed Cutting Height Pierce Height Motion Delay Kerf Width mm psi psi...

Страница 71: ... 1 4 130 200 200 200 3 8 133 150 070 225 150 1 2 140 110 115 250 300 152 5 8 146 75 150 600 3 4 153 60 190 300 800 155 1 0 158 40 210 1200 160 1 25 170 20 250 165 1 5 20 82 58 0 180 10 275 325 300 175 Edge start or moving pierce recommended Metric Material Thickness Preflow Air Plasma Air Shield Nitrogen Postflow Air Arc Voltage Travel Speed Cutting Height Pierce Height Motion Delay Kerf Width mm ...

Страница 72: ...trogen Postflow Air Arc Voltage Travel Speed Cutting Height Pierce Height Motion Delay Kerf Width in psi psi psi psi volts ipm in in msec in 040 150 065 050 120 075 065 063 30 92 20 2 135 90 030 085 100 070 Metric Material Thickness Preflow Air Plasma Air Shield Nitrogen Postflow Air Arc Voltage Travel Speed Cutting Height Pierce Height Motion Delay Kerf Width mm psi psi psi psi volts mm m mm mm m...

Страница 73: ...Postflow Air Arc Voltage Travel Speed Cutting Height Pierce Height Motion Delay Kerf Width in psi psi psi psi volts ipm in in msec in 050 135 180 050 080 063 138 140 065 082 080 25 74 19 1 143 90 075 100 100 085 Metric Material Thickness Preflow Air Plasma Air Shield Nitrogen Postflow Air Arc Voltage Travel Speed Cutting Height Pierce Height Motion Delay Kerf Width mm psi psi psi psi volts mm m mm...

Страница 74: ... Kerf Width in psi psi psi psi volts ipm in in msec in 080 130 250 050 1 8 135 160 070 100 080 3 16 145 80 100 125 100 1 4 150 50 060 150 200 085 3 8 155 40 075 175 300 1 2 25 80 25 2 162 30 115 200 400 090 Metric Material Thickness Preflow Air Plasma Air Shield Nitrogen Postflow Air Arc Voltage Travel Speed Cutting Height Pierce Height Motion Delay Kerf Width mm psi psi psi psi volts mm m mm mm m...

Страница 75: ...ltage Travel Speed Cutting Height Pierce Height Motion Delay Kerf Width in psi psi psi psi volts ipm in in msec in 1 4 145 105 155 200 200 095 3 8 156 90 180 250 300 098 1 2 25 94 26 0 157 70 195 275 400 100 Metric Material Thickness Preflow Air Plasma Air Shield Nitrogen Postflow Air Arc Voltage Travel Speed Cutting Height Pierce Height Motion Delay Kerf Width mm psi psi psi psi volts mm m mm mm ...

Страница 76: ...ce Height Motion Delay Kerf Width in psi psi psi psi volts ipm in in msec in 1 4 145 145 130 225 400 3 8 155 115 185 500 125 1 2 165 90 230 600 130 5 8 65 275 800 135 3 4 25 75 50 1 170 45 250 325 1000 140 Metric Material Thickness Preflow Air Plasma Air Shield Nitrogen Postflow Air Arc Voltage Travel Speed Cutting Height Pierce Height Motion Delay Kerf Width mm psi psi psi psi volts mm m mm mm ms...

Страница 77: ...m in in msec in 1 4 150 190 135 200 200 3 8 145 140 250 300 150 1 2 155 110 400 5 8 95 135 300 500 155 3 4 160 65 150 600 160 1 0 20 82 58 0 175 35 200 350 400 170 Edge start or moving pierce recommended Metric Material Thickness Preflow Air Plasma Air Shield Nitrogen Postflow Air Arc Voltage Travel Speed Cutting Height Pierce Height Motion Delay Kerf Width mm psi psi psi psi volts mm m mm mm msec...

Страница 78: ...eflow Air Plasma Nitrogen Shield Nitrogen Postflow Air Arc Voltage Travel Speed Cutting Height Pierce Height Motion Delay in psi psi psi psi volts ipm in in msec All Thicknesses 25 25 20 2 120 150 050 050 0 Metric Material Thickness Preflow Air Plasma Nitrogen Shield Nitrogen Postflow Air Arc Voltage Travel Speed Cutting Height Pierce Height Motion Delay mm psi psi psi psi volts mm m mm mm msec Al...

Страница 79: ...Preflow Air Plasma Nitrogen Shield Nitrogen Postflow Air Arc Voltage Travel Speed Cutting Height Pierce Height Motion Delay in psi psi psi psi volts ipm in in msec All Thicknesses 25 25 20 2 125 150 050 050 0 Metric Material Thickness Preflow Air Plasma Nitrogen Shield Nitrogen Postflow Air Arc Voltage Travel Speed Cutting Height Pierce Height Motion Delay mm psi psi psi psi volts mm m mm mm msec ...

Страница 80: ...flow Air Plasma Nitrogen Shield Nitrogen Postflow Air Arc Voltage Travel Speed Cutting Height Pierce Height Motion Delay in psi psi psi psi volts ipm in in msec All Thicknesses 25 25 30 2 120 100 050 050 0 Metric Material Thickness Preflow Air Plasma Nitrogen Shield Nitrogen Postflow Air Arc Voltage Travel Speed Cutting Height Pierce Height Motion Delay mm psi psi psi psi volts mm m mm mm msec All...

Страница 81: ...Current Set Point To alter the current set point from the default setting use the arrow keys to scroll to Current Set Point or press the Menu key then the Current key The current setting should be highlighted as shown in Figure 5 1 and the set point should be blinking Press F3 to scroll through the available current choices The current can only be set to values of 30 50 70 100 or 200 amps while cu...

Страница 82: ...ault Delay parameter see below a default pierce delay time can be automatically retrieved after a material type and thickness are entered or the delay time can be entered manually To alter the pierce delay time use the arrow keys to scroll to Pierce Delay Time The pierce time should be highlighted as shown in Figure 5 2 and the editing cursor should be blinking Use the numerical keypad to enter th...

Страница 83: ...o scroll to the appropriate gas or press the Menu key then the Plasma Gas or Shielding Gas key The appropriate gas selection should be highlighted as shown in Figure 5 3 and the present gas choice should be blinking Press F3 to scroll through the gas choices When the desired gas type is blinking press ENT to accept the gas type The plasma gas can be changed to air oxygen or nitrogen and the shield...

Страница 84: ...he arrow keys to scroll to the appropriate pressure setting The pressure setting should be highlighted as shown in Figure 5 4 and the editing cursor should be blinking Use the numerical keypad to enter the desired operating pressure Use the CLR key to backspace if an error is made Press ENT when the correct value has been entered Note that all of the gases have minimum and maximum limits and canno...

Страница 85: ...meters If the pierce height cutting height arc voltage or x y machine speed must be altered to achieve the desired cut quality switch to the voltage screen use the arrow keys to scroll to the desired parameter and edit the parameter using the keypad Figure 5 5 Altering Arc Voltage Control and X Y Machine Parameters 5 5 ...

Страница 86: ... F3 will cause the save confirmation window to pop up When this occurs press ENT to save the condition or press CLR to cancel the procedure Pressing ENT will save the settings for the particular material being cut and a User icon will appear in the upper right hand corner of the screen The User icon indicates that the parameters for the particular material being cut are not factory defaults but ar...

Страница 87: ...e Menu key then the Maint key The maintenance screen will be displayed as shown in Figure 5 7 From the maintenance screen use the arrow keys to scroll up or down to highlight a selection and press the Ent key to enter the desired maintenance mode The different maintenance modes are described below Figure 5 7 Maintenance Screen 5 7 ...

Страница 88: ... console scroll down to the View Messages selection on the maintenance screen and press ENT The message screen will be displayed as shown in Figure 5 8 The message screen displays all power supply and gas console messages sequencing and errors The message screen should be the initial starting point when troubleshooting the system Figure 5 8 Message Screen 5 8 ...

Страница 89: ...election on the maintenance screen and press ENT The cut errors screen will be displayed as shown in Figure 5 9 The error tracking system keeps a record of the total number of pierces the number of errors and the error percentage Any time the consumables are changed the pierce counter should be reset to zero by pressing CLR When this occurs the data from the present count will move into the first ...

Страница 90: ...o View When the cut errors screen is being displayed press F3 to view the actual cut errors When F3 is pressed the error selection screen is displayed as shown in Figure 5 10 Use the arrow keys to scroll to the error set that is to be viewed and press ENT Figure 5 10 Error Selection Screen 5 10 ...

Страница 91: ... is typically due to a pierce height that is too high Transferred arc lost before upslope This error occurs when the cutting arc transfers to the workpiece but is lost immediately It primarily causes nozzle damage and is typically due to a pierce height that is too high Transferred arc lost during upslope This error occurs when the arc transfers to the workpiece but is lost before steady state ope...

Страница 92: ...e electrode life and is typically due to an incorrect lead out or when cutting a given material thickness with excessive current When cutting small pieces that tend to drop into the table after being cut there should be a very short lead out or none at all On thicker materials the arc is sometimes lost when crossing the kerf during the lead out It is critical that the lead outs be fine tuned so th...

Страница 93: ...T The pressure diagnostics screen will be displayed as shown in Figure 5 12 Pressing the Preflow Gas Plasma Gas and Shielding Gas buttons will toggle the corresponding valves between the off and on states Note that the preflow valve and the plasma valve cannot be on at the same time Also if a particular regulator is adjusting the corresponding valve status will display N A Figure 5 12 Pressure Dia...

Страница 94: ...elay time is automatically retrieved after a material type and thickness are entered Note that when the Default Delay parameter is disabled the present Pierce Delay Time will be used for all cutting conditions Make sure the Pierce Delay Value is set to zero or another chosen value after the Default Delay parameter is disabled To view the status of the Default Delay parameter scroll down to the Def...

Страница 95: ... screen will be automatically displayed on the restore screen Press ENT to restore the factory default setting for the material type and thickness displayed To change the material type press the F3 key To edit the material thickness use the arrow keys to scroll to Thickness and use the numerical keypad to enter the thickness To restore the factory default cutting condition for all user saved files...

Страница 96: ... units or Metric units To change the units of operation scroll down to the Measurement System selection on the maintenance screen and press ENT The measurement system screen will be displayed as shown in Figure 5 15 Press F3 to toggle the measurement system between Imperial and Metric Figure 5 15 Measurement System Selection Screen 5 16 ...

Страница 97: ...or the FineLine system scroll down to the Set Communication Node selection on the maintenance screen and press ENT The communication node selection screen will be displayed as shown in Figure 5 16 Press F3 to scroll through the available node numbers When using an Inova torch height control system with the FineLine the communication node feature must be disabled To disable the communication node p...

Страница 98: ...reen is being displayed will automatically transmit the pierce height cutting height and arc voltage set points to the Inova arc voltage control To view the status of the Inova Parameter Transmit setting scroll down to the Inova Parameter Transmit selection on the maintenance screen and press ENT The Inova parameter transmit screen will be displayed as shown in Figure 5 17 Pressing F3 will toggle ...

Страница 99: ...ntenance screen and press enter The Serial Communication screen will be displayed as shown in Figure 5 18 All incoming and outgoing data is displayed in decimal base 10 format Note that incoming data is appended to show an R before the data and outgoing transmissions are appended to show a T before the data Pressing F3 will toggle the display on and off and pressing CLR will clear the screen Figur...

Страница 100: ...material types and thicknesses To prevent the use of hydrogen the hydrogen manifold must be disabled To disable the hydrogen manifold scroll down to the Configure Hydrogen Manifold selection on the Maintenance Screen and press enter The Configure Hydrogen Manifold screen will be displayed as shown in Figure 5 19 Pressing F3 will toggle the Hydrogen Manifold setting between enabled and disabled Fig...

Страница 101: ... the extinction of the cutting arc after a stop signal is received To program an arc off delay scroll down to the Set Arc Off Delay selection on the Maintenance Screen and press enter The Set Arc Off Delay screen will be displayed as shown in Figure 5 20 Use the keypad to enter the desired delay time in milliseconds The delay can be set from 0 to 2000 mS Figure 5 20 Set Arc Off Delay Screen 5 21 ...

Страница 102: ... power to the system Two Disk Update 1 Remove primary power from the FineLine system 2 Insert the first floppy disk containing the software update into the floppy disk drive 3 Apply primary power to the system and wait until the AGC Updated Successfully message appears 4 Remove the floppy disk from the floppy disk drive 5 Remove primary power from the system wait five seconds then reapply primary ...

Страница 103: ...t and no parity A table can be found in this section that lists the RS 422 commands and their descriptions This table contains the necessary hex strings for sending different commands and parameters to the system For example to switch the material type from mild steel to stainless steel look up the command for setting material type in the table You will see the following table entry Command Hex St...

Страница 104: ...cking With a single torch system all commands and parameters transmitted to the FineLine will be back transmitted in exactly the same form for error checking With a multiple torch system global commands will not be back transmitted Only the system with node focus will back transmit the commands The purpose of the node focus command 254 is to allow one FineLine system to use the transmission lines ...

Страница 105: ...roubleshooting Serial Communication When troubleshooting serial communication with the FineLine system switch to the View Serial Communication Screen to view incoming and outgoing data See Section 5 for information on the Serial Communication Screen 6 3 ...

Страница 106: ...ches x 1000 Valid Range 0 to 2000 Set Operating Current 3 AA nn FA 03 00 0D 01 30 Amps Cutting 02 50 Amps Cutting 03 70 Amps Cutting 04 100 Amps Cutting 06 200 Amps Cutting 07 8 Amps Marking 08 9 Amps Marking 09 10 Amps Marking Set Pierce Delay 4 AA nn FA 04 0D Pierce Delay Time in ms Valid Range 0 to 5000 Set Preflow Pressure 6 AA nn FA 06 0D Preflow psi x 10 Valid Range 0 to 1200 Set Plasma Gas ...

Страница 107: ...he AGC will transmit the most significant word of the electrode part number Torch Electrode Part Number lsw 19 AA nn FA 13 0D If requested in command 30 the AGC will transmit the least significant word of the electrode part number Torch Swirl Ring Part Number msw 20 AA nn FA 14 0D If requested in command 30 the AGC will transmit the most significant word of the swirl ring part number Torch Swirl R...

Страница 108: ...oint 04 Send pierce delay time 05 Send preflow gas type 06 Send preflow pressure 07 Send plasma gas type 08 Send plasma gas pressure 09 Send shield gas type 10 Send shield gas pressure 11 Send recommend arc voltage 12 Send recommended pierce height 13 Send recommended cutting height 15 Send recommended travel speed 16 Send torch body part number msw 17 Send torch body part number lsw 18 Send elect...

Страница 109: ... coolant pump and cooling fans If torch coolant flow switch not satisfied within 8 seconds unit will power down Power Off 39 AA nn FA 27 00 01 0D Deenergizes power supply torch coolant pump and cooling fans Request System Status 40 AA nn FA 28 00 01 0D System status can only be requested after a Power On command 38 is transmitted The status is returned in the following form All bits 0 fault 1 ok L...

Страница 110: ...ill transmit whether the present cutting condition is a factory default setting or a custom user setting Note This is only valid when initially loading material type thickness and process 0 factory 1 custom Configure Hydrogen Manifold 49 AA nn FA 31 00 0D 0 Disable Hydrogen manifold 1 Enable Hydrogen manifold Reload Cutting Condition 50 AA nn FA 32 00 01 0D Reloads the cutting conditions for the p...

Страница 111: ...exchanger at the rear of the unit In an excessively dirty environment blow out the unit on a weekly basis 3 Verify that all torch lead and work ground connections are secure and free from corrosion 4 Verify that the primary three phase A C voltage connections are tight 5 Verify that all p c board connectors are installed securely 6 Verify that the rear panel cable connectors are installed securely...

Страница 112: ...ened Also make sure the torch lead insulating sleeves are positioned to properly cover the brass torch fittings at the rear of the torch 4 Remove the torch consumables from the torch and inspect the o rings on the torch body Replace any o rings with cuts nicks abrasions or any other signs of wear Faulty o rings may cause gas or water leaks which will affect cut quality 5 Wipe any excess o ring lub...

Страница 113: ...olant drains out of the reservoir 6 Remove the torch coolant supply hose from the rear of the power supply Note that the coolant supply hose has right hand threads 7 Blow compressed air 100 psi maximum into the coolant supply hose This will clear the coolant out of the torch torch leads and heat exchanger Note that the coolant will be forced into the reservoir and will drain out of the drain petco...

Страница 114: ... power from the main contactor to one of the 230V connections on each primary winding See Figure 7 1 When the primary voltage of TR1 is changed the control transformer TR2 must also be rewired for the correct service voltage For 230V operation connect the white wire of control transformer TR2 to TB1 13 and the red white wire to TB1 14 460V 60Hz Operation For 460V operation install a 4 AWG jumper w...

Страница 115: ...Maintenance and Troubleshooting FineLine 200PC User s Manual Figure 7 1 230V 60 Hz Transformer Configuration Figure 7 2 460V 60 Hz Transformer Configuration 7 5 ...

Страница 116: ...IN Arc hold input or IHS hold input enabled to keep arc from igniting LED 14 HOLD OUT Hold relay energized used for dual power supply mode LED 15 MAN CONSOLE Not used LED 16 5V uP PWR 5V microprocessor power supply satisfactory LED 17 12V uP PWR 12V microprocessor power supply satisfactory LED 18 ILK PWR 12V interlock power supply satisfactory LED 19 ANALOG PWR 15V analog power satisfactory LED 20...

Страница 117: ...essed LED 26 3 PHASE LED 7 PUMP LED 5 LATCH The following LED s should illuminate in sequence after a start signal is received LED 8 START LED 4 PREFLOW LED 14 HOLD OUT LED 2 CON LED 9 CHOPPER LED 1 PAR LED 10 PAT LED 27 HIGH FREQ LED 11 TAC LED 24 PLASMA LED 12 MOTION After a transferred cutting arc is established the following LED s will go out LED 14 HOLD OUT LED 27 HIGH FREQ LED 4 PREFLOW LED ...

Страница 118: ...ied to the chopper assembly Verify that the primary wall disconnect fuses are good and check the main transformer main contactor and A C Detect p c board for proper operation Coolant Flow LED Extinguishes when there is a problem with the torch coolant system Check the coolant pump fuse F2 and verify that 230VAC is present between TB3 13 and TB3 14 Also check for clogs in the coolant leads and cool...

Страница 119: ...ted to determine which error has occurred The following chart lists the errors and the corresponding number of blinks LED22 Number of Blinks Error 1 No transferred arc TAC established 2 TAC lost before current slope up 3 TAC lost during current slope up 4 TAC lost while cutting 5 TAC lost during current slope down 6 Start signal applied prematurely 7 Start signal removed prematurely 8 Output volta...

Страница 120: ...t will not energize when the ON button is pressed 1 RHF door open 2 Low coolant level 3 Fuse F4 blown 4 Faulty ON switch or associated wiring The ON switch is normally open 5 Faulty OFF switch or associated wiring The OFF switch is normally closed 6 Relay CR1 coil open Power supply will not stay on when the front panel ON button is pressed and released 1 Check the control panel status LED s and tr...

Страница 121: ... power supply The arc will not transfer to the workpiece 1 Loose work ground connection 2 Pierce height too high 3 Incorrect damaged or worn consumables The gas console screen is blank 1 Blown gas console fuse F10 2 Loose cables inside the gas console Remove and reinstall all plugs on the interface p c board computer video board and display 3 Bad power supply inside gas console Check for all volta...

Страница 122: ...d disconnect the black primary wires of the high frequency transformer from the 120 VAC line filter Close the RHF console door to activate the door interlock switch 3 Remove the front and left side panels from the power supply to expose the output terminal block and the microprocessor p c board 4 Remove the Electrode and Nozzle leads from the bottom connections of the output terminal block refer t...

Страница 123: ...ed If 4 VDC is not present replace the chopper If no voltage change occurs check for approximately 4 0 VDC between P26 1 ground and P26 2 signal on the microprocessor p c board If 4 0 VDC is not present check continuity between P26 on the microprocessor p c board and P2 on the chopper p c board If 4 0 VDC is present at the microprocessor p c board replace the microprocessor 11 Turn off primary pow...

Страница 124: ...Maintenance and Troubleshooting FineLine 200PC User s Manual Figure 7 3 Chopper Diagnostics Part 1 7 14 ...

Страница 125: ...Maintenance and Troubleshooting FineLine 200PC User s Manual Figure 7 4 Chopper Diagnostics Part 2 7 15 ...

Страница 126: ...This page intentionally left blank ...

Страница 127: ...main transformer 575 V 60 Hz 3Ø 15 709086 4 TB1 TB4 terminal block marker strip 14 position 16 709007 4 TB1 TB4 terminal block 14 position 17 709058 10 F2 F11 fuse holder 18 709012 1 F10 fuse AGC 3A fuse 19 709011 2 F3 F4 fuse AGC 5A 21 709076 4 F6 F7 F9 F11 fuse AGC 1 2A 22 709033 2 F5 F8 fuse AGC 1A 23 201450 1 Microprocessor p c board assembly 24 709002 3 P8 P12 P13 14 socket receptacle 25 7090...

Страница 128: ...5 3Ø power terminal block 55 702054 1 PAT IGBT filter capacitor 56 277452 1 I O p c board assembly 57 Contact factory 1 Height control voltage divider p c board assembly 58 200361 1 Chopper assembly 59 709117 1 I O terminal block small 61 708106 7 Relay DPDT 62 706036 1 TR8 transformer 241 4 36 63 706041 2 TR4 TR7 transformer 241 3 12 64 706042 1 TR5 transformer 241 4 12 65 706043 1 TR3 transforme...

Страница 129: ...Parts List FineLine 200PC User s Manual Front panel fans not shown item numbers 42 and 82 Figure 8 1 Power Supply Front View 8 3 ...

Страница 130: ...Parts List FineLine 200PC User s Manual Figure 8 2 Power Supply Rear View 8 4 ...

Страница 131: ...Parts List FineLine 200PC User s Manual Figure 8 3 Power Supply Left Side View 8 5 ...

Страница 132: ...Parts List FineLine 200PC User s Manual Figure 8 4 Power Supply Right Side View 8 6 ...

Страница 133: ...acle 6 707001 1 Line filter 7 706019 1 Transformer 5000V 20 mA 8 702069 1 Capacitor 15 kV 9 708057 1 Door interlock switch 10 500014 1 Spark gap assembly 11 740039 3 Spark gap electrode 12 505043 1 High frequency inductor 13 740072 1 Standoff 14 800041 1 Busbar 15 500505 1 RHF console p c board assembly 16 715021 1 Coolant supply fitting right hand 17 500503 1 Cathode manifold 18 205010 1 CTP sens...

Страница 134: ...Parts List FineLine 200PC User s Manual Figure 8 5 Remote High Frequency Console 8 8 ...

Страница 135: ...h valve assembly includes bracket 2 500549 1 Torch valve bracket 3 820134 1 Torch handle 4 277000 1 Torch main body 5 500740 1 Torch solenoid plasma hose 6 820209 1 O ring 7 500024 1 O ring 8 500018 1 O ring Not shown 716008 1 O ring lubricant Not shown 200390 1 Consumable removal tool Figure 8 6 Torch and Torch Valve Assembly 8 9 ...

Страница 136: ...ds Part Number Length 200304 10 10 ft 3 0 m 200304 15 15 ft 4 6 m 200304 20 20 ft 6 1 m 200304 25 25 ft 7 6 m 200304 30 30 ft 9 1 m 200304 35 35 ft 10 7 m 200304 40 40 ft 12 2 m 200304 45 45 ft 13 7 m 200304 50 50 ft 15 2 m Figure 8 7 Shielded Torch Leads 8 10 ...

Страница 137: ... 35 35 ft 10 7 m 200317 40 40 ft 12 2 m 200317 45 45 ft 13 7 m 200317 50 50 ft 15 2 m 200317 55 55 ft 16 8 m 200317 60 60 ft 18 3 m 200317 65 65 ft 19 8 m 200317 70 70 ft 21 3 m 200317 75 75 ft 22 9 m 200317 80 80 ft 24 4 m 200317 85 85 ft 25 9 m 200317 90 90 ft 27 4 m 200317 95 95 ft 29 0 m 200317 100 100 ft 30 5 m Figure 8 8 Gas Hose Package 8 11 ...

Страница 138: ...6 m 200306 30 30 ft 9 1 m 200306 35 35 ft 10 7 m 200306 40 40 ft 12 2 m 200306 45 45 ft 13 7 m 200306 50 50 ft 15 2 m 200306 55 55 ft 16 8 m 200306 60 60 ft 18 3 m 200306 65 65 ft 19 8 m 200306 70 70 ft 21 3 m 200306 75 75 ft 22 9 m 200306 80 80 ft 24 4 m 200306 85 85 ft 25 9 m 200306 90 90 ft 27 4 m 200306 95 95 ft 29 0 m 200306 100 100 ft 30 5 m Figure 8 9 Coolant and Power Leads 8 12 ...

Страница 139: ...30 30 ft 9 1 m 200318 35 35 ft 10 7 m 200318 40 40 ft 12 2 m 200318 45 45 ft 13 7 m 200318 50 50 ft 15 2 m 200318 55 55 ft 16 8 m 200318 60 60 ft 18 3 m 200318 65 65 ft 19 8 m 200318 70 70 ft 21 3 m 200318 75 75 ft 22 9 m 200318 80 80 ft 24 4 m 200318 85 85 ft 25 9 m 200318 90 90 ft 27 4 m 200318 95 95 ft 29 0 m 200318 100 100 ft 30 5 m Figure 8 10 Work Ground Cable 8 13 ...

Страница 140: ...53 277120 277140 277130 277000 30A 277154 277115 277153 277122 277140 277142 277131 277000 50A 277154 277150 277153 277125 277142 277131 277000 70A 277154 277286 277151 277284 277283 277282 277000 100A 277154 277117 277151 277152 277293 277139 277292 277000 150A 277154 277274 277266 277289 277143 277291 277000 200A Figure 8 11 Torch Consumables Mild Steel Cutting 8 14 ...

Страница 141: ...44 277110 277121 277138 277137 277000 30A 277154 277149 277110 277123 277142 277137 277000 50A 277154 277150 277153 277125 277142 277131 277000 70A 277154 277286 277151 277284 277283 277282 277000 100A 277154 277117 277152 277293 277139 277292 277000 150A 277154 277274 277266 277289 277143 277291 277000 200A Figure 8 12 Torch Consumables Stainless Steel Cutting Air Plasma 8 15 ...

Страница 142: ...ap Nozzle Swirl Ring Electrode Torch body 277154 277150 277113 277124 277140 277132 277000 70A 277154 277146 277113 277126 277141 277133 277000 100A 277154 277298 277266 277297 277139 277135 277000 150A 277154 277274 277266 277287 277259 277135 277000 200A Figure 8 13 Torch Consumables Stainless Steel Cutting H17 Plasma 8 16 ...

Страница 143: ...45 277153 277120 277140 277130 277000 30A 277154 277150 277153 277122 277142 277131 277000 50A 277154 277150 277153 277125 277142 277131 277000 70A 277154 277286 277151 277284 277283 277282 277000 100A 277154 277117 277152 277293 277139 277292 277000 150A 277154 277274 277266 277289 277143 277291 277000 200A Figure 8 14 Torch Consumables Aluminum Cutting 8 17 ...

Страница 144: ...Line 200PC User s Manual Torch Consumables Marking Outer Cap Shield Cap Retaining Cap Nozzle Swirl Ring Electrode Torch body 277154 277145 277152 277120 277140 277190 277000 Figure 8 15 Torch Consumables Marking 8 18 ...

Страница 145: ...sk drive cover Not shown 505047 1 Floppy disk drive cable 16 501145 8 Manifold 17 708097 4 Pressure switch 80 200 psi 18 715097 4 Transducer isolator 19 708095 3 Solenoid valve 20 500867 3 Motorized regulator assembly 0 125 psi 22 500060 1 Motorized regulator assembly 0 15 psi 23 709007 1 Terminal block 14 position 24 709009 1 Terminal block marker strip 14 position 25 200082 1 Solenoid valve asse...

Страница 146: ...Parts List FineLine 200PC User s Manual QUICK DATA Figure 8 16 Gas Console Exterior 8 20 ...

Страница 147: ...Parts List FineLine 200PC User s Manual Figure 8 17 Gas Console Interior 8 21 ...

Страница 148: ...Parts List FineLine 200PC User s Manual Power Supply Microprocessor P C Board Assembly 200450 Figure 8 18 Power Supply Microprocessor P C Board 8 22 ...

Страница 149: ...Parts List FineLine 200PC User s Manual A C Detect P C Board Assembly 500810 Figure 8 19 A C Detect P C Board 8 23 ...

Страница 150: ...Parts List FineLine 200PC User s Manual Relay P C Board Assembly 500348 Figure 8 20 Relay P C Board 8 24 ...

Страница 151: ...Parts List FineLine 200PC User s Manual Power Supply I O P C Board Assembly 277452 Figure 8 21 Power Supply I O P C Board 8 25 ...

Страница 152: ...Parts List FineLine 200PC User s Manual Automatic Gas Console I O P C Board Assembly 201080 Figure 8 22 Automatic Gas Console I O P C Board 8 26 ...

Страница 153: ...Parts List FineLine 200PC User s Manual Automatic Gas Console Interface P C Board Assembly 505600 Figure 8 23 Automatic Gas Console Interface P C Board 8 27 ...

Страница 154: ...A Stainless Air 150A Aluminum 277291 3 Electrode 200A Mild Steel 200A Stainless Air 200A Aluminum 277135 2 Electrode 150 200 Stainless H17 277120 5 Nozzle 30A Mild Steel 30A Aluminum 277121 3 Nozzle 30A Stainless Air 277122 5 Nozzle 50A Mild Steel 50A Aluminum 277123 3 Nozzle 50A Stainless Air 277125 5 Nozzle 70A Mild Steel 70A Stainless Air 70A Aluminum 277124 3 Nozzle 70A Stainless H17 277284 5 ...

Страница 155: ... 277298 3 Shield Cap 150A Stainless H17 277274 3 Shield Cap 200A Mild Steel 200A Stainless 200A Aluminum 277138 1 Swirl Ring 30A Stainless Air 277140 1 Swirl Ring 30 50A Mild Steel 70A Stainless H17 30A Aluminum 277142 1 Swirl Ring 50 70A Mild Steel 50 70A Stainless Air 50 70A Aluminum 277283 1 Swirl Ring 100A Mild Steel 100A Stainless Air 100A Aluminum 277141 1 Swirl Ring 100A Stainless H17 27713...

Страница 156: ...r 150A Aluminum 277113 1 Inner Retaining Cap 70 100A Stainless H17 277266 1 Inner Retaining Cap 150A Stainless H17 200A Mild Steel 200A Stainless 200A Aluminum 716012 1 O ring Lubricant 500024 2 Torch O ring blue lower 500018 2 Torch O ring red middle 820209 2 Torch O ring black upper 277056 1 Nozzle Removal Tool 277086 1 Electrode Removal Tool Driver 277087 1 Electrode Removal Tool Socket 260105 ...

Страница 157: ...Propylene Glycol MSDS FineLine 200PC User s Manual Appendix A Propylene Glycol MSDS A 1 ...

Страница 158: ...Propylene Glycol MSDS FineLine 200PC User s Manual A 2 ...

Страница 159: ...Propylene Glycol MSDS FineLine 200PC User s Manual A 3 ...

Страница 160: ...Propylene Glycol MSDS FineLine 200PC User s Manual A 4 ...

Страница 161: ...Propylene Glycol MSDS FineLine 200PC User s Manual A 5 ...

Страница 162: ...Propylene Glycol MSDS FineLine 200PC User s Manual A 6 ...

Страница 163: ...Propylene Glycol MSDS FineLine 200PC User s Manual A 7 ...

Страница 164: ...Propylene Glycol MSDS FineLine 200PC User s Manual A 8 ...

Страница 165: ...nstallation and Use The user is responsible for installing and using the plasma cutting equipment according to the manufacturer s instructions If electromagnetic disturbances are detected then it shall be the responsibility of the user of the plasma cutting equipment to resolve the situation with the technical assistance of the manufacturer In some cases this remedial action may be as simple as ea...

Страница 166: ...ng area may extend beyond the boundaries of the premises Methods of Reducing Emissions Mains Supply Plasma cutting equipment should be connected to the mains supply according to the manufacturer s recommendations If interference occurs it may be necessary to take additional precautions such as filtering of the mains supply Consideration should be given to shielding the supply cable of permanently ...

Страница 167: ...to earth for electrical safety nor connected to earth because of its size and position e g ship s hull or building steelwork a connection bonding the workpiece to earth may reduce emissions in some but not all instances Care should be taken to prevent the earthing of the workpiece increasing the risk of injury to users or damage to other electrical equipment Where necessary the connection of the w...

Страница 168: ...This page intentionally left blank ...

Страница 169: ... is desired When using the manifold H17 17 5 hydrogen 32 5 argon 50 nitrogen must be connected to the inlet port and the plasma outlet hose must be connected to the outlet port The manifold is fully integrated with the operating software of the automatic gas console Specifications Stock Number 200535 Height 5 3 in 135 mm Width 10 1 in 257 mm Depth 9 5 in 241 mm Weight 12 lb 5 4 kg Figure C 1 Hydro...

Страница 170: ...r than 1 2 or the manifold may be damaged Next the RS 422 communication cable must be installed between one of the communication ports on the rear of the automatic gas console and the plug labeled AGC Console on the hydrogen manifold Finally the power cable must be installed between the plug labeled P13 on the rear of the FineLine 200PC power supply and the input power adaptor on the hydrogen mani...

Страница 171: ...Hydrogen Manifold Optional FineLine 200PC User s Manual Figure C 2 Hydrogen Manifold Mounting Location C 3 ...

Страница 172: ... the hose then press enter on the automatic gas console keypad to clear the alert As with other operating conditions ensure that the correct torch parts are installed before continuing with the cut During normal operation the power error LED on the front panel of the hydrogen manifold is constantly illuminated When an error occurs the LED flashes on and off to indicate an error The number of flash...

Страница 173: ...sformer 12V 4 704009 3 LED panel mount 5 707006 1 Input power module 6 709033 1 Fuse 1A 7 708076 1 Pressure gauge 200 psi 8 200503 1 Fan 9 501147 1 Fan guard filter 10 200502 1 Pressure regulator electronic 11 200501 1 Power supply Not Shown 708097 1 Pressure switch 80 200 psi Not Shown 200285 1 Microprocessor p c board Not Shown 200505 1 Communication Cable Not Shown 200504 1 Power Cable C 5 ...

Страница 174: ...Hydrogen Manifold Optional FineLine 200PC User s Manual Hydrogen Manifold Microprocessor P C Board Assembly 200285 Figure C 3 Hydrogen Manifold Microprocessor P C Board C 6 ...

Страница 175: ...the last on a string of nodes SW1 1 and SW1 2 should be switched off in all other manifolds on the network Dip Switch 3 SW3 Pressure Diagnostics SW3 1 energizes the pressure control valve and sets the output pressure to 65 psi This is a diagnostic mode only SW3 2 energizes the pressure control valve and sets the output pressure to 115 psi This is a diagnostic mode only C 7 ...

Отзывы: