↻
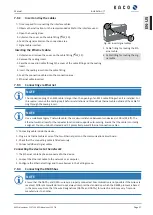
The device has been installed on the mount.
1. Strip the insulation from the equipotential bonding cable.
2. Furnish the stripped cable with an M8 ring cable lug.
3. Lay the cable for equipotential bonding onto the grounding point and attach
with an additional M8 nut and lock washer [ W_17/ 88.50 In-Ibs ].
4. Check that the connected cable is fitted securely.
ð
The housing is included in the equipotential bonding.
1
Fig. 34:
Additional earthing point
1 Earthing bolt
7.9
Connecting the interfaces
7.9.1
Overview
DANGER
Risk of fatal injury due to electric shock!
Severe injuries or death may result from improper use of the interface connections and failure to observe pro-
tection class III.
1. The SELV circuits (SELV: safety extra low voltage) can only be connected to other SELV circuits with protec-
tion class III.
CAUTION
Damage to the device from electrostatic discharge
Components inside the unit can be damaged beyond repair by static discharge.
1. Observe the ESD protective measures.
2. Earth yourself before touching a component by touching a grounded object.
All interfaces are located on the communication circuit board (HMI board) inside the housing.
USB
RS485
INV
OFF
ERR
B
A
GND
B
A
GND
PID 24V
B
A
GND
GND
-+
-
+
2x RJ 45
SD Card
-+
1x RJ 45
+
2
1
3
4
6
5
7
8
9
10
11
INV
OFF
RS485
2xRJ45
6
Fig. 35:
Communication circuit board (HMI board)
1 Communication circuit board
7 INV OFF - connection for remote controls - 24V(+/-
20%) / 1A (at least 15mA)
2 USB socket
8 ERR connection for external grid protection com-
ponents (fault signal relay)
3 SD slot
9 24V 0.5A PID supply (optional)
4 Ethernet for network connection DHCP
10 Ethernet – only for starting up by means of static
IP ( [See section 8.4.2
5 RS485 - default
11 RS485 - connection for string combiner (CON 200)
6 DIP switch - activate terminator (2x)
7 | Installation
Manual
KACO blueplanet 110 TL3 KACO blueplanet 125 TL3
Page 30
EN-US


