background image

Filename [DR-M1EK_06Name.fm]

Masterpage:Left+

Page 12

August 29, 2003 6:28 pm

INDEX (cont.)

12

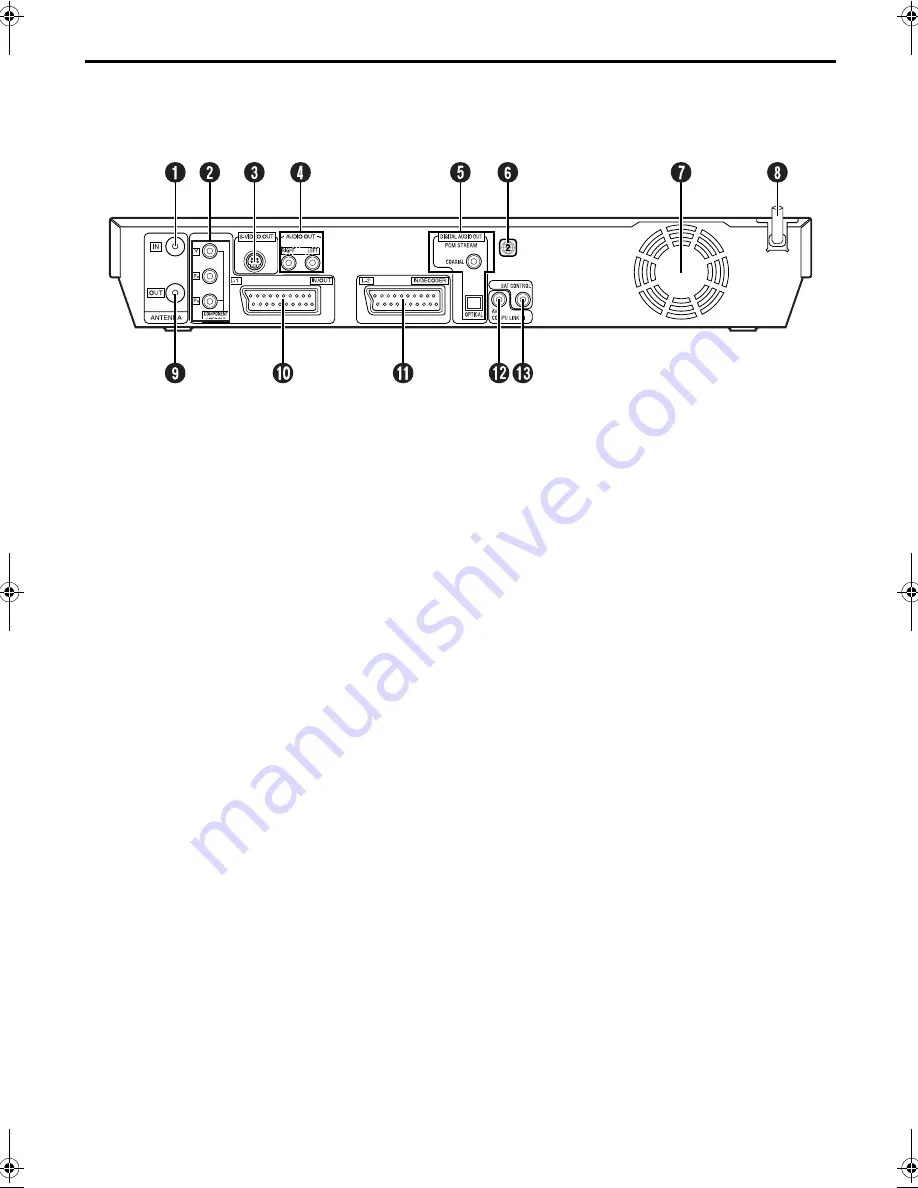
REAR VIEW

A

Antenna Input Connector (ANTENNA IN) 

pg. 18

B

Component Video Output Connectors 
(COMPONENT VIDEO OUT (L-1)) 

pg. 20

C

S-video Output Connector (S-VIDEO OUT) 

pg. 19

D

Audio Output Connectors 
(AUDIO OUT (RIGHT/LEFT)) 

pg. 19

E

Digital Audio Output Connectors 
(DIGITAL AUDIO OUT (COAXIAL/OPTICAL)) 

pg. 86, 91

F

Region Number Label 

pg. 7

G

Cooling Fan

This prevents the temperature from rising inside the unit. 
Do not remove it.

Install the unit so as not to block the area around the fan.

The fan may be activated even if the unit is turned off.

H

Mains Power Cord 

pg. 18

I

Antenna Output Connector (ANTENNA OUT) 

pg. 18

J

L-1 Input/Output Connector (L-1 IN/OUT) 

pg. 18, 83, 84, 90

K

L-2 Input/Decoder Connector 
(L-2 IN/DECODER) 

pg. 28, 83, 90

L

AV COMPU LINK III Connector*

* Not function with this unit.

M

Satellite Control Connector (SAT CONTROL) 

pg. 28

DR-M1EK_06Name.fm  Page 12  Friday, August 29, 2003  6:29 PM

Содержание DR-M1SLB

Страница 1: ...EN DVD VIDEO RECORDER INSTRUCTIONS LPT0827 001B DR M1SLB ...

Страница 2: ...TION A UNIT IS A CLASS 1 LASER PRODUCT HOWEVER THIS UNIT USES A VISIBLE LASER BEAM WHICH COULD CAUSE HAZARDOUS RADIATION EXPOSURE IF DIRECTED BE SURE TO OPERATE THE UNIT CORRECTLY AS INSTRUCTED WHEN THIS UNIT IS PLUGGED INTO THE WALL OUTLET DO NOT PLACE YOUR EYES CLOSE TO THE OPENING OF THE DISC TRAY AND OTHER OPENINGS TO LOOK INTO THE INSIDE OF THIS UNIT USE OF CONTROLS OR ADJUSTMENTS OR PERFORMA...

Страница 3: ...onditions where condensation may occur disconnect the unit s power plug from the wall and keep it disconnected for a few hours to let the moisture dry then turn on the unit The STANDBY ON 1 button does not completely shut off mains power from the unit but switches operating current on and off shows electrical power standby and shows ON ATTENTION To mobile phone users Using a mobile phone in the vi...

Страница 4: ...equipment switched on when it is unattended unless it is specifically stated that it is designed for unattended operation or has a standby mode Switch off using the switch on the equipment and make sure that your family knows how to do this Special arrangements may need to be made for infirm or handicapped people DON T use equipment such as personal stereos or radios so that you are distracted fro...

Страница 5: ...6 VIDEO Plus Timer Programming 56 Manual Timer Programming 58 On Disc Timer Programming 60 Automatic Satellite Programme Recording 65 NAVIGATION 66 Library Database DVD Navi 66 Modify Original Information 69 Modify Play List Information 72 Modify Library Information 76 Playback with MP3 JPEG Navigation 78 EDITING 80 DV Dubbing 80 Edit From A Camcorder 82 Edit To Or From Another Recorder 83 Output ...

Страница 6: ...on a standard DVD player as a DVD VIDEO disc When a DVD RW disc VR mode is finalised 墌 pg 107 it can be played back on a standard DVD player compatible with the VR mode of DVD RW discs Before finalising 墌 pg 107 it is possible to record on unrecorded areas of the disc edit the disc title and programme titles and delete programmes It is impossible to record or edit DVD R RW discs recorded on other ...

Страница 7: ...patible with conventional CD players can be played Unplayable Discs The following types of discs cannot be played using this unit Do not attempt to play back any kind of disc that is damaged cracked warped or repaired with adhesive tape or discs in unusual shapes heart shaped octagonal or other forms If such discs are accidentally played back it may cause noise that can lead to speaker damage CD R...

Страница 8: ...lts in a single title a single chapter However chapter marks are automatically inserted when recording is paused or audio changes from monaural or bilingual to stereo due to commercial breaks etc It is also possible to insert chapter marks at desired locations during playback 墌 pg 34 When you record a programme on a DVD R RW Video mode disc A single recording session results in a single title a si...

Страница 9: ... discs Some files may not be played back depending on the file types and other factors DVD VIDEO Marks Sometimes marks are printed on a DVD disc and or on its packaging to indicate information regarding the contents and functions of the disc Check the marks indicating the contents and functions of the disc Note however that in some cases a disc may not include a mark even for a function it support...

Страница 10: ...t with the label side facing up Care and Handling of Discs How to handle discs When handling a disc do not touch the surface of the disc Since discs are made of plastic they are easily damaged If a disc gets dirty dusty scratched or warped the images and sound will not be picked up correctly and such a disc may cause the unit to malfunction Label side Do not damage the label side stick paper to or...

Страница 11: ...ip Button 6 墌 pg 33 J Stop Button 8 墌 pg 31 53 K Play Button 4 PLAY 墌 pg 31 L Pause Button 9 PAUSE 墌 pg 31 M Record Button 7 REC 墌 pg 53 N Front Display Panel 墌 pg 13 O Video Indicator VIDEO 墌 pg 54 P S video Video Audio Input Connectors S VIDEO VIDEO AUDIO L R 墌 pg 82 Q DV Input connector DV IN i Link 墌 pg 80 i Link refers to the IEEE1394 1995 industry specification and extensions thereof The i l...

Страница 12: ...on Number Label 墌 pg 7 G Cooling Fan This prevents the temperature from rising inside the unit Do not remove it Install the unit so as not to block the area around the fan The fan may be activated even if the unit is turned off H Mains Power Cord 墌 pg 18 I Antenna Output Connector ANTENNA OUT 墌 pg 18 J L 1 Input Output Connector L 1 IN OUT 墌 pg 18 83 84 90 K L 2 Input Decoder Connector L 2 IN DECO...

Страница 13: ...tand by or being executed Lights when On Disc Timer Programming is on stand by or being executed Blinks quickly if you press TIMER in the following cases Disc is not loaded Clock has not been set There is no programme setting D Recording Mode Indicator XP SP LP EP FR 墌 pg 54 Blinks when recording mode is being set While FR is blinking the left 3 digits of the Multi Display L M indicate setting val...

Страница 14: ... A B is played back repeatedly No display Repeat Playback mode is off K Video Output Indicator 墌 pg 108 No display Indicates that interlace mode is engaged Indicates that progressive mode is engaged Example lights when video output mode is in progressive mode L Group Title Number Display 墌 pg 8 46 M Track Chapter Number Display 墌 pg 8 46 N Remaining Time Elapsed Time Indicator 墌 pg 34 54 Lights wh...

Страница 15: ...During Live Memory playback playback operation status is displayed During normal playback the multichannel encoding method is displayed G Chapter Number Displays playback chapter number during playback and recording chapter number during recording H Clock Display I Bar Meter Display 墌 pg 39 Displays playback point and other information in bar meter J Title Name Display Displays title name newly re...

Страница 16: ...k Button MARK 墌 pg 34 Y Play Set Up Button PLAY SET UP 墌 pg 42 Progressive Scan Button PROGRESSIVE SCAN 墌 pg 108 Z Display Button DISPLAY 墌 pg 15 34 39 54 a Menu Button MENU 墌 pg 32 b w e Button 墌 pg 25 40 c Enter Button ENTER 墌 pg 21 d Return Button RETURN 墌 pg 36 56 e Forward Skip Button 6 墌 pg 33 40 Next Button NEXT 墌 pg 36 f Forward Search Button 5 墌 pg 33 40 Forward Slow Button SLOW 墌 pg 33 g...

Страница 17: ...NEW UNIT Check Contents CHECK ALL THE CONTENTS SHOWN BELOW 4 You are now ready to install your unit 墌 pg 18 DVD Video Recorder RF Cable AA Batteries x 2 Infrared Remote Control Unit 21 pin SCART Cable Satellite Controller ...

Страница 18: ...B mode according to the type of your TV s SCART connector For switching the TV s mode refer to the instruction manual of your TV C Connect the unit to mains Connect the AC plug of the mains power cord into a mains outlet LOADING blinks on the front display panel when the AC plug of the mains power cord is connected into a mains outlet and it takes the unit approximately 50 seconds to be turned on ...

Страница 19: ...high quality S VHS pictures With S VIDEO connection you cannot use the Preset Download function 墌 pg 23 If your TV is not stereo capable use the unit s AUDIO OUT connectors to connect to an audio amplifier for Hi Fi stereo sound reproduction For switching the TV s video input mode refer to the instruction manual of your television Back of TV Aerial connector S VIDEO input connector AUDIO input con...

Страница 20: ...ors B Connect the unit to mains Connect the AC plug of the mains power cord into a mains outlet NOTES If your TV is not stereo capable use the unit s AUDIO OUT connectors to connect to an audio amplifier for Hi Fi stereo sound reproduction For switching the TV s video input mode refer to the instruction manual of your television Back of TV Aerial connector Component Video Input connectors AUDIO in...

Страница 21: ...Set Up function After the 1 button on the unit or DVD 1 on the remote control is pressed for the first time to turn on the unit the Auto Set Up function sets the tuner channels clock and Guide Program numbers automatically Before starting make sure of the following The TV aerial cable should be connected to the unit The unit s mains power cord should be connected to a mains outlet Turn on the TV a...

Страница 22: ...n properly depending on the reception condition ATTENTION Once you have performed Auto Set Up even if the unit s memory backup has expired all the stored stations and their Guide Program numbers remain in the unit s memory and the unit will not perform Auto Set Up again The unit only performs Auto Clock Set when the unit is turned on If you have moved to a different area perform each setting as re...

Страница 23: ... numbers automatically A Turn on the unit On the unit Press 1 on the unit On the remote control Press DVD 1 on the remote control The AUTO SET T V LINK display appears on the TV screen B Perform Preset Download A Press ENTER The AUTO SET T V LINK display appears on the TV screen ATTENTION You can use this function only with a TV offering T V Link etc Be sure to use a fully wired 21 pin SCART cable...

Страница 24: ...anually such as to add or skip channels to change channel positions or to set or change station names see pages 99 103 B Perform Clock Set on page 104 NOTE After making sure the cables are connected properly turn off the unit s power once then turn the unit s power back on again Perform Auto Set Up on page 21 or Preset Download on page 23 again IMPORTANT To check if the Guide Program numbers have ...

Страница 25: ...PS Pan Scan Select this when the aspect ratio of your TV is 4 3 conventional TV While viewing a wide screen picture the black bars do not appear however the left and right edges of the pictures will not be shown on the screen 16 9 AUTO Wide television conversion Select this when the aspect ratio of your TV is 16 9 wide TV 16 9 FIX Wide television conversion Select this when the aspect ratio of you...

Страница 26: ...en C Select the desired language A Press rt to move the arrow to MENU LANGUAGE then press ENTER See Language Code List 墌 pg 27 B Press rt to select your desired language then press ENTER D Complete the setting Press SET UP NOTE When the selected language is not available on the disc the disc s default menu language is played back Turn on the unit Turn on the TV and select the AV mode Slide the TV ...

Страница 27: ...k Indonesian Icelandic Hebrew Japanese Yiddish Javanese Georgian Kazakh Greenlandic Cambodian Kannada Korean KOR Kashmiri Kurdish Kirghiz Latin Lingala Laothian Lithuanian Latvian Lettish Malagasy Maori Macedonian Malayalam Mongolian Moldavian Marathi Malay MAY Maltese Burmese Nauru Nepali Occitan Afan Oromo Oriya Panjabi Polish Pashto Pushto Portuguese Quechua Rhaeto Romance RN RO RU RW SA SD SG ...

Страница 28: ...s transmitter and the satellite receiver s remote sensor is unobstructed B Attach the Satellite Controller Fix securely using the adhesive strip attached on the back of the Satellite Controller C Make connections Be sure to connect the unit s L 2 IN DECODER connector to the satellite receiver s 21 pin SCART connector NOTE When connecting your satellite receiver refer to its instruction manual D Co...

Страница 29: ...n press ENTER If the brand code you entered is invalid the code field will be reset Enter the correct brand code again If the unit is in playback or recording mode you cannot set the brand code E Select the satellite receiver s channel for testing Turn on the unit Turn on the TV and select the AV mode Slide the TV CABLE SAT DVD switch to DVD A Press w e to move the arrow to INITIAL SET UP then pre...

Страница 30: ...h TVs offering T V Link EasyLink Megalogic SMARTLINK Q Link or DATA LOGIC via a fully wired 21 pin SCART cable The degree of compatibility and available functions may differ by system TV Auto Power On The TV will turn on and be set to its AV mode automatically whenever you start playback For details refer to the instruction manual of your TV Unit Auto Standby You can use your TV s remote control t...

Страница 31: ...and select the desired programmes 墌 pg 66 C Pause playback Press 9 To resume normal playback press 4 D Stop playback Press 8 When a recordable disc is played playback stops and a programme received with the unit s tuner resumes on the TV screen When a playback only disc is played playback stops and the still image at the time you press 8 remains on the TV screen Pressing 8 again resumes a programm...

Страница 32: ...screen Press TOP MENU to access the top menu Disc menu Disc menus include playback data angle menu subtitle menu etc specific to each title Press MENU to access the disc menu 1 Access the DVD menu 2 Start playback Press rt w e to select a desired title then press ENTER It may be possible to select the desired item using the number keys depending on the menu display NOTE When X appears on the TV sc...

Страница 33: ...onds for forward high speed search or press and hold 2 for 2 or more seconds for reverse high speed search Releasing the button resumes normal playback Still Picture Frame By Frame Playback 1 Pause during playback Press 9 2 Activate frame by frame playback Press 9 Each press of 9 advances the still picture frame by frame OR Press w e Each press of w e advances reverses the still picture frame by f...

Страница 34: ...ral programme or bilingual programme changes to a stereo programme while recording a mark signal is automatically recorded When a DVD R RW Video mode disc is finalised marked points marked before finalising will be deleted and programmes will be divided automatically into chapters approximately every 5 minutes 墌 pg 107 Finalise a disc Checking the disc remaining time You can change the counter dis...

Страница 35: ...nning of the part where more than one subtitle language are recorded 1 Access Subtitle display 2 Select the subtitle language Press w e to select your desired language To clear the subtitle selection display press ENTER NOTES When X appears on the TV screen no subtitle language is recorded When the subtitle language won t be changed with the procedure above change the subtitle on a disc menu displ...

Страница 36: ...f the operation is different depending on the disc NOTES If you want to playback a PBC compatible Video CD disc without activating the PBC function start playback in stop mode by using the number keys instead of the 4 button to choose the track then press ENTER To activate the PBC function when a PBC compatible Video CD disc is being played back without the PBC function press TOP MENU or press 8 t...

Страница 37: ...y recorded while recording or timer recording another programme but the unit also allows you to play back from the beginning of a programme while continuing to record the same programme Recording playback status display Press DISPLAY The current status is superimposed on the TV screen Playback High speed read out Recording High speed writing High speed spin Image figure of DVD RAM disc Current rec...

Страница 38: ...ramme It is impossible to perform ITR even if you press 7 during Live Memory Playback 墌 pg 54 Instant Timer Recording ITR Press 8 to display the programme being recorded then perform ITR settings Playback may be paused for a moment during Live Memory Playback which does not interfere with recording Live Memory Playback cannot be performed while recording the source from DV input When LIVE CHECK is...

Страница 39: ...ay Live Memory Playback mark Playback title number Disc used Bar meter see below Title name Playback counter Recording title number Recording counter display remaining elapsed time Present time Recording channel Playback mark Recording mode Recording mark Live Check picture Recording mark Station name While stopped During playback While recording Live Memory Playback Live Memory Playback of anothe...

Страница 40: ... of the button during playback advances the playback speed in 5 steps for reverse direction Available only when paused Pressing once reverses playback by 1 16 times the normal speed Each press of the button during reverse 1 16 times slow motion reverses slow motion by 1 16 times 1 4 times and 1 2 times the normal speed 9 Pressing once pauses playback still picture playback Pressing repeatedly adva...

Страница 41: ...tinuing to record or timer record onto a DVD RAM disc 1 Start One Touch Replay function Press Each press skips back for approximately 7 seconds and resumes playback Pressing while paused skips back for approximately 7 seconds and resumes pause To watch a programme previously recorded while recording You can play back a programme you recorded previously while recording 1 Start Live Memory Playback ...

Страница 42: ... Select this for time search function 墌 pg 47 F Select this to switch Simulated Surround Effect function 墌 pg 47 G Select this for Picture Control function 墌 pg 48 H Select this to switch picture source type 墌 pg 48 I Current status area for the selected item J Select this for Programme Playback 墌 pg 45 K Select this for Random Playback 墌 pg 45 L Select this to control the switching interval of th...

Страница 43: ...LAY SET UP The item currently selected is highlighted and pointed by 0 2 Select the menu item Press w e to select then press ENTER The pop up window appears under the selected item 3 Select the option Press rt to select the desired option then press ENTER To clear Play Set Up Menu Press PLAY SET UP NOTE See the corresponding pages for details on each menu item ...

Страница 44: ...peat Playback Press ENTER at the end of the desired part you want to repeat point B The elapsed playing time of the point B appears The selected part of the disc between point A and B is played repeatedly To clear Play Set Up Menu Press PLAY SET UP To cancel A B Repeat Playback Press w e to select then press ENTER NOTES A B Repeat Playback may not work properly depending on the type of disc being ...

Страница 45: ...se number keys 1 9 0 to enter the track numbers If you have specified a wrong selection Press The last selection is erased Or press 8 The whole selection is erased 4 Start playback Press 4 Playback starts in the programmed order When all of the programmed tracks have been played back Programme Playback stops but the programmed information remains To add tracks to the end of the programme perform s...

Страница 46: ...pecify the number of the selected item Press number keys 1 9 0 to enter the desired item number then press ENTER Playback starts from the selected section If you have specified a wrong selection Press or 8 to clear the wrong number then enter the correct one before you press ENTER in this step To clear Play Set Up Menu Press PLAY SET UP NOTES When X is displayed on the TV screen in step 4 the chap...

Страница 47: ...D VIDEO discs do not contain time information and it is not possible to use the Time Search function In such cases X is displayed on the TV screen as well This function is not possible for a Video CD with PBC function Simulated Surround Effect It is possible to get a simulated surround effect from your stereo system You can enjoy the virtual surround sound with your 2 channel stereo system 1 Acces...

Страница 48: ... Access Play Set Up Menu Press PLAY SET UP 2 Select the menu item Press w e to select then press ENTER The pop up window appears under the selected item 3 Select the desired option Press rt to select the desired option then press ENTER NOTE When the progressive mode is set be sure to set L 1 OUTPUT to COMPONENT 墌 pg 84 L 1 Output and L 1 Input Setting L 1 OUTPUT and L 1 INPUT Progressive scan is o...

Страница 49: ...ing Press SET UP twice The normal screen resumes NOTE Remember your password or make a note of it Turn on the unit Turn on the TV and select the AV mode Slide the TV CABLE SAT DVD switch to DVD A Press w e to select UTILITY then press ENTER B Press rt to select PARENTAL LOCK then press ENTER A Press rt repeatedly to select PARENTAL LEVEL then press ENTER B Press rt repeatedly to select the desired...

Страница 50: ...firmation screen appears on the TV screen asking you whether you want Parental Lock to be temporarily released or not A Access the password screen A Place the disc on the disc tray If the disc is rated higher than the selected level the confirmation screen appears B Press w e to select YES then press ENTER If you select NO you cannot play back that disc B Enter your password Press the number keys ...

Страница 51: ...many Djibouti Denmark Dominica Dominican Republic Algeria Ecuador Estonia Egypt Western Sahara Eritrea ES ET FI FJ FK FM FO FR FX GA GB GD GE GF GH GI GL GM GN GP GQ GR GS GT GU GW GY HK HM HN HR HT HU ID IE IL IN IO IQ IR IS IT JM JO JP KE KG KH KI KM KN KP KR KW KY KZ LA LB Spain Ethiopia Finland Fiji Falkland Islands Malvinas Micronesia Federated States of Faroe Islands France France Metropolit...

Страница 52: ...uay Qatar Réunion Romania Russian Federation Rwanda SA SB SC SD SE SG SH SI SJ SK SL SM SN SO SR ST SV SY SZ TC TD TF TG TH TJ TK TM TN TO TP TR TT TV TW TZ UA UG UM US UY UZ VA VC VE VG VI VN VU WF WS YE YT YU ZA ZM ZR ZW Saudi Arabia Solomon Islands Seychelles Sudan Sweden Singapore Saint Helena Slovenia Svalbard and Jan Mayen Slovakia Sierra Leone San Marino Senegal Somalia Suriname Sao Tome an...

Страница 53: ...en you stop recording NOTES It is recommended to format a DVD RAM disc before use if you use the disc on this unit for the first time When using a brand new DVD RW disc format the disc either in VR mode or in Video mode 墌 pg 106 Format a DVD RW disc You can record up to 99 programmes and 999 play lists on each disc Some programmes can only be recorded one time When recording is started an index of...

Страница 54: ...ther Programme While Recording on the Unit While recording is going on you can watch another programme on the TV by using the TV s tuner It is required that the remote control is set to be able to operate the TV in advance 墌 pg 88 TV Multi Brand Remote Control 1 Switch the TV to TV mode During recording press VIDEO to select TV mode Video mode is disengaged and the video indicator on the unit is t...

Страница 55: ...time of FR JUST mode is the same as the recording time of EP mode When timer programming a long programme in FR JUST mode on a disc whose remaining time is short it is recommended checking the disc remaining time in EP mode to see if the remaining time is enough for the programme Even if more than one programme are timer programmed in FR JUST mode only the first one is recorded In order to ensure ...

Страница 56: ...CT CHANNEL YOU WANT TO RECORD appears on the TV screen set Guide Program Numbers 墌 pg 97 manually When PROGRAMME FULL DELETE UNWANTED TIMER PROGRAMME appears on the TV screen you need to cancel some of the reserved programmes 墌 pg 63 D Check the programme data The PlusCode number you entered and the matching timer recording information are displayed on the TV screen Check if they are correct To ca...

Страница 57: ... function prolongs the stop time of the programming When two successive programmes are recorded on a DVD RW disc with VIDEO Plus programming timer recording function the beginning of the second one may be left off the recording VIDEO Plus Timer Programming is not possible on the discs used exclusively for On Disc Timer Programming If the copy limited programme is received during timer recording th...

Страница 58: ...d date The current date appears on the TV screen The date you enter appears in its place E Enter the recording start time Press w e to select START then press rt repeatedly to set the desired start time Each press of rt advances goes back the start time in 1 min increments To advance go back the start time in 30 min increments press and hold rt Before performing Manual Timer Programming Turn on th...

Страница 59: ...T Then press rt to enter the channel position for the satellite broadcast In step H you cannot set VPS PDC to ON C Leave the satellite receiver s power on PDC Recording Now available from some TV stations PDC Programme Delivery Control is a service designed to assure safe accurate timer recording With this system special code signals are transmitted together with the audio video signals These code...

Страница 60: ...n the disc a caution message appears In such a case backup the programmes as required then format the disc before making On Disc Timer Programming 墌 pg 106 Format a disc When On Disc Timer Programming has already been made on the disc Press rt repeatedly to select NEW TIMER PROGRAMME then press ENTER D Enter the recording date Press rt repeatedly to set the desired date The current date appears on...

Страница 61: ...caution message does not appear In such a case recording will be executed in the descending order of the recording start time of the programme On Disc Timer Programming is not possible on a DVD RW disc formatted in video mode 墌 pg 106 Format a DVD RW disc The information of a programme recorded with On Disc Timer Programming is not stored in the library 墌 pg 76 The play list is not created for the...

Страница 62: ...ma every Friday in SP mode Example 2 To record a 15 minute serial drama every morning in XP mode Example 3 To record a 90 minute serial drama every Sunday in SP mode The first programme is overwritten by the third The second programme is overwritten by the forth Overwritten Blank Overwritten 1st 2nd 1st 2nd 3rd 4th 3rd 1st 2nd 3rd 4th 5th 6th 7th 8th Areas treated as blank cannot be played back ev...

Страница 63: ... PROG CHECK To return to the previous screen after you check the programme press PROG CHECK again To cancel the programme Press rt repeatedly to select a programme to be cancelled then press Programme s information on the front display panel You can check the details of the programmes even when the power is turned off It is necessary that the Power Save mode 墌 pg 95 POWER SAVE is disengaged or the...

Страница 64: ...ded correctly If no changes are made for approximately 1 minute the unit will return to the normal screen B Select the desired programme to be cancelled or changed Press rt To cancel the programme Press THE TIMER PROGRAMMING SETTING WAS CANCELLED appears on the TV screen for about 5 seconds then the normal screen resumes To change the programme setting Press ENTER C Change the programme setting Re...

Страница 65: ...ding is in progress turns off the unit s power and disengages the Automatic Satellite Programme Recording mode If there are more than one satellite programmes you wish to record with Automatic Satellite Programme Recording it is not possible to set different recording speeds for each programme Depending on the type of satellite receiver the unit may not record a slight portion of the beginning of ...

Страница 66: ...se DVD Navi screen when you press NAVIGATION You can move the arrow to select the desired position on the screen by pressing rt w e on the remote control The Icons and their meanings A Index Small still picture of each programme B Names of functions ORIGINAL 墌 pg 69 PLAY LIST 墌 pg 72 LIBRARY 墌 pg 76 C Remaining time Based on the recording speed currently selected D Current Total number of programm...

Страница 67: ...ry Database DVD Navi system About editing of programmes Library Database DVD Navi system has the following functions for editing of programmes Modify Original Information 墌 pg 69 Delete programme 墌 pg 71 The limitations of registration You can register information up to 99 programmes When the amount of information is at the limits of registration you cannot record new programme any more In this ca...

Страница 68: ...ed back continuously press MEMO after selecting the desired programme The numbers of the playback order appear on the index You can select up to 30 programmes When you want to correct the order move the arrow on the desired index and press MEMO The number disappears and the unit re numbers the other programmes automatically When you want to cancel the order press 8 E Start playback Press ENTER Or ...

Страница 69: ... B Press w e to move the arrow to MODIFY INDEX The MODIFY INDEX screen appears E Register new index B Confirm the arrow is on REPLACE then press ENTER to register new index New index appears on the right window When you press ENTER with the arrow on RETURN you can return to the previous screen F Return to the normal screen Press NAVIGATION Press 8 to cancel pause mode after pressing NAVIGATION Tur...

Страница 70: ...y C Register new category Press ENTER The Library Database DVD Navi screen appears again D Return to the normal screen Press NAVIGATION Protect title You can protect the programme to prevent accidental erasure of the important programme A Select a programme Press rt w e to move the arrow to a programme you want to protect then press t B Protect the programme Press w e to move the arrow to PROTECT ...

Страница 71: ...EDITING then press ENTER C Start playback Press 4 to start playback The playback pictures appear in the window on the screen The elapsed playing time starts counting with the arrow on IN D Set edit in and edit out points B Find the point where you want the deletion to end then press ENTER with the arrow on OUT The edit out time is fixed Press 3 4 5 2 6 or 9 to find the edit in and edit out points ...

Страница 72: ...appears B Press rt w e to move the arrow to PLAY LIST then press t or ENTER D Create a play list Press rt w e to move the arrow to CREATE then press ENTER E Start playback Press 4 to start playback The playback pictures appear in the window on the screen The elapsed playing time starts counting with the arrow on IN To locate the beginning of other titles press 2 6 F Set edit in and edit out points...

Страница 73: ... the arrow on OUT The edit out time is fixed Press 3 4 5 2 6 or 9 to find the edit in and edit out points E Confirm the addition A Press w e to move the arrow to PREVIEW then press ENTER to preview approximately 5 seconds before and after the edited scene B Press w e to select EXECUTE then press ENTER The selected scene is added To modify the points A Press w e to move the arrow to CLEAR then pres...

Страница 74: ...from which you wish to delete unwanted parts then press t B Access the Editing screen C Start playback Press 4 to start playback The playback pictures appear in the window on the screen The elapsed playing time starts counting with the arrow on IN To locate the beginning of other titles press 2 6 D Set edit in and edit out points A Find the point where you want the deletion to begin then press ENT...

Страница 75: ... ENTER When you cancel the deletion select NO then press ENTER C Return to the normal screen Press NAVIGATION NOTE Even if a play list is deleted the programmes recorded on a DVD disc and the library information are not affected at all Modify Index A Perform steps A to C of Create Play List 墌 pg 72 B Perform steps C to F of Modify Index 墌 pg 69 Modify Programme Title A Perform steps A to C of Crea...

Страница 76: ... pressing the sort buttons D Select the programme s Press w e to move the arrow to select the desired programme then press ENTER Playback begins automatically after the selected programme is located When the disc that contains the selected programme is not loaded A screen prompting you to load the designated disc appears Place the disc whose number is displayed on the screen after pressing ENTER t...

Страница 77: ...possible to register discs formatted on devices other than JVC s DVD recorders It is not possible to register discs recorded on devices other than JVC s DVD recorders It is not possible to register discs when SAVE AS LIBRARY is set to OFF in FUNCTION SET UP menu 墌 pg 94 Delete information A Turn on the unit Press DVD 1 B Access the library screen A Press NAVIGATION The Library Database DVD Navi sc...

Страница 78: ...g screen appears as the MP3 JPEG Navigation screen when you press NAVIGATION You can move the arrow to select the desired position on the screen by pressing rt w e on the remote control A Name of the inserted disc B Sort buttons MP3 JPEG C Selected group number total number of groups on the disc D Group name E Return button RETURN F Group name Created date G File type indicator MP3 JPEG H Selected...

Страница 79: ...lect the items in the desired order Press rt w e to move the arrow to the desired item then press MEMO The order number appears on the left of the track name Repeat this step as necessary To cancel the track press rt w e to move the arrow to the track then press Pressing 8 clears all the order numbers B Start playback Press 4 To quit the Programme Playback press 8 Repeat playback can be performed ...

Страница 80: ...ble The unit s remote control allows you the limited control of the connected camcorder or DV equipment functions during dubbing NOTE When you connect a PC to the DV IN connector we do not assure the normal operation of this unit DV IN connector DV cable not provided Camcorder DV connector Your unit DV equipment ...

Страница 81: ...ternal DV equipment pause dubbing Pressing 9 on the unit also works the same way To clear the DV DUBBING controller from the TV screen press PLAY SET UP E Stop dubbing Press 8 on the remote control Both the unit and the external DV equipment stop dubbing NOTES Dubbing copyright guarded programmes is not possible Original DV informations such as the recording date and time are not recorded The supe...

Страница 82: ...F 1 Input Setting F 1 INPUT C Set the recording speed Press REC MODE repeatedly until the desired recording speed appears D Prepare the camcorder for dubbing Start playback on the camcorder slightly before the actual point from where you wish to start dubbing E Start dubbing Press and hold 7 then press 4 on the remote control or press 7 on the unit F Stop dubbing Press 8 on the unit then stop play...

Страница 83: ...L 2 SELECT to VIDEO or S VIDEO 墌 pg 85 L 2 Select Setting L 2 SELECT C Set the recording speed Press REC MODE repeatedly until the desired recording speed appears D Start the source player Engage the Play mode of the source player E Start the recording deck Engage the Record mode of the recording deck F Stop dubbing Stop recording on the recording deck then stop playback on the source player NOTES...

Страница 84: ...UTPUT 墌 pg 108 Turn on the TV and select the AV mode Slide the TV CABLE SAT DVD switch to DVD A Press w e to move the arrow to FUNCTION SET UP then press ENTER B Press w e to move the arrow to VIDEO IN OUT then press ENTER A Press rt to move the arrow to L 1 OUTPUT or L 1 INPUT then press ENTER B Press rt to select the appropriate setting then press ENTER 8 L 1 OUTPUT SCART VIDEO If a connected ap...

Страница 85: ... and L 1 Input Setting L 1 OUTPUT and L 1 INPUT on page 84 A Press rt to move the arrow to L 2 SELECT then press ENTER B Press rt to select the appropriate setting then press ENTER 8 L 2 SELECT Select VIDEO or S VIDEO to use this unit as the recording deck with the player connected to the L 2 IN DECODER connector or to use the satellite receiver connected to the L 2 IN DECODER connector VIDEO If a...

Страница 86: ...ghtly before the actual point from where you wish to start dubbing C Press 9 to pause playback D Prepare the digital audio device for dubbing Select the input mode E Start dubbing A Press 4 to start playback on the unit B Start recording on the digital audio device F Stop dubbing Stop recording on the digital audio device Then press 8 to stop playback on the unit NOTE There may be a discrepancy of...

Страница 87: ... B A Change the remote control code Press the number key 1 for 1 2 for 2 3 for 3 or 4 for 4 B Set the remote control code Press ENTER to set the code On the unit C Turn off the unit Press 1 on the unit D Display the code Press 4 on the unit for over 5 seconds while the unit is turned off The code currently set appears on the front display panel E Change the unit s code Press 8 on the remote contro...

Страница 88: ...control to turn on the TV and try operations 墌 step B Once you have set the remote control to operate the TV you do not have to repeat this step until you replace your remote control s batteries Some brands of TVs have more than one code If the TV does not function with one code try entering another B Operate the TV Press the corresponding button TV CBL SAT 1 VIDEO TV CBL DVD PR TV Volume TV Mutin...

Страница 89: ...llite receiver you do not have to repeat this step until you replace your remote control s batteries Some brands of satellite receiver have more than one code If the satellite receiver does not function with one code try entering another B Operate the satellite receiver Press the corresponding button TV CBL SAT 1 TV CBL DVD PR number keys For some brands of satellite receiver you must press ENTER ...

Страница 90: ...ORTANT When you set L 2 SELECT to SAT VIDEO or SAT S VIDEO 墌 pg 85 L 2 Select Setting L 2 SELECT it is possible to view a satellite broadcast with the TV set to its AV mode even if the unit is turned off When the unit is in Stop mode or recording press on the remote control to turn off the VIDEO indicator on the unit If you turn on the unit when the satellite receiver s power is off nothing appear...

Страница 91: ... the TV set as this can adversely affect the playback picture Back of unit Note for connection Remove the protection cap from the optical cable Optical cable not provided Dolby Digital decoder or amplifier with built in DTS To DIGITAL AUDIO input Coaxial cable not provided DIGITAL AUDIO OUT OPTICAL DIGITAL AUDIO OUT COAXIAL When you can t switch the audio channel of a bilingual programme When the ...

Страница 92: ...creen C Select the desired option D Complete the setting Press SET UP Turn on the unit Turn on the TV and select the AV mode Slide the TV CABLE SAT DVD switch to DVD DVD SET UP LANGUAGE SET 墌 pg 26 AUDIO OUTPUT 墌 pg 93 UTILITY 墌 pg 49 106 107 FUNCTION SET UP VIDEO IN OUT 墌 pg 25 84 RECORDING SET 墌 pg 94 DISPLAY SET 墌 pg 95 OTHERS 墌 pg 96 INITIAL SET UP AUTO CH SET 墌 pg 98 MANUAL CH SET 墌 pg 99 SAT...

Страница 93: ... audio from a DVD VIDEO disc to a Mini Disc etc DOLBY SURROUND Select this when listening to multichannel surround audio with the unit s AUDIO OUT connectors connected to an amplifier receiver with a built in surround decoder or a surround decoder 8 D RANGE CONTROL NORMAL WIDE RANGE TV MODE The dynamic range the difference between the loudest sound and the quietest one can be compressed during pla...

Страница 94: ...he main language of NICAM audio NICAM 2 SUB To record the sub language of NICAM audio MONO To record the standard monaural sound of NICAM audio NOTE This function works only for the NICAM bilingual programme 8 DIRECT REC OFF ON When this function is set to ON you can easily start recording the programme that you are watching on your TV Press and hold 7 and press 4 on the remote control or press 7 ...

Страница 95: ...hen receiving a channel not in use NOTE When you want to receive an unstable channel with poor signals set this function to OFF 8 DIMMER BRIGHT DARK You can change the brightness of the front display panel BRIGHT Normally select this DARK To dim the front display panel Blue lamp on the front display panel is turned off 8 POWER SAVE OFF ON When this function is set to ON you can reduce the power co...

Страница 96: ... TIMER OFF ON When this function is set to ON the timer is automatically engaged when the unit power is turned off and automatically disengaged when the unit is powered back on NOTE For safety when AUTO TIMER is set to OFF all other functions are disabled while the Timer mode is engaged To disengage the timer press TIMER ...

Страница 97: ...E Complete the setting Press SET UP IMPORTANT Normally Auto Set Up 墌 pg 21 Preset Download 墌 pg 23 or Auto Channel Set 墌 pg 98 sets the Guide Program numbers automatically You need to set the Guide Program numbers manually only in the following cases When timer programming with the VIDEO Plus system the channel position where the station you wish to record is received on your unit is not selected ...

Страница 98: ...yed on the TV screen Press OK then the Confirmation screen appears The confirmation screen lists the channel position number PR station channel number CH and station name ID 墌 pg 102 TV Station And ID List of all stored broadcast stations The programme currently received on the selected channel position appears behind the confirmation screen To view the next page press rt w e The Guide Program num...

Страница 99: ...ppears C Select the channel position IMPORTANT In certain reception conditions station names may not be stored correctly and Auto Guide Program Number Set may not work properly When the Guide Programme numbers are not set properly the programme that you do not intended to record will be timer recorded by the VIDEO Plus system of the unit When programming the timer using the VIDEO Plus system be su...

Страница 100: ...m Press rt w e to select the item you want to delete B Delete a channel Press The item next to the cancelled one moves up one line Repeat steps A and B as necessary C Close the Confirmation screen Press SET UP Change Station Channel Position A Select the item Press rt w e to select the item you want to move then press ENTER B Select the new position Repeat steps A and B as necessary C Close the Co...

Страница 101: ...ated then press e to enter C Enter the remaining characters the same way maximum of 4 D After entering all characters press w e to select OK then press ENTER C Close the Confirmation screen Press SET UP twice NOTE The characters available for the station name ID are A Z 0 9 f I space maximum of 4 Fine Tuning Channels Already Stored A Select the channel to fine tune A Press rt w e to select the cha...

Страница 102: ... RTBF 1 RTBF 2 RTE 1 RTL RTL 2 RTP ANGL ARD ARTE BBC BBC1 BBC2 BBCW BLN1 BLN2 BORD BR1 BR3 BRT1 BRT2 CHLD CH CNN CHNL CNTR CH 4 CH 5 DISC DRS DRTV DSF EURN EURO EURS FR1 FR2 FR3 GRNA GRMP HR1 HR3 HRT HTV ITV1 KABL LNDN MDR MTV N3 NDR1 NDR3 NED1 NED2 NED3 NET2 NRK N TV OKAN ORF1 ORF2 ORF3 OWL3 PRMI PR07 RAI1 RAI2 RAI3 RB1 RB3 RKPS RTB1 RTB2 RTE1 RTL RTL2 RTP STATION NAME ID SAT SAT 1 Scottish TV SC...

Страница 103: ...65 52 Midlands Ridge Hill 22 28 25 32 35 Sutton Coldfield 46 40 43 50 37 The Wrekin 26 33 23 29 35 Waltham 58 64 61 54 35 North Belmont 22 28 25 32 56 Emley Moor 44 51 47 41 37 BBC1 BBC2 ITV CH4 CH5 North West Caldbeck 30 34 28 32 56 Winter Hill 55 62 59 65 48 North East Bilsdale West Moor 33 26 29 23 35 Chatton 39 45 49 42 Pontop Pike 58 64 61 54 68 Scotland Angus 57 63 60 53 Black Hill 40 46 43 ...

Страница 104: ... Just Clock option can be set to ON or OFF at the Clock Set screen the default setting is OFF 墌 pg 105 IMPORTANT If you turn off Just Clock the accuracy of your unit s built in clock may be reduced which could adversely effect timer recording We recommend you to keep Just Clock on In cases where the clock setting data from a PDC signal is incorrect however you are advised to keep Just Clock set to...

Страница 105: ...ber representing the station transmitting clock setting data then press ENTER F Start the clock operation Press SET UP NOTES Just Clock when set to ON adjusts the unit s built in clock every hour except for 23 00 0 00 1 00 and 2 00 Just Clock is not effective when the unit s power is on the unit is in the Timer mode a difference of more than 3 minutes exists between the built in clock s time and t...

Страница 106: ... VIDEO MODE To be chosen when you want to erase all the data on the disc once played back to record new data or play the disc on other DVD players B Press w e to select YES then press ENTER when DISC WILL BE FORMATTED IN VR MODE VIDEO MODE appears on the TV screen NOTES It is impossible to format Version 1 0 DVD RW discs in Video mode It is impossible to format DVD R discs All the programmes on a ...

Страница 107: ...ording it may not be possible to play back the discs In this case play back the discs on this unit Additional recordings become impossible Finalise a DVD R RW disc A Finalise the disc A Press rt to select FINALISE then press ENTER Press w e to select YES then press ENTER when DISC WILL BE FINALISED appears on the TV screen B Press w e to select OK then press ENTER when FINALISING WILL MAKE DISC RE...

Страница 108: ... seconds switches the scan mode NOTES When the progressive mode is set be sure to set L 1 OUTPUT to COMPONENT 墌 pg 84 L 1 Output and L 1 Input Setting L 1 OUTPUT and L 1 INPUT Progressive scan is output only from COMPONENT VIDEO OUT connector Interlaced scan mode is the setting at your purchase When Progressive scan mode is engaged no video signal is output from S VIDEO OUT connector and L 1 IN OU...

Страница 109: ...in The batteries are discharged Replace the dead batteries with new ones 7 The unit does not operate There are cases when the operation is prohibited on the disc Lightning or static electricity may cause malfunction of the unit Press 1 to turn the power off then press the button again to turn the power on SYMPTOM POSSIBLE CAUSE CORRECTIVE ACTION 1 Images do not appear on the TV screen The TV is no...

Страница 110: ... position does not correspond to that in the receiving area Set the correct channel position for the receiving broadcast 墌 pg 98 6 Automatic Satellite Programming recording does not start The satellite receiver is not connected properly to this unit Connect the satellite receiver to the L 2 IN DECODER connector properly 墌 pg 90 7 On the front display panel appears Power failure occurred Set date a...

Страница 111: ...S DISC PREPARE A FORMATTED DISC AS DESCRIBED BELOW DVD RAM DVD RW VR MODE On Disc Timer Programming has been attempted when a disc that is not compatible with the function is loaded 墌 pg 60 NO DISC INSERTED On Disc Timer Programming has been attempted when a disc is not loaded or loaded upside down 墌 pg 10 60 DISC NOT RECORDABLE INSERT RECORDABLE DISC When a playback only disc or a finalised disc ...

Страница 112: ... while playback continues COPY PROHIBITED CAN NOT RECORD An attempt has been made to record copy protected contents An attempt has been made to record copy once contents on a disc that is not CPRM compatible such as DVD R COPY PROHIBITED CAN NOT PLAY The unit has detected invalid contents at the start or in the middle of playback THE i LINK DEVICE THAT YOU HAVE CONNECTED IS NOT RECOGNIZED MAKE SUR...

Страница 113: ...3 format one CD R RW can contain about 10 times as much data volume as a regular CD can 8MPEG A family of Standards for compressing audio visual information MPEG standards include MPEG 1 MPEG 2 and MPEG 4 Video CD and MP3 are based on MPEG 1 while DVD is based on MPEG 2 MPEG stands for Moving Picture coding Experts Group 8Multiangle By recording multiple scenes progressing at the same time in a si...

Страница 114: ...de only Video recording compression system MPEG2 CBR VBR Input Output S video input Y 0 8 1 2 Vp p 75 ohms C 0 2 0 4 Vp p 75 ohms S video output Y 1 0 Vp p 75 ohms C 0 3 Vp p 75 ohms RGB output R 0 7 Vp p 75 ohms G 0 7 Vp p 75 ohms B 0 7 Vp p 75 ohms Video input 0 5 2 0 Vp p 75 ohms pin jack Video output 1 0 Vp p 75 ohms pin jack Audio input 8 dB 50 kilohms pin jack Corresponding to mono left Audi...

Страница 115: ...ions to play again later 34 Menu Audio Subtitle Language Set 26 O On Disc Timer Programming 60 One Touch Replay 41 P Pan Scan 25 Parental Lock 49 PDC Recording 59 Play List 72 Play Set Up Menu 42 Playback Control PBC 36 Programme Playback 45 R Random Playback 45 Recordable playable discs 6 Recording Medium and Format 8 Recording Resume Function 53 RECORDING SET 94 Recording Speed 54 Region Number ...

Страница 116: ...EN DR M1SLB Printed in Germany 0903 MN ID VE ...

Отзывы: