background image

Filename [M150SEK_10Subsidiary.fm]

Masterpage:Left+

66


EN

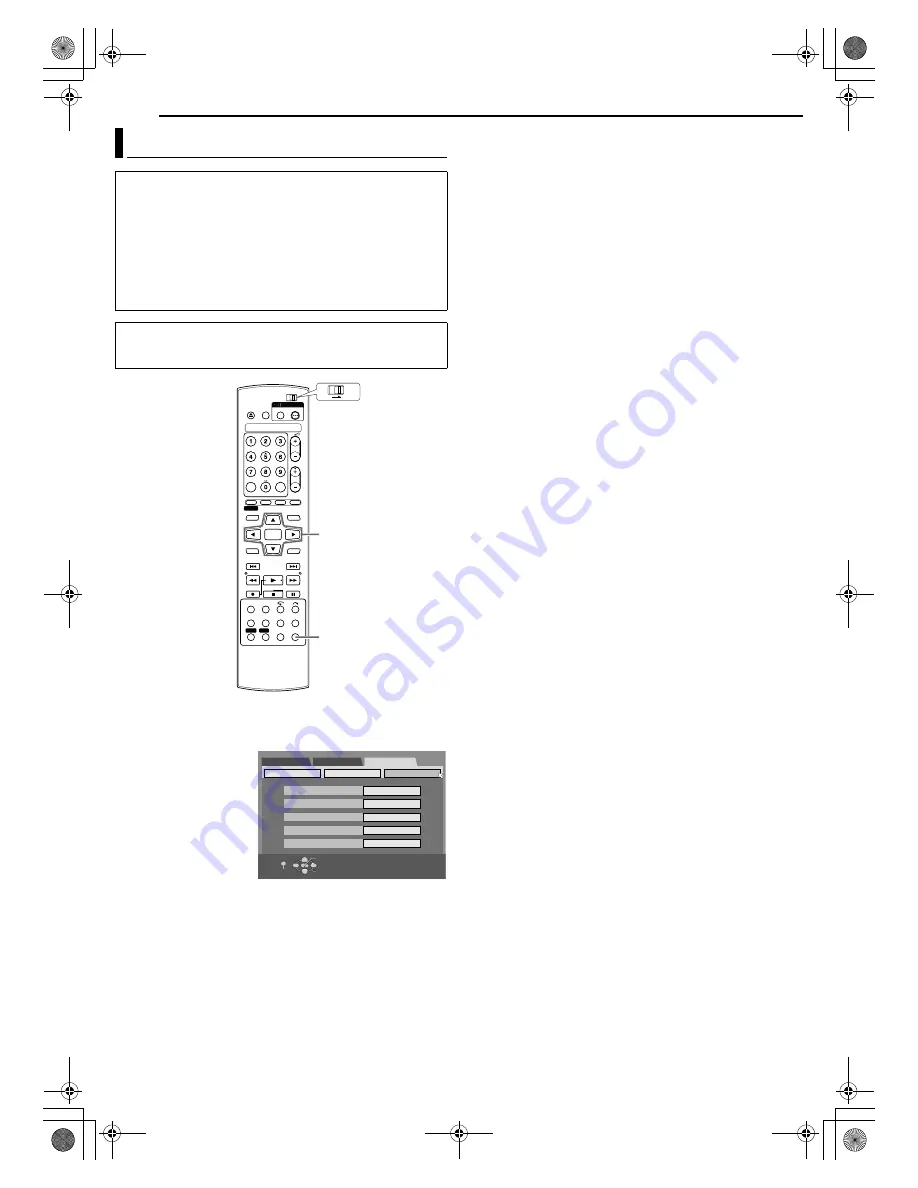
SUBSIDIARY SETTINGS

1

Press 

SET UP

 to access the Main Menu screen.

2

Press 

selection keys

 to select 

A

INITIAL SET UP

B

, then press 

ENTER

.

3

Press 

selection keys


to select 

A

CLOCK 

SET

B

, then press 

ENTER

.

4

Press 

selection keys


to select 

A

YEAR

B

, then 

press 

ENTER

. Press 

selection keys

 to set 

the year, then press 

ENTER

.

Repeat the same 
procedure to set the date and time.

When you set the date, press and hold 

F G

 to change the date 

by 15 days interval.

When you set the time, press and hold 

F G

 to change the time 

by 30 minutes interval.

5

Press 

selection keys

 to select 

A

JUST CLOCK

B

, then press 

ENTER

. Press 

selection keys

 to set to the desired mode, then 

press 

ENTER

.

The default setting is 

A

ON

B

.

If you set to 

A

OFF

B

, you can disregard the next step as you 

won’t be able to receive regular clock adjustments.

6

Press 

selection keys

 to select 

A

TV PROGRAMME

B

, then press 

ENTER

. Press 

selection keys

 to set the channel position to the 

number representing the station transmitting clock setting data, 
then press 

ENTER

.

The unit is preset to receive clock setting and adjustment data 
from the channel selected in this step (step 

6

).

7

Press 

SET UP

 to start the clock operation.

NOTES:

Just Clock adjusts the unit’s built-in clock automatically when it is 
set to 

A

ON

B

.

Just Clock is not effective when:

^

the unit’s power is on.

^

the unit is in the Timer mode.

^

a difference of more than 3 minutes exists between the built-in 
clock’s time and the actual time.

^

the unit is in the Automatic Satellite Programme Recording 
mode. (

A

pg. 42)

^

A

L-2 SELECT

B

 is set to 

A

SAT VIDEO/RGB

B

 or 

A

SAT S-VIDEO/

RGB

B

. (

A

pg. 58)

If Just Clock is set to 

A

ON

B

, the unit’s clock is automatically 

adjusted at the start/end of Summer Time.

Just Clock may not function properly depending on the reception 
condition.

Just Clock

The Just Clock function provides accurate time keeping through 
automatic adjustments at regular intervals, by reading data from 
digital tuner signal.
The Just Clock option can be set to 

A

ON

B

 or 

A

OFF

B

 at the Clock Set 

screen. (The default setting is 

A

ON

B

.)

IMPORTANT:

If you set Just Clock to 

A

OFF

B

, time correction will not be 

performed, which could adversely affect timer recording. We 
recommend you to keep Just Clock set to 

A

ON

B

.

If you set Just Clock to 

A

ON

B

, automatic time acquisition is 

performed even when the unit is turned off. As part of the circuitry 
of this unit is turned on during this intervals, the fan functions and 
a spinning sound is generated.

Clock Set

IMPORTANT:

If you performed Auto Set Up (

A

pg. 17), without ever having set 

the clock previously, the unit’s built-in clock is also set 
automatically.
Perform the following steps only if

^

^

Auto Clock Set has not been performed correctly by Auto Set 
Up.

OR

^

you want to change Just Clock setting. (See 

A

Just Clock

B

 in 

the right column)

Turn on the unit.

Turn on the TV and select an input mode such as EXT1.

Slide the 

TV/DVD

 switch to 

DVD

.

SET UP

(

FGDE

)

ENTER

TV

DVD

Selection Keys

DVD SET UP

FUNCTION SET UP

SELECT WITH [CURSORS] 
THEN PRESS [ENTER]

INITIAL SET UP

YEAR

DATE

2005

05/07 SAT

TIME

18:56

JUST CLOCK

ON

TV PROGRAMME

18

EXIT

OK

SELECT

SET UP

CHANNEL SET

DTV SETTING

CLOCK SET

M150SEK_00.book  Page 66  Wednesday, June 15, 2005  4:04 PM

Содержание DR-M150SEK

Страница 1: ... ON PR PR Ð PUSHÐOPEN Trade Mark of the DVB Digital Video Broadcasting Project 1991 to 1996 Number 3546 LPT1045 001A EN DVD VIDEO RECORDER INSTRUCTIONS DR M150SEK M150SEK_00 book Page 1 Wednesday June 15 2005 4 04 PM ...

Страница 2: ...AUSE HAZARDOUS RADIATION EXPOSURE IF DIRECTED BE SURE TO OPERATE THE UNIT CORRECTLY AS INSTRUCTED WHEN THIS UNIT IS PLUGGED INTO THE WALL OUTLET DO NOT PLACE YOUR EYES CLOSE TO THE OPENING OF THE DISC TRAY AND OTHER OPENINGS TO LOOK INTO THE INSIDE OF THIS UNIT USE OF CONTROLS OR ADJUSTMENTS OR PERFORMANCE OF PROCEDURES OTHER THAN THOSE SPECIFIED HEREIN MAY RESULT IN HAZARDOUS RADIATION EXPOSURE D...

Страница 3: ...ach a power point then obtain a proper safety approved extension lead adapter or consult your dealer In the unlikely event of the plug fuse failing be sure to replace the fuse only with an identical approved type as originally fitted and to replace the fuse cover If the fuse fails again consult your nearest JVC dealer If nonetheless the mains plug is cut off remove the fuse and dispose of the plug...

Страница 4: ... than expected this does not necessarily indicate a fault Because of the nature of digital transmissions there can be several external causes for this The following information may help you determine the exact cause Digital transmissions are broadcast at much lower power and on different channels or different transmitters to analogue transmissions This may mean that you will require an aerial upgr...

Страница 5: ...gital Audio Dubbing 54 Edit From A Camcorder 55 Edit To Or From Another Recorder 56 Output Input Set 57 SYSTEM CONNECTIONS 59 Connecting To A Satellite Receiver 59 Connecting To A Dolby Digital Decoder Or An Amplifier With Built in DTS 59 SUBSIDIARY SETTINGS 60 Mode Set 60 Remote Control Functions 62 TV Multi Brand Remote Control 62 Tray Lock 63 Child Lock 63 Scan Mode Set 63 Tuner Set 64 Clock Se...

Страница 6: ...scs Before finalising It is possible to record on unrecorded areas of the disc edit the disc title and programme titles and delete programmes It is impossible to record or edit DVD R RW discs recorded on other devices even if they have not been finalised It is impossible to overwrite recorded areas of DVD R discs Available recording capacity does not increase even if a recorded programme is delete...

Страница 7: ... may take some time to read a disc depending on the recording status or condition of the disc or if the disc is scratched dirty or warped In addition do not attempt to play back discs in unusual shapes heart shaped octagonal or other forms If such discs are accidentally played back it may cause noise that can lead to speaker damage CD ROM discs including PHOTO CD and CD G Discs recorded in Packet ...

Страница 8: ...arks are deleted and new chapter marks are assigned automatically approximately every 5 minutes In Video mode even before finalising it is impossible to perform editing operations other than changing the disc name and or title names and deleting programmes and or titles After finalising it is impossible to perform editing operations Audio CD Video CD SVCD Typically Audio CD discs are divided into ...

Страница 9: ...er groove DVD RAM discs contained in cartridges Double sided discs Remove the disc from the cartridge Align the disc with the grooves on the disc tray as shown in the illustration and insert with the side you wish to play back or record facing down If you insert the disc with ASide AB facing down programmes are recorded on side A Single sided discs Remove the disc from the cartridge Align the disc...

Страница 10: ...rty when removed from cartridge then put back in after use Storage Make sure that discs are kept in their cases If discs are piled on top of one another without their protective cases they can be damaged Do not put discs in a location where they may be exposed to direct sunlight or in a place where the humidity or temperature is high Avoid leaving discs in your car Maintenance of discs If there ar...

Страница 11: ...o Output Connector DIGITAL OUT COAXIAL A pg 54 60 G Region Number H AC Power Cord I Antenna Output Connector ANTENNA OUT A pg 16 J Cooling Fan This prevents the temperature from rising inside the unit Do not remove it Install the unit so as not to block the area around the fan The unit may become hot when it is turned off as the cooling fan on the rear of the unit is not activated However the cool...

Страница 12: ...lti Display N indicate the numbers explained below ATRKB Total number of tracks or track number being played back are displayed on the Multi Display ACHAPB Chapter number being played back are displayed on the Multi Display H Random Programme Playback Mode Indicator RND PRGM A pg 33 ARNDB Lights when Random Playback mode is set APROGB Lights when Programme Playback mode is set I Repeat Mode Indica...

Страница 13: ...utton TIMERj A pg 37 38 a Automatic Satellite Programme Recording Button SATj A pg 42 b Navigation Button NAVIGATION A pg 43 c Enter Button ENTER d Return Button RETURN A pg 26 e Forward Skip Button T A pg 23 26 29 33 f Forward Search Button N A pg 23 29 Forward Slow Button SLOW A pg 24 g Play Button I A pg 22 23 28 h Pause Button W A pg 22 29 i Stop Button o A pg 22 Clear Button CLEAR A pg 32 j S...

Страница 14: ... CHECK ALL THE CONTENTS SHOWN BELOW RAM RW STANDBY ON PR PR Ð PUSHÐOPEN I You are now ready to install your unit A pg 16 DVD Video Recorder RF Cable AAAB Batteries x 2 21 pin SCART Cable Infrared Remote Control Unit M150SEK_00 book Page 14 Wednesday June 15 2005 4 04 PM ...

Страница 15: ...1 6 03 2 31 FR150 A B REC QUALITY RECORDABLE TIME Appears for eight seconds A Recording mode B Remaining disc time for each recording speed 0 13 TITLE13 ITR CHAPTER1 SP A During Instant Timer Recording ITR A Record remaining time 0 13 34 DVD RAM TITLE2 TITLE2 0 12 27 EACH CHAPTER1 LP 6 36PM PR 10 A B C D G E F When using Live Memory playback A Disc type B Current time C Bar meter for recording pla...

Страница 16: ...you can view the images in the progressive mode For switching to the progressive mode refer to AScan Mode SetB A pg 63 NOTE Select an appropriate option of AL 1 OUTPUTB as follows A pg 57 When the setting selected is not in accordance with the TV connected and depending on the type of appliance connected to the unit the correct picture will not appear This unit only supports 625i 625p PAL signals ...

Страница 17: ...e unit the Auto Set Up function sets the tuner channels and clock automatically Before starting make sure of the following The TV aerial cable should be connected to the unit The unit s mains power cord should be connected to a mains outlet Turn on the TV and select an input mode such as EXT1 Slide the TV DVD switch to DVD FGDE ENTER SET UP DVD A DVD TV RAM RW 1 Selection Keys INITIAL SET UP AUTO ...

Страница 18: ...f the TV screen for about 5 seconds when the unit is tuned to a different station If you want to set the tuner manually such as to add or skip channels or to set or change station names see pages 64 and 65 B Perform AClock SetB A pg 66 ATTENTION After making sure the cables are connected properly turn off the unit s power once then turn the unit s power back on again Perform AAuto Set UpB A pg 17 ...

Страница 19: ...is played back 4 3PS Pan Scan Select this when the aspect ratio of your TV is 4 3 conventional TV While viewing a wide screen picture the black bars do not appear however the left and right edges of the pictures will not be shown on the screen 16 9AUTO Wide television conversion Select this when the aspect ratio of your TV is 16 9 wide TV 16 9FIX Wide television conversion Select this when the asp...

Страница 20: ... are selected using PR OFF All the channels stored on this unit are selected 6 Press SET UP to complete the setting Setting The Subtitle Language Some TV programmes contain subtitles It is possible to set the subtitle language when recording these programmes 1 Press SET UP to access the Main Menu screen 2 Press selection keys to select AINITIAL SET UPB then press ENTER 3 Press selection keys to se...

Страница 21: ...he subtitles The SUBTITLE button functions only after the unit has been turned on and a TV programme is displayed on the TV screen However when SET UP is pressed to access the Main Menu the subtitles will not be displayed Viewing Teletext Broadcast 1 Press TEXT when the channel is being selected The teletext menu screen appears 2 Following the instructions on the screen select the item with FGD E ...

Страница 22: ... stops and a programme received with the unit s tuner resumes on the TV screen When a playback only disc is played playback stops and the TV screen becomes all blue when you press o Pressing o again resumes a programme received with the unit s tuner If M is pressed during playback playback stops then the disc tray opens NOTE When the Library Database Navigation screen appears choose a thumbnail im...

Страница 23: ...ack or skips to the marked point in the reverse direction then resumes playback Variable Speed Search During playback press N for forward variable speed search or O for reverse variable speed search Each press of the button increases the search speed for each direction To resume normal playback press I OR During playback press and hold T for 2 or more seconds for forward variable speed search or p...

Страница 24: ...ess MENU to display the disc menu then start playback by selecting an item etc When ARESUMEB is set to ADISC RESUMEB ARESUMEB must be set to AOFFB A pg 61 Press o in stop mode Press TOP MENU to display the top menu then start playback by selecting an item etc Press MENU to display the disc menu then start playback by selecting an item etc 2 Press I in stop mode to resume playback The unit starts p...

Страница 25: ... to switch the recording mode during playback or while recording 8 Video CD SVCD Audio CD During playback or in stop mode Current track elapsed time N Current track remaining time N Total elapsed time N Total remaining time N back to the beginning NOTE When a PBC compatible Video CD SVCD disc is loaded deactivate the PBC function A pg 26 Angle Selection You can enjoy a variety of scene angles if a...

Страница 26: ...can select the desired audio language sound from the setup menu while in stop mode Playback Control PBC Function Some Video CD SVCD discs support the PBC function PBC is an abbreviation of APlay Back ControlB A Video CD SVCD disc recorded with PBC has its own menus such as a list of the songs on the disc You can locate a specific scene by using the menu 1 Press I in stop mode The PBC menu appears ...

Страница 27: ...or the next timer programme It is impossible to perform ITR even if you press R during Live Memory Playback Press o to display the programme being recorded then perform ITR settings Playback may be paused for a moment during Live Memory Playback which does not interfere with recording When LIVE CHECK is pressed to display the picture currently being recorded the picture size may not be correct Liv...

Страница 28: ...can playback other programmes available in the Library Database Navigation on the disc To watch other previously recorded programmes during recording 1 Press NAVIGATION to display the Library Database Navigation screen 2 Press selection keys to select AORIGINALB then press ENTER 3 Press selection keys to select a desired programme then press ENTER Turn on the unit Turn on the TV and select an inpu...

Страница 29: ...sing during pause mode reverses playback at a slower speed G N Each press of the button during playback advances the playback speed in 4 steps in the forward direction Pressing during pause mode advances playback at a slower speed H o Pressing once stops Live Memory Playback and returns to the screen on air Pressing again stops the recording and returns to the screen on air I W Pressing once pause...

Страница 30: ... The On screen Bar Example When selecting Picture Control function of DVD During playback or while stopped 1 Press ON SCREEN twice to access the on screen bar The DVD VIDEO SHARP AUTO 1 item currently selected is highlighted and pointed by 2 Press selection keys to select A B then press ENTER The DVD VIDEO SHARP AUTO 1 pop up window appears under the selected item 3 Press selection keys to select ...

Страница 31: ...the type of disc being used The subtitles recorded around the A B point may not appear When the end of the item is reached before the end point is set the on screen bar disappears from the TV screen In such a case repeat the procedure from step 1 The point B must be set at least 3 seconds after the point A When playing back a DVD A B Repeat Playback is possible only within the same title AA B xB c...

Страница 32: ...ess ENTER NORMAL Normally select this CINEMA Suitable for a movie disc etc SHARP Clearer sharper edged picture when viewing images with lots of flat same coloured surfaces such as cartoons SOFT Select this option when too much noise appears To clear the on screen bar Press ON SCREEN Setting The Progressive Mode You can obtain optimal picture quality by selecting whether the content on the disc is ...

Страница 33: ... 1 to 3 During Programme Playback pressing T skips to the next track of the programme Pressing S returns to the beginning of the current track To clear the on screen bar and the contents of the programme Press ON SCREEN To cancel Programme Playback Press selection keys to select APRGMB then press ENTER NOTE Programme Playback is not possible depending on the type of disc Random Playback You can pl...

Страница 34: ... up to 99 programmes and 99 play lists on each disc Some programmes can only be recorded one time When recording is started an index of the first part of recording is automatically recorded A pg 43 To delete the index refer to page 46 Recording sometimes may stop or cannot be performed even if there is enough available capacity remaining on the disc Recording Mode MPEG 2 format is used as recordin...

Страница 35: ... disc remaining time Watch Another Programme While Recording On The Unit While recording is going on you can watch another programme on the TV It does not interfere with recording 1 Turn on the TV 2 Select the desired channel to watch on the TV using your TV s remote control Elapsed Recording Time And Disc Remaining Time Indication During recording press DISPLAY repeatedly until the desired indica...

Страница 36: ...g time When the disc remaining time is not enough it is not possible to record until the end of the timer programme Example If you programmed to timer record for 60 minutes in SP mode on a 120 minutes disc the disc remaining time would be 30 minutes in XP mode 60 minutes in SP mode 120 minutes in LP mode 180 minutes in EP mode and 240 minutes in FR480 mode Timer recording will not complete beyond ...

Страница 37: ...ngage the unit s timer mode The unit turns off automatically and j appears on the front display panel To disengage the timer mode press TIMERj again When two successive programmes are recorded with the AEPGB Timer Programming function the ending of the first programme or the beginning of the second programme may not be recorded This unit does not automatically extend the stop time when a programme...

Страница 38: ...appears on the front display panel To disengage the timer mode press TIMERj again NOTES When two successive programmes are recorded with the AManual Timer ProgrammingB function the ending of the first programme or the beginning of the second programme may not be recorded If the copy limited programme is received during timer recording the unit enters Record Pause mode Recording starts again if it ...

Страница 39: ...as required ARecording ModeB A pg 34 AModify Title NameB A pg 46 9 Press ENTER to access the Programme Confirmation screen 10 Press ENTER to complete ATo Make The Disc For On Disc Timer ProgrammingB To programme another timer using ATo Make The Disc For On Disc Timer ProgrammingB repeat steps 1 10 11 Press DVD A to turn off the power is displayed on the front display panel To disengage the timer m...

Страница 40: ...units from other manufacturers The beginning of a programme may not be recorded In addition if the 1st programme s recording stop time and the 2nd programme s recording start time is the same the ending of the 1st programme may not be recorded If there is a power outage while recording the recordings when the power outage occurs are not guaranteed How Discs Are Overwritten NOTE On Disc Timer Progr...

Страница 41: ...TER to exit the Programme screen 3 Press TIMERj to enter into timer standby mode NOTE When any overlaps remain after deletion and modification of programmes Programme Overlap list remains showing the conflicting programmes In such a case repeat the procedure above until the conflict is solved When Programmes Overlap Each Other 2 With AEPGB Timer Programming if appears on the extreme right of the p...

Страница 42: ...ns off the unit s power and disengages the Automatic Satellite Programme Recording mode If there are more than one satellite programmes you wish to record with Automatic Satellite Programme Recording it is not possible to set different recording modes for each programme Depending on the type of satellite receiver the unit may not record a slight portion of the beginning of the programme or may rec...

Страница 43: ... The items marked with an asterisk can be easily modified and registered again after recording by using Library Database Navigation system The limitations of registration You can register information up to 99 programmes in a single DVD When the amount of information is at the limits of registration you cannot record new titles any more In this case you need to delete old titles to register new one...

Страница 44: ...protect then press G 4 Press selection keys to select APROTECTB then press ENTER A B appears on the TV screen To cancel the protection select APROTECTB again then press ENTER 5 Press NAVIGATION to return to the normal screen NOTE All the titles on a disc will be deleted once the disc is formatted even if they are protected titles A pg 67 Delete Title You cannot record any more with Library Databas...

Страница 45: ...itle To modify the points A Press selection keys to select ACLEARB then press ENTER Press selection keys to select ARETURNB then press ENTER to return to the screen in step 4 B Press selection keys to select AINB C Perform steps 5 9 10 Press selection keys to select AEXECUTEB then press ENTER The confirmation screen appears 11 Press selection keys to select AYESB then press ENTER When you cancel t...

Страница 46: ...form steps 1 4 of AModify IndexB A pg 46 before continuing 2 Press selection keys to select AMODIFY CATEGORYB then press ENTER 3 Press selection keys to select the desired category then press ENTER 4 Press selection keys to select ARETURNB then press ENTER Return to the Library Database Navigation screen to confirm the modified category 5 Press NAVIGATION to return to the normal screen Edit Origin...

Страница 47: ...edit and the scene which is actually edited The title index and category of the play list can be modified in the same way as AORIGINALB A pg 46 You can modify the play list that has just been created here by adding moving or deleting unwanted parts to create a digest edition etc Play Back Play List 1 Press NAVIGATION to display the Library Database Navigation screen 2 Press selection keys to selec...

Страница 48: ...eys to select the desired category then press ENTER 4 Press selection keys to select ARETURNB then press ENTER Return to the Library Database Navigation screen to confirm the modified category 5 Press NAVIGATION to return to the normal screen Edit Play List Information Turn on the TV and select an input mode such as EXT1 Load a DVD disc to modify Slide the TV DVD switch to DVD ATTENTION It is not ...

Страница 49: ...irm the arrow is on AINB then press ENTER The edit in time is displayed on the left of the AINB window 8 Press I to start playback Press W to pause at the point where you want the moved scene to end 9 Confirm the arrow is on AOUTB then press ENTER The edit out time is displayed on the left of the AOUTB window 10 Press I to start playback Find the point where you want the moved scene to be moved th...

Страница 50: ...R 6 Press I to start playback To move to other titles press S or T Press O or N to find the point where you want the created play list to begin then press W 7 Perform steps 5 10 of ACreate Play ListB A pg 47 0001 1 2 3 4 MODIFY DELETE EDITING CREATE DANCE ORIGINAL PLAY LIST LIBRARY REMAIN TIME 87min SP SELECT WITH CURSORS THEN PRESS ENTER EXIT OK SELECT NAVIGATION DELETE SCENE MOVE SCENE ADD SCENE...

Страница 51: ...hould be registered appears when the Library Database Navigation screen is displayed If registering perform the following procedure 1 Press NAVIGATION to display the Library Database Navigation screen 2 Press selection keys to select ALIBRARYB 3 Press selection keys to select AREGISTERB then press ENTER To quit registration select ACANCELB then press ENTER 4 Press NAVIGATION to return to the norma...

Страница 52: ... ENTER in step 4 the unit starts playback from the first file of the group JPEG files are played back as a slide show at the set intervals A pg 33 If a file name includes any 2 byte character the unit may not show the file name correctly The order of the groups and items shown in steps 4 and 5 may differ from the order shown on your PC When you want multiple files to be played back continuously pr...

Страница 53: ...me press W to pause playback then press W repeatedly Each press of W advances a frame To change the playback direction press O or N 5 Press selection keys to select then press ENTER Select the desired sound track from the pull down menu then press ENTER AUDIO 1 Select this to record the original stereo sound played back on the connected DV equipment AUDIO 2 Select this to record the dubbed stereo ...

Страница 54: ...I to start playback on the unit 8 Start recording on the digital audio device 9 Stop recording on the digital audio device Then press o to stop playback on the unit NOTE There may be a discrepancy of several seconds between where you intend editing to start and where it actually starts When you dub from DV equipment other than a camcorder A Perform steps 1 3 B Locate the point from where you want ...

Страница 55: ... REC MODE repeatedly to set the recording mode 4 Start playback on the camcorder slightly before the actual point from where you wish to start dubbing 5 Press R on the unit to start recording Or while holding R press I on the remote control The dubbing starts 6 Upon completing dubbing stop the unit and the camcorder Stop recording on the recording deck your unit then stop playback on the source pl...

Страница 56: ...ording mode 4 Engage the Play mode of the source player 5 Engage the Record mode of the recording deck 6 Stop recording on the recording deck then stop playback on the source player NOTES All necessary cables can be obtained from your dealer For Y C signal input output be sure to use a 21 pin SCART cable that is compatible with the Y C signal When you use this unit as the source player for editing...

Страница 57: ...ppliance s input is compatible with RGB signals set to ASCART RGBB You can obtain a high quality RGB picture COMPONENT If a connected appliance s input is compatible with Y PB PR signals set to ACOMPONENTB You can obtain a high quality Y PB PR picture Switch the TV to the input that you can watch component video pictures 8 L 1 INPUT VIDEO S VIDEO VIDEO If a connected appliance s output is compatib...

Страница 58: ...play back and record RGB picture connect the satellite receiver s RGB compatible output connector to the unit s input connector If you are not connecting a satellite receiver to the L 2 IN connector leave AL 2 SELECTB set to AVIDEO RGBB When AL 2 SELECTB is set to ASAT VIDEO RGBB and ASAT S VIDEO RGBB ASATB appears on the TV screen or front display panel instead of AL 2B If AL 1 OUTPUTB is set to ...

Страница 59: ...refer to ADIGITAL AUDIO OUTB A pg 60 Connecting To A Satellite Receiver IMPORTANT When you set AL 2 SELECTB to ASAT VIDEO RGBB or ASAT S VIDEO RGBB A pg 58 it is possible to view a satellite broadcast with the TV set to an input mode such as EXT1 even if the unit is turned off When the unit is in Stop mode or recording press TV VIDEO on the remote control to turn off the Video indicator on the fro...

Страница 60: ...elect this when listening to conventional two channel stereo audio with the unit s AUDIO OUT connectors connected to a stereo amplifier receiver or TV set or in case you want to record the audio from a DVD VIDEO disc to a Mini Disc etc DOLBY SURROUND Select this when listening to audio with the unit s AUDIO OUT connectors connected to an amplifier receiver with a built in surround decoder or a sur...

Страница 61: ...o receive an unstable channel with poor signals ON When this function is set to AONB the TV screen becomes all grey when receiving a channel not in use 8 DIMMER BRIGHT DIMMED1 DIMMED2 OFF You can change the brightness of the front display panel BRIGHT Normally select this To turn on the display and blue lamp of the front display panel DIMMED1 DIMMED2 To change the brightness level and turn off the...

Страница 62: ...the unit Your Remote can operate the basic functions of your TV set In addition to JVC TVs other manufacturer s TVs can also be controlled IMPORTANT Although the supplied Remote unit is compatible with JVC televisions as well as many other models it may not work with your TV or in some instances may have limited function capability 8 Set the TV brand code 1 Keep pressing SET UP down during step 2 ...

Страница 63: ...picture is shown on the display monitor in two halves The Interlaced scan system places lines of the second half of the picture in between lines of the first half of the picture 8 Progressive scan Progressive scan displays all the horizontal lines of a picture at one time as a single frame This system can convert the interlaced video from DVD into progressive format for connection to a progressive...

Страница 64: ...e channel is received the screen displays the programme list for a few seconds before returning to the AMANUAL SEARCHB screen If the channel is not received the screen display returns to the AMANUAL SEARCHB screen without displaying the programme list Repeat step 5 to add or check other channels 6 Upon completing AMANUAL SEARCHB press SET UP on the remote control Tuner Set Turn on the unit Turn on...

Страница 65: ...TER to return to the AEdit PR ListB screen Repeat steps 6 8 as necessary 9 Press SET UP to end Setting Favourites You can tuned to your frequently watched channels with ease by setting the channels to AFavouritesB 1 Press SET UP in DTV mode to access the Main Menu screen 2 Press selection keys to select AINITIAL SET UPB then press ENTER 3 Press selection keys to select ACHANNEL SETB then press ENT...

Страница 66: ... Automatic Satellite Programme Recording mode A pg 42 AL 2 SELECTB is set to ASAT VIDEO RGBB or ASAT S VIDEO RGBB A pg 58 If Just Clock is set to AONB the unit s clock is automatically adjusted at the start end of Summer Time Just Clock may not function properly depending on the reception condition Just Clock The Just Clock function provides accurate time keeping through automatic adjustments at r...

Страница 67: ...EB To be chosen when you want to record erase or edit data on the disc repeatedly AVIDEO MODEB To be chosen when you want to erase all the data on the disc once played back to record new data or play back the disc on other DVD players 3 Press selection keys to select AYESB then press ENTER 4 Upon completing formatting ACOMPLETEDB appears on the TV screen Press ENTER to complete formatting 5 Press ...

Страница 68: ...at A DVD RAM DiscB A pg 67 before continuing 2 Press selection keys to select AFINALISEB then press ENTER 3 The confirmation screen appears Press selection keys to select AYESB then press ENTER 4 The confirmation screen appears again Press selection keys to select AOKB then press ENTER To cancel finalisation press ACANCELB 5 Upon completing finalisation ACOMPLETEDB appears on the TV screen Press E...

Страница 69: ...ug from the AC outlet and connect again Press and hold M until the disc tray opens Approximately 30 seconds Remove the disc and press M to close the disc tray The disc tray was locked Unlock the tray A pg 63 Playback The TV receiver s channel selector is not set to an input mode such as EXT1 Set the TV to an input mode such as EXT1 When interlace scanned programme is played back progressive scan m...

Страница 70: ... SCAN for 3 or more seconds so that the Video output indicator q lights off on the front display panel The camcorder s microphone is too close to the TV Position the camcorder so its microphone is away from the TV The TV s volume is too high Turn the TV s volume down Those channels have been designated to be skipped If you need the skipped channels restore them using AManual Channel SetB A pg 64 A...

Страница 71: ... memory is not enough for registration for the Navigation system The recording cannot be started even though the capacity for the recording is enough On Disc Timer Programming has been attempted when a disc that is not compatible with the function is loaded On Disc Timer Programming has been attempted when a disc is not loaded or loaded upside down To set the timer programme using the EPG system t...

Страница 72: ...e CO Corsican LT Lithuanian SW Swahili CS Czech LV Latvian Lettish TA Tamil CY Welsh MG Malagasy TE Telugu DZ Bhutani MI Maori TG Tajik EL Greek MK Macedonian TH Thai EO Esperanto ML Malayalam TI Tigrinya ET Estonian MN Mongolian TK Turkmen EU Basque MO Moldavian TL Tagalog FA Persian MR Marathi TN Setswana FJ Fiji MS Malay MAY TO Tonga FO Faroese MT Maltese TR Turkish FY Frisian MY Burmese TS Tso...

Страница 73: ...compression system MPEG2 CBR VBR S video input Y 1 0 Vp p 75 K C 0 3 Vp p 75 K Video input 1 0 Vp p 75 K pin jack Audio input 2 Vrms pin jack Audio output 2 Vrms pin jack 21 pin SCART connectors IN OUT x 1 IN x 1 i Link 4 pin for DV input Component video output Y 1 0 Vp p 75 K PB PR 0 7 Vp p 75 K Corresponding to copy protection Digital audio output Coaxial Corresponding to Dolby Digital and DTS D...

Страница 74: ...l Channel Set 64 Manual Timer Programming 38 Marking Positions To Play Back Again Later 25 Menu Audio Subtitle Language Set 19 Monitor Set 19 O On Disc Timer Programming 39 40 One Touch Replay 24 On screen Bar 30 On Screen Display 15 P Pan Scan 19 Play List 47 Playback Control PBC Function 26 Programme Playback 33 Progressive scan 63 R Random Playback 33 Recordable Playable Discs 6 Recording Mediu...

Страница 75: ...Masterpage Right No Heading EN 75 Filename M150SEK_11IX fm Page 75 June 15 2005 4 04 pm MEMO M150SEK_00 book Page 75 Wednesday June 15 2005 4 04 PM ...

Страница 76: ... 2005 Victor Company of Japan Limited EK Printed in Germany 0605MNH SW VE EN DR M150SEK M150SEK_00 book Page 76 Wednesday June 15 2005 4 04 PM ...

Отзывы: