background image

23

Preparations

4.

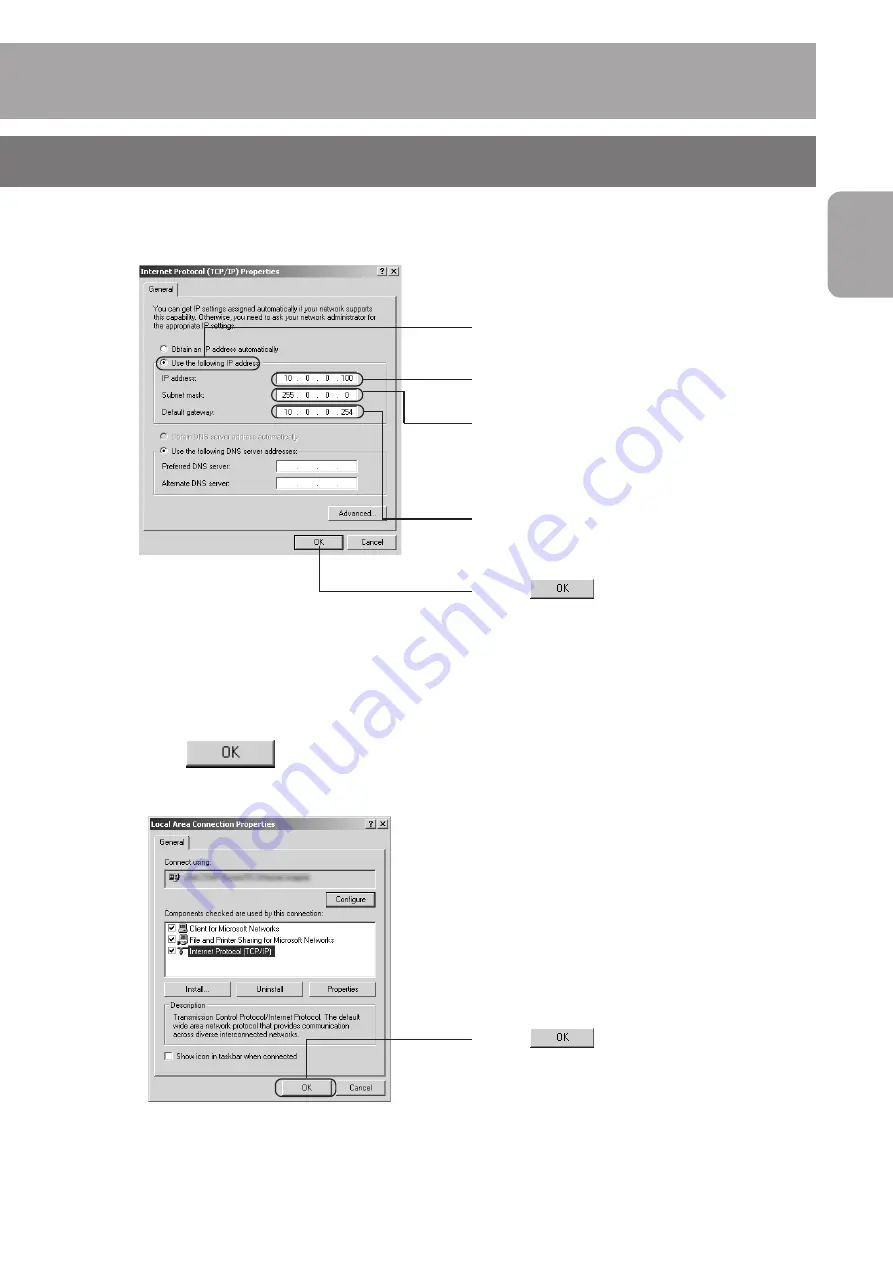
Set the IP address

5.

Click 

 in the “Local Area Connection Properties” dialog box

1

Click 

.

1

Select “Use the following IP address”.

2

Set  “IP address”. (For use at default setting

without DHCP server, enter 10.0.0.100)

3

Enter appropriate values for “Subnet mask”. If

unknown, ask to your network administrator.

4

If there is a “Default gateway”, enter the IP

address. (For example, 10.0.0.254)

5

Click 

.

Содержание DM-NC40

Страница 1: ...ated on the body Retain this information for future reference Model No DM NC40 Serial No DM NC40 INSTRUCTIONS NETWORK CODEC LST0176 001A POWER IN 2 IN 1 HOLD DECODE ENCODE CF PLAY STOP HOLD SELECT P P in This instruction book is mode from 100 recycled paper ...

Страница 2: ...utlet contact your electrician to replace your obsolete outlet Do not defeat the safety purpose of the grounding plug 11 For added protection for this product during a lightning storm or when it is left unattended and unused for long periods of time unplug it from the wall outlet and disconnect the antenna or cable system This will prevent damage to the product due to lightning and power line surg...

Страница 3: ...r relocate the receiving antenna Increase the separation between the equipment and receiver Connect the equipment into an outlet on a circuit different from that to which the receiver is connected Consult the dealer or an experienced radio TV technician for help CAUTION CHANGES OR MODIFICATIONS NOT APPROVED BY JVC COULD VOID USER S AUTHORITY TO OPERATE THE EQUIPMENT INFORMATION FOR USA THIS DEVICE...

Страница 4: ...atures How to view this manual Symbols used Items concerning the operations of this product are described References concerning the usage restrictions etc of this product are described Reference pages and reference items are indicated Button names in operation procedures are enclosed using Example Menu button Menu About the contents of this manual All rights reserved by JVC Unauthorized duplicatio...

Страница 5: ...rminal Software of a PC 53 Settings by Telnet of the PC 55 About the Alarm 56 Specifications 58 Features 4 Contents 5 Operational Environment 6 Cautionary Notes 7 Names and Operations of Parts 8 Various Applications 11 Preparation Flow 12 Step 1 Connection Installation 1 1 Connection Examples 13 1 2 Connecting a LAN Cable 17 1 3 Inserting a CF Compact Flash Card 17 1 4 SERIAL Ports and ALARM Port ...

Страница 6: ... nearest JVC authorized service agent Compatible PC The following operation environment is required when connecting a PC to this unit OS Windows XP Home Edition Windows XP Professional Windows 2000 CPU Pentium III 700MHz or higher Memory 256MB or more Monitor 640 X 480 pixels or higher Web browser Settings of this unit can be performed using Web browser Internet Explorer 6 0 Netscape 7 0 and brows...

Страница 7: ... in fire or elec trical shock Do not use the included power cord other than with this unit Do not place heavy objects such as a monitoring television on top of the unit Malfunction may oc cur as a result Always request installation to the dealer of pur chase About the echo canceller The echo canceller of the unit is provided for the prevention of howling However repeated echo ing of sound other th...

Страница 8: ... the lamp will turn off Factory setting HOLD 5 STOP Stop button Pressing the button will terminate connection and the 0 connection number display will turn off See Operations pages 42 and 43 6 PLAY Play button Pressing the button will establish connection The con necting destination will be displayed in the 0 connec tion number display See Operations page 42 7 CF Compact Flash button The button wi...

Страница 9: ...X OPEN VIDEO LOOP THRU SERIAL 1 SERVICE CONTROL SERIAL 2 OUT VIDEO IN 1 OPEN LOOP THRU VIDEO RESERVED AC IN R L OUT AUDIO ALARM RS485 RS232C IN 2 1 0 9 8 7 6 5 4 3 2 0 Connection number display While in the Teleconference or Monitor mode the con necting destination number is displayed The display will flash when establishing connection and the lamp will change to a constant display when connection...

Страница 10: ...ntrol unit etc The signal protocol can be selected using the N RS485 RS232C select switch The unit is equipped with a pass through feature for remote control via network P SERVICE CONTROL Protocol select switch of Serial Port 2 Selects the protocol of Q SERIAL 2 port SERVICE Only used during servicing Do not use this setting CONTROL Performs input output using signals with electrical properties th...

Страница 11: ... IN 1 HOLD DECODE ENCODE CF PLAY STOP HOLD SELECT P P in POWER IN 2 IN 1 HOLD DECODE ENCODE CF PLAY STOP HOLD SELECT P P in Network Network Live video audio can be sent received Speaker Microphone Remote monitoring can be performed while having audio communication Playback can be performed using a ISMA compliant player Camera Camera Microphone Teleconferencing Connection example page 13 PROFESSINA...

Страница 12: ...e LAN Login as the administrator Input the user name and password for administrator Page 24 Step 4 Initial Settings Change IP address of the unit according to the network environment You need reconnect Web browser with new IP address after changed Set the date and time to the unit Page 27 Step 5 Mode Setting Select mode of the unit according to the application See 1 1 Connection Examples page 13 P...

Страница 13: ...FILTER ON OFF FOCUS AUTO PUSH AUTO MANU OPEN VIDEO OUT AUDIO OUT AUDIO IN VIDEO IN 1 Teleconference mode page 29 V IN A IN AUDIO OUT VIDEO OUT 100BASE TX V IN A IN AUDIO OUT VIDEO OUT AUDIO IN VIDEO IN 1 VIDEO OUT AUDIO OUT Te l e c o n fe r e n c e mode page 29 100BASE TX Memo Make sure to set each IP address differently Use of a dedicated network is recommended Use 100BASE TX compatible network ...

Страница 14: ...2 VIDEO IN 1 AUDIO OUT 100BASE TX Monitor mode Page 29 Microphone Monitor Microphone A IN Make sure to set each IP address differently Use of a dedicated network is recommended Use 100BASE TX compatible network devices Set ports of the devices to Auto Negotiation Use the L channel of AUDIO IN R channel is not available in this mode Automatic recovery works by power on when working unit is turned o...

Страница 15: ...e to set each IP address differently Use of a dedicated network is recommended Up to 5 players can be connected for unicast Audio is compatible with MPEG 4 AAC LC stereo 3 Streaming system ISMA compliant When using the unit in the ISMA Server mode an ISMA compliant player is required For details of ISMA compliant player please consult the person in charge of professional equipment at your nearest ...

Страница 16: ...d back Camera mode Camera mode Only audio will be played back Observing the video and audio using another DM NC40 unit observer mode Observing stream is available by connecting another DM NC40 unit to working DM NC40 Camera mode accepts observing at the time of shipment For teleconference mode a setting change using API is required to accept observing Page 54 Remote Monitoring system Camera mode a...

Страница 17: ... steps shown below Note Always turn off the power when inserting removing a CF card Inserting removing the card with the power on may cause damage to the recorded files of the card or the card itself 1 Remove the cover If the mounting screw is difficult to turn use a hexagonal wrench bolt width 2 5mm Insert a CF card Make sure the top side is facing up and insert the card securely 3 Collapse the E...

Страница 18: ...orts see Serial Port Setup screen page 40 When viewing from the back of unit Pin no Signal name 1 OUTPUT 1 2 OUTPUT 2 3 OUTPUT 3 4 OUTPUT 4 5 OUTPUT 5 6 OUTPUT 6 7 OUTPUT 7 8 OUTPUT 8 9 INPUT 1 10 INPUT 2 11 INPUT 3 12 INPUT 4 13 GND 14 GND 15 GND Alarm input port Input conditions Signal length setting Trigger Duration page 38 Polarity setting Trigger page 38 Connection to 5V power 10kΩ internally...

Страница 19: ... pull out the feet using the pro trusions on the center 2 Remove the 4 screws on the sides 3 Install the rack mount brackets WT Z11J as shown in the diagram Screws are included with the rack mount brackets 1 Remove the 4 feet on the bottom of the unit Use a set of long nose pliers or a flat head screwdriver to pull out the feet using the pro trusions on the center 2 Remove the 2 screws on the bott...

Страница 20: ...the PC For Windows XP When connection and installation are completed the IP address of the PC controlling the unit is set For Windows XP perform the setting using the steps shown below For Windows 2000 see page 22 Step 2 PC Network Setup Confirm that the checkbox is selected Memo If Client for Microsoft Network and Internet Protocol TCP IP are not displayed perform Install N 1 Select Internet Prot...

Страница 21: ...ithout DHCP server enter 10 0 0 100 3 Enter appropriate values for Subnet mask If unknown ask to your network administrator For compatibility with default settings use 255 0 0 0 4 If there is a Default gateway enter the IP address For example 10 0 0 254 5 Click Memo Always take a memo of the original IP address before making changes Do not use the same IP addresses within a LAN 1 Click ...

Страница 22: ...IP and click 2 2 Setting the IP Address of the PC For Windows 2000 When connection and installation are completed the IP address of the PC controlling the unit is set For Windows 2000 perform the setting using the steps shown below For Windows XP see page 20 Step 2 PC Network Settings Continued 1 Select Internet Protocol TCP IP 2 Click 1 Click ...

Страница 23: ...1 Click 1 Select Use the following IP address 2 Set IP address For use at default setting without DHCP server enter 10 0 0 100 3 Enter appropriate values for Subnet mask If unknown ask to your network administrator 4 If there is a Default gateway enter the IP address For example 10 0 0 254 5 Click ...

Страница 24: ...s manual are screen copy of Internet Explorer as examples For Internet Explorer 6 0 When the password of the unit is changed the user may be prompted to enter the password twice in the password confirmation window In this case enter the same password twice For Netscape 7 0 Web page will not be refreshed even if window size of Netscape is changed Click the Refresh button of Netscape to refresh the ...

Страница 25: ...SETUP OUTPUT PIN SETUP SERIAL PORT SETUP CF CARD SETUP Screen displayed after authentication Administrator Operator User Displayed screen STATUS screen STATUS screen ENCODE PARAMETERS screen Factory set user names and passwords Administrator Operator User admin OPERATOR Uppercase USER Uppercase dm nc40 dm nc40 None Can be changed in the SECURITY SETUP screen Can be changed in the SECURITY SETUP sc...

Страница 26: ...lose previous browser and reconnect or open new browser and connect 3 Network Codec screen STATUS is displayed 1 Enter the IP address of the unit Factory setting 10 0 0 1 is available when there is no DHCP server 2 Click Go Memo Direct specification of the IP ad dress may not be possible when a proxy server is used for Internet access In this case dis able the proxy setting Click Detailed Setup to...

Страница 27: ...nging IP address of DM NC40 from 10 0 0 1 to 192 168 0 1 and Subnet mask from 255 0 0 0 to 255 255 255 0 You may change IP address of PC from 10 0 0 2 to 192 168 0 2 and Subnet mask from 255 0 0 0 to 255 255 255 0 Connection can be reestablished by entering http 192 168 0 1 in the address bar of the Web browser 4 1 Changing the IP Address of the Unit Be sure to perform Step 4 Initial Settings DHCP...

Страница 28: ... of the Network Codec screen The TIME SETUP screen will be displayed 1 Select the country region of use 4 Current time and date can be confirmed by pressing the RELOAD button 3 Press the SET button to register the entered values Memo The Second is for display only and cannot be entered or changed 2 Enter the year month date hour and minute Memo When changing the Timezone be sure to set Date Time S...

Страница 29: ...ns user defined mode changed from Camera mode Click Detailed Setup to display submenus Memo When clicking this button the HOLD display lamp will turn on and panel operations will be locked The following screen appears on the Browser after performing changes and the number display of the unit will show a circling display and are displayed 1 Select the mode Factory setting CAMERA mode Cautions conce...

Страница 30: ...m Web browser using the new IP address for more settings Subnet Mask Set the subnet mask 255 0 0 0 The subset mask is noted using 4 decimal numbers Set the default gateway Default Gateway The default gateway is noted using 4 decimal numbers 10 0 0 254 If you failed to set default gateway address try again from setting of IP address If there is no default gateway enter 0 0 0 0 Network related setti...

Страница 31: ...RT Multicast transmission is started when the button is clicked The START button is yellow during Multicasting STOP Multicast transmission is stopped when the button is clicked The STOP button is yellow when Multicast stream is not transmitted Multicast Address The multicast destination IP address is set 225 0 1 1 When the START button of Multicast is clicked multicast stream is sent to this IP ad...

Страница 32: ...ate is average value when inputting standard video Real bitrate can be higher lower than the set value depending on the input video When the encode parameters are changed during communication with other DM NC40 the play back can freeze for a while This is a characteristic of this unit and is not a malfunction When the encode parameters are changed during streaming in the ISMA Server mode playback ...

Страница 33: ...30 30 fps M 5 5 6 6 10 10 10 10 15 15 15 15 15 15 15 L 3 3 5 5 6 6 6 6 10 10 10 10 10 10 10 audio rate bps 96k 128k Cannot be set Cautions when changing settings To check current communication refer to Telnet Settings on page 53 and execute the stat command Do not change settings during CF recording Malfunction may occur as a result Set values in this page are default values Working ENCODER PARAME...

Страница 34: ...ephone Book on the left the Network Codec screen to display the TELEPHONE BOOK screen Enter Click Add to Book to register entered values Select the screen Registered IP addresses are listed To delete the registered number enter Edit No and click Del from Book By registering a multicast address to the telephone book multicast receiving can be started by panel operation When multicast address is reg...

Страница 35: ...n the left of the Network Codec screen to display the SECURITY SETUP screen Click Change to display the Change Setting screen 6 4 SECURITY SETUP screen Change Setting Screen Enter the current user name E n t e r t h e c u r r e n t password Enter the new user name Enter the new password Enter the new password again Select the screen ...

Страница 36: ...r Account information user name and password to get nc40jpeg dm nc40 JPEG files via Web browser can be changed Pass Through The pass through account information nc40serial dm nc40 user name and password can be changed Characters allowed for user name and password Numbers alphabets underscore _ hyphen period Number of characters allowed for user name and password Telnet API only User name Minimum o...

Страница 37: ... the left the Network Codec screen to display the ALARM SETUP screen 6 5 ALARM SETUP screen Select from the pull down menu Select the screen Select from the pull down menu Select one Enter Enter destination IP address and parameters for forwarding alarm Click to confirm settings Select from the pull down menu ...

Страница 38: ... characters must be alphanumerical characters dm nc40 with a maximum of 64 characters Select the pin no of the alarm port to set Variable 1 4 Select the polarity of the alarm input signal Input signal is invalid when setting to Disable Variable Low High Disabled Set the length of input signal to assume as an alarm Variable 50ms 100ms 200ms 300ms 400ms 500ms CF recording duration triggered by alarm...

Страница 39: ... display the OUTPUT PIN SETUP screen Select the screen Select one for each item Click to confirm settings Item Content Default value Output Pin 1 8 High Set high or low to output pins in the alarm port High Outputs high level Low Outputs low level Outputs are TTL level These output pins are not alarm output of the unit These output pins are available to control external devices ...

Страница 40: ...m Content Default value Baudrate 19200bps Data Length 8 Parity None Stop Bit 1 Comment dm nc40 Timeout sec 0 Select communication rate Variable 4800bps 9600bps 19200bps 38400bps Select the data length from 8 bits and 7 bits Variable 8 7 Select parity bit Variable Even Odd None Select stop bit length Variable 1 2 This can be used as a memo when viewing this screen with a Web browser Entry is option...

Страница 41: ...es for recording and the total size of the inserted CF card However the entire capacity may not be used for recording due to system restrictions concerning the number of recorded images allowed See page 56 Sets whether to leave log information operation history for servicing in the CF card ON Leaves log information OFF Does not leave log information Sets whether to overwrite old image files record...

Страница 42: ...LECT P P in POWER IN 2 IN 1 HOLD DECODE ENCODE CF PLAY STOP HOLD SELECT P P in Network Network 4 7 6 1 User Number display 2 3 7 6 1 The number display circles IP address is displayed as shown on page 48 and then turns off when ready Off The number display circles IP address is displayed as shown on page 48 and then turns off when ready Off Use 왗 and 왘 to select the digit to input Use 왔 and 왖 to i...

Страница 43: ... will be displayed Connection will be disconnected and the number display and video display will be cleared Connection will be disconnected and the number display and video dis play will be cleared 5 When connection is established 6 Press the PinP button 7 Press the STOP button The display will change to a constant display and the video of the connect party will be displayed The videos of the user...

Страница 44: ...ns off when ready The number display circles IP address is displayed as shown on page 48 and then turns off when ready Off Off The entered number will flash The sent number will flash Memo Pressing 왗 or 왘 first will display the number of the previous connection Use 왗 and 왘 to select the digit to input Use 왔 and 왖 to increment decrement the number of the selected digit 0 9 4 When connection is esta...

Страница 45: ...ODE lamp and DECODE lamp will light Memo When unicast communication is stopped in cam era side the number display on the camera side is off even if the unit is sending multicast stream and some monitor side is receiving it When configuring remote monitoring system set same frame rate to camera mode unit and monitor mode unit Set bitrates within same color on the select bar to all units Settings ar...

Страница 46: ...the Refresh button on the browser Specifying URL Specify JPEG URL of the unit as follows http IP address port number live jpg Example http 10 0 0 1 8009 live jpg This value is fixed Value set in the Network Setup Screen Default user name is nc40jpeg and default password is dm nc40 The password can be changed Enabling JPEG server of the unit To enable JPEG server of the unit set JPEG in the ENCODE ...

Страница 47: ...the same IP addresses have not been set within the same network For multicast 1 Set the IP address of the PC for connection with DM NC40 See Setting the IP Address pages 20 and 22 2 Launch the Web browser In Network Setup of the unit page 30 set the Multicast stream start button to ON The multicast stream is transmitted from the DM NC40 3 Receive multicast streams with an ISMA compliant player For...

Страница 48: ...0 1 Initialization operation When DHCP server is not available network settings by manual may be required Use Web browser see page 30 or API commands described in page 54 to change the setting to Manual Changing from DHCP to Manual is possible from Web browser but you need to use API command to change from Manual to DHCP During DHCP is enabled IP Address Subnet Mask Default Gateway Domain Name and...

Страница 49: ... When using a CF card reader with Windows format the CF card using the FAT32 When deleting all files in the jpeg 1 and jpeg 2 directories of each Alarm directory will be deleted The unit does not support hot swap of CF card Turn off the power when inserting removing a CF card Format See Delete CF CARD SETUP screen Card reader Via FTP Number of files for each alarm total number in jpeg 1 and jpeg 2...

Страница 50: ... folders YYMMDDHHmmss jpg YY last 2 digits of year MM month 01 12 DD date 01 31 HH hour 00 23 mm minute 00 59 ss second 00 59 running number within the second value 00 01 02 However running numbers at the second of the start are 70 71 and 72 to show the beginning Running numbers at the second of the end are 80 81 and 82 to show the last Running numbers at the second of alarm input or manual start ...

Страница 51: ...t the second of the start are 70 71 and 72 to show the beginning Running numbers at the second of the end are 80 81 and 82 to show the last Running numbers at the second of alarm input or manual start are 90 91 and 92 to show the timing Example Recorded files at 12 34 56 on April 1 2003 File names will be 03040112345600 jpg 03040112345601 jpg 03040112345602 jpg Operating of FTP 1 Enter 10 0 0 1 IP...

Страница 52: ...yed the transfer is completed 1 Enter get file name of image and press the Enter key 2 Transfer file to the C drive as pict1 jpg 1 Enter del file name to delete and press the Enter key 2 When DEL command successful is displayed the deletion is completed 3 File names in current directory are displayed 2 Enter ls and press the Enter key 1 Type cd path of directory to move to the directory Here jpeg ...

Страница 53: ...are using the PC For Windows XP Start Accessories Communication Hyper Terminal Set the terminal software as follows Baud rate 115200bps Data length 8 bits Parity None Stop bit 1 bit Flow control None Launch screen When the DM NC40 is running the prompt will appear in the terminal software when the Enter key is pressed Terminal software cannot work during Telnet is connected to the unit Please term...

Страница 54: ...ideo 49398 Port settings in NETWORK SETUP screen are not used In the UDP mode used ports are audio 49200 and video 49300 In the case of RTCP transmission will be done in UDP even when in TCP mode When TCP is selected used ports for RTCP are audio 49299 and video 49399 Multicast is UDP protocol Multicast does not turn to TCP set tcp on Switches to TCP mode set tcp off Switches to UDP mode set brmon...

Страница 55: ...tart command prompt 2 Type telnet 10 0 0 1 3 Enter nc40api as the user name and dm nc40 as the password Settings by Telnet of the PC Memo When displayed lines in the telnet window are not enough increase the buffer size in the settings of the Telnet software Memo If Telnet cannot be exited properly due to network or PC problems reconnection of Tenet will fail since the unit keeps previous Telnet c...

Страница 56: ...ngs Select input video Select input video for JPEG in the ENCODE PARAMETERS screen Video In 1 or Video In 2 Alarm input settings Polarities of ALARM INPUT 1 4 pin 9 12th in Dsub for alarm recording time etc are set in the ALARM SETUP screen CF card settings Settings concerning the CF card are made in the CF CARD SETUP screen Operations Approximate maximum number of images and recording time for ea...

Страница 57: ...led as above When connected with PLAY button encode parameters in the telephone book of the monitor unit are used If there are multiple registrations having same IP addresses in the telephone book smallest Edit No is used In observing mode monitor unit obeys settings of camera side Alarm notifications from DM NC40 units not registered in the TELEPHONE BOOK is ignored Alarm notifications from curre...

Страница 58: ...Ω with loop through 2 Audio input Lch Rch RCA 2 Vrms AAC LC only for Rch Video output 1 V p p BNC Audio output 1 channel RCA External control 2 lines D sub 9 pin male RS485 RS232C switching possible However RS232C fixed for 1 line Alarm port D sub 15 pin female Stream control RTSP Telnet API Stream input output 100BASE TX Overall Power supply AC120V 50Hz 60Hz Rated current 0 3A Mass 2 6kg Operatio...

Страница 59: ...59 ...

Страница 60: ...OMPANY OF JAPAN LIMITED Printed in Japan LST0176 001A is a registered trademark owned by VICTOR COMPANY OF JAPAN LTD is a registered trademark in Japan the U S A the U K and many other countries 2003 VICTOR COMPANY OF JAPAN LIMITED ...

Отзывы: