14
Network
Network
IN 2
100BASE-TX
OPEN
VIDEO
LOOP
THRU
SERIAL 1
SERVICE
CONTROL
SERIAL 2
OUT
VIDEO
IN 1
OPEN
LOOP
THRU
VIDEO
RESERVED
AC IN
R
L
OUT
AUDIO
ALARM
RS485
RS232C
IN
IN 2
100BASE-TX
OPEN
VIDEO
LOOP
THRU
SERIAL 1
SERVICE
CONTROL
SERIAL 2
OUT
VIDEO
IN 1
OPEN
LOOP
THRU
VIDEO
RESERVED
AC IN
R
L
OUT
AUDIO
ALARM
RS485
RS232C
IN
ALC
LEVEL
Av Pk
L H
ALC
LEVEL
Av Pk
L H
1-1 Connection Examples
(Continued)
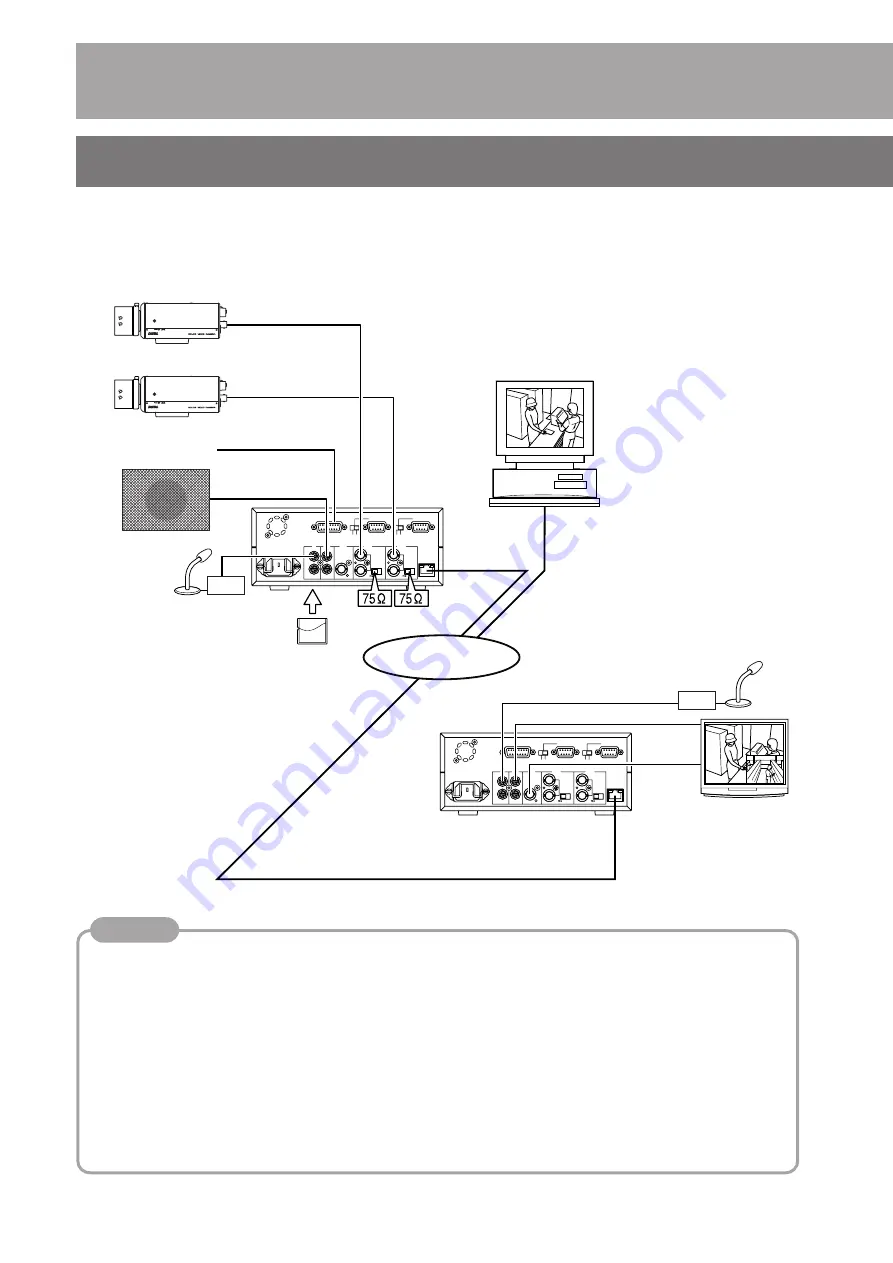
(2) Remote monitoring system
Bidirectional audio conference is available. The units can reconnect automatically by power on after power failures.
(CF card recording can only be performed on the camera side. Recording on the monitoring side is not available.)
Step 1 Connection/Installation
(Continued)
Speaker
Camera 1
CF card
(
Page 17)
Camera 2
Camera mode
(
Page 29)
VIDEO IN 2
VIDEO IN 1
AUDIO OUT
100BASE-TX
Monitor mode
(
Page 29)
Microphone
Monitor
Microphone
A. IN
•
Make sure to set each IP address differently.
•
Use of a dedicated network is recommended.
•
Use 100BASE-TX compatible network devices. Set ports of the devices to Auto Negotiation.
•
Use the L channel of AUDIO IN. R channel is not available in this mode.
•
Automatic recovery works by power on when working unit is turned off.
•
When connection is resumed by the automatic recovery feature, flashing of the connection number display
may be longer than usual or the video and audio output may take some time after the display turns on. How-
ever, this is not a malfunction of the unit.
•
Video input is to be inputted in VIDEO IN 1 or VIDEO IN 2 on the camera side.
•
The echo canceller is set to OFF when shipped. To use echo canceller for bidirectional audio communication,
see page 53.
JPEG images can be
monitored (
Page 46)
AUDIO IN
AUDIO OUT
V. IN
VIDEO
OUT
ALARM
INPUT 1~4
Alarm signal
Amplifier
Amplifier
Memo
Содержание DM-NC40
Страница 59: ...59 ...


