3-1
Section 3 Basic Operations
3.1 Name and Function of Each Unit
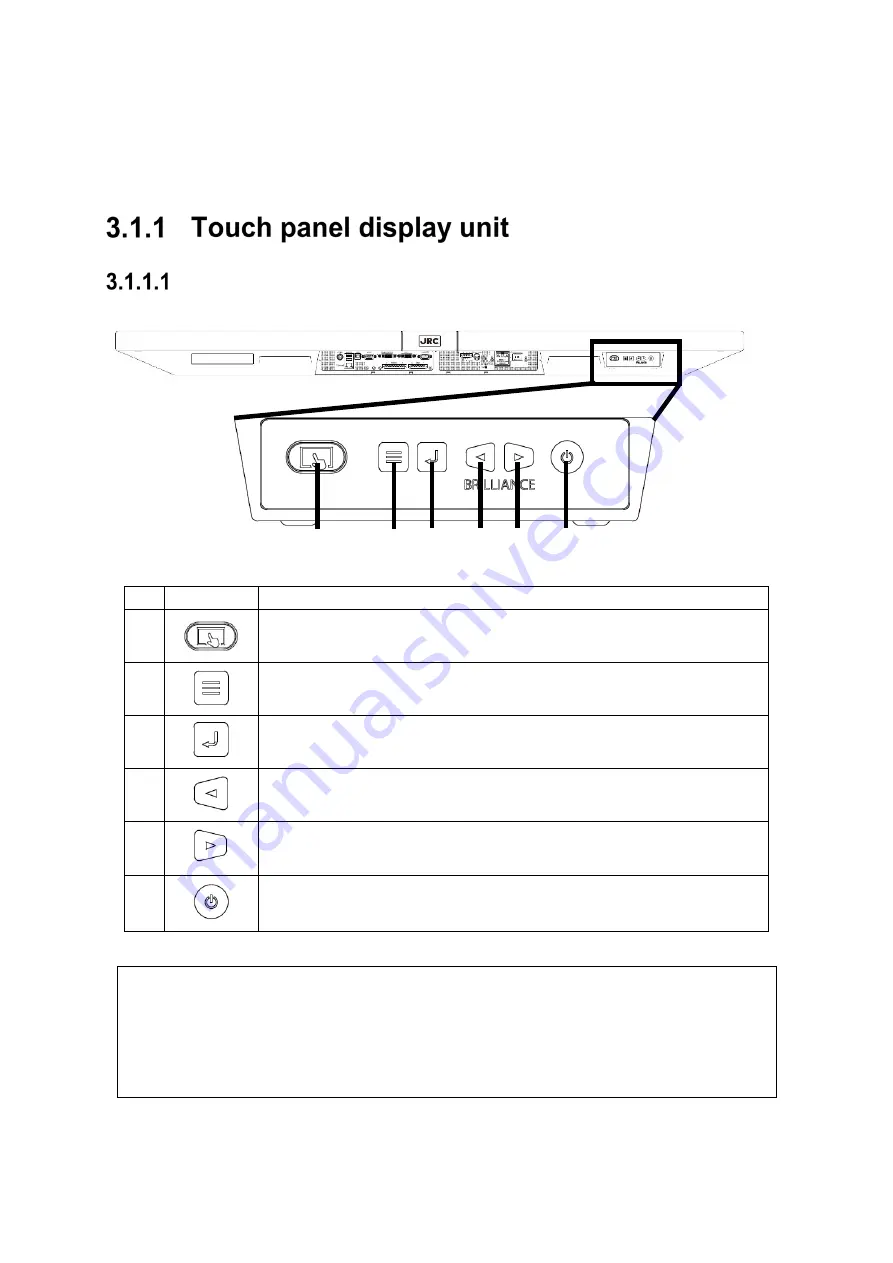
46 inch touch panel display unit (NWZ-1470/1470N)
No.
Button
Function outline
1
To switch touch panel operation to Enabled/Disabled.
When touch panel operation is enabled, the button lights in blue.
2
To display the adjustment menu of the touch panel display unit or cancel the
adjustment/setting of the touch panel display unit.
3
To display the input signal name, determine the adjustment items of the touch
panel display unit, or save the adjustment results.
4
To decrease the screen brightness, or to select an adjustment item of the touch
panel display unit.
5
To increase the screen brightness, or to select an adjustment item of the touch
panel display unit.
6
To switch ON/OFF the power.
To turn OFF the power, press the button for 5 seconds or longer. After a progress
bar is displayed on the screen, the power turns OFF.
Memo
Adjust the brightness of the screen to the extent it is not dazzling, taking into account the
brightness of the surroundings and to the brightness which you can be easily observed the
ECDIS screens.
Be careful in the nighttime brightness adjustment because nighttime brightness adjustment may
hinder the visibility of information.
(1)
(2)
(3)
(4)
(5)
(6)
Содержание J-Marine NeCST
Страница 2: ......
Страница 25: ...xxiii...
Страница 33: ...2 6 External Views of HNS 00010 Display Processing Unit MASS APPROX 1 91kg UNIT mm 1 91kg mm...
Страница 39: ...2 12 MASS APPROX 18 9kg UNIT mm 18 9kg mm External Views SMT1000I 171 00 219 00 439 00...
Страница 40: ...2 13 External Views of AP9630...
Страница 42: ...2 15 External Views of HJP 100 3 MASS 6 5kg UNIT mm 6 5kg mm...
Страница 58: ...2 31 FURUNO ECDIS VDR For 230V configuration Figure 2 6 2c JAN 470 2ANN for FURUNO ECDIS connection diagram...
Страница 61: ...2 34 Figure 2 6 2f FURUNO ECDIS VDR connection diagram...
Страница 67: ...3 6 Windows starts Then double tap the NeCST icon The NeCST app starts...
Страница 77: ...3 16 The delete confirmation pop up is displayed To cancel the import of the route tap the Cancel button...
Страница 91: ...3 30 Deleting WP of Route The tapped WP is deleted Editing Route Data...
Страница 99: ...3 38 If the Soft Version of JAN 7201 9201 is earlier than 01 30 110 you can use the following procedure...
Страница 100: ...3 39 The route data of JAN 470 is displayed on ECIDS...
Страница 128: ...3 67 Deleting Circle The selected circle is deleted...
Страница 141: ...3 80 If the Soft Version of JAN 7201 9201 is earlier than 01 30 110 you can use the following procedure...
Страница 143: ...3 82 JAN 701B 901B The Handwritten data is displayed on ECDIS...
Страница 152: ...3 91 JAN 701B 901B The Handwritten data is displayed on ECDIS...
Страница 155: ...3 94 An addition to a created memo can be made The mode switches to the Edit mode...
Страница 174: ...3 113 The file selection screen is displayed Select supplied permit txt Information of the used Cell Permit is displayed...
Страница 181: ...3 120 If Success is displayed and Chart process is displayed Running update is completed...
Страница 182: ...3 121 Starting the Chart Import Software The chart import software starts...
Страница 184: ...3 123 The file selection screen is displayed Select supplied permit txt Information of the used Cell Permit is displayed...
Страница 217: ...3 156 The photo list is displayed The selected photo and icon are displayed...
Страница 275: ...6 2...
Страница 287: ...7 12...
Страница 290: ......
Страница 291: ......


