T606MSx-4 and T606MSx-4+PIR Series Multi-Stage Temperature and Humidity Controllers
Installation Instructions
8
Configuring the
T606MSx-4 or T606MSx-4+PIR
Series Controller
The T606MSx-4 and T606MSx-4+PIR Series
Controllers ship from the factory with default settings
for all configurable parameters. The default settings are
shown in Table 2. To reconfigure the parameters via the
controller, follow the steps in this section.
1.
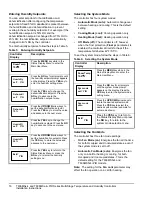
To access the Installer Configuration Menu,
press and hold the
MENU
key for approximately
8 seconds.
Note:
If the
Password
parameter is configured,
Password 0 appears on the controller display indicating
that the configured password is required to proceed.
Use the
UP/DOWN
arrow keys to indicate the
configured password, then press the
YES
key to
proceed through the Installer Configuration Menu
parameters.
2.
Once the Installer Configuration Menu begins,
press the
NO
key to scroll through the parameters
listed in Table 2.
3.
When the desired parameter is displayed, use the
YES
key to choose the desired selection option.
4.
Press the
YES
key and then the
NO
key to
continue scrolling through the parameters.
To exit the Installer Configuration Menu at any time,
press the
MENU
key, then at the exit prompt, press the
YES
key. To pass over a parameter without changing it,
press the
NO
key.
When the controller is in the Installer Configuration
Menu and left unattended for approximately 8 seconds,
the controller reverts to the Status Display Menu.
Configuring the Digital Input
When DI is configured for an alarm condition, an alarm
condition is displayed locally when the input is closed.
An alarm message is included on the scrolling Status
Display Menu and when the message is displayed, the
backlight momentarily lights up.
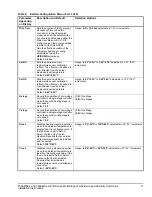
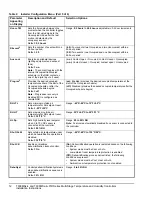
The input can be configured to the Selection Options
included in Table 2.
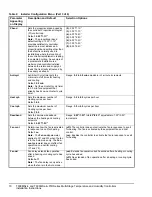
Table 2: Installer Configuration Menu (Part 1 of 6)
Parameter
Appearing
on Display
Description and Default
Selection Options
Pswrd
Sets the protective access
password to prevent unauthorized
access to the Installer Configuration
Menu.
Default:
0
Note:
The default setting does not
lock out access to the Installer
Configuration Menu.
Range:
0
to
1,000
%RH disp
Enables the display of humidity
(%RH) below the room temperature
on the controller display.
Default:
Off
(On):
Display %RH.
(Off):
No %RH display.
DI
1
Configures digital input.
Open Contact Input = function not
energized.
Closed Contact Input = function
energized.
Default:
None
(None):
No function is associated with an input.
(Service):
A Service alarm is displayed on the controller when the
input is energized. Tie this input into the air conditioning unit control
card, which provides an alarm if a malfunction occurs.
(Filter):
A Filter alarm is displayed. This alarm can be connected to
a differential pressure switch that monitors a filter.
(RemOVR):
Temporary occupancy request via a remote input. This
override function is controlled by a manual remote occupancy
override. When enabled, this condition disables the override
capability of the controller.
(RemNSB):
Remote Night Setback (NSB) via a time clock input, an
occupancy sensor, or from a voltage-free contact.
Contact open = Occupied; contact closed = Unoccupied.
(Fan lock):
A backlit flashing Fan lock alarm is displayed on the
controller when the input is not energized. This alarm is used in
conjunction with a local airflow sensor connected to the input. The
controller heating or cooling action is locked out if no airflow is
detected 10 seconds after the fan (Terminal G) is energized. Contact
open = no airflow; contact closed = airflow present.


