background image

3.5  GENERAL OPERATIONS 

y


yy


3-21 


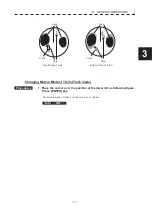
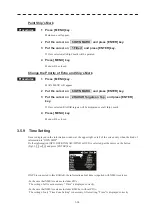
Changing Motion Mode of Trails (Trails mode) 


Procedures 


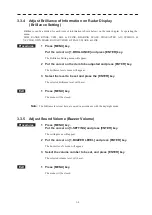
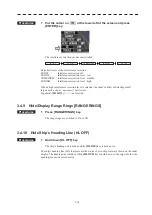
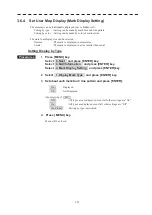
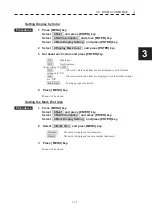
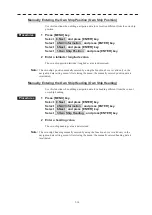
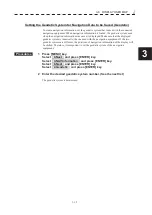
1  Place the cursor over the position at the lower left as following figure. 

Press [ENTER] key. 

 
The motion mode of trails is switched to true or relative.   


Land

Ship


Trails


Land 

Ship


Trails


True Motion Trails


Relative Motion Trails


Содержание JMR-611

Страница 1: ...R EQUIPMENT ISO 9001 ISO 14001 Certified SEP 2021 Edition 2 CODE No 7ZPRD1016 Not use the asbestos For further information contact URL Head office http www jrc co jp eng Marine Service Department 1 7...

Страница 2: ......

Страница 3: ...r correct operation z Keep this manual in a convenient place for future reference Make use of this manual when experiencing operation difficulties z The LCD of this equipment uses thin film transistor...

Страница 4: ...are not operated correctly CAUTION This indication is shown where any person is supposed to be injured or any property damage is supposed to occur if this indication is neglected and these equipment...

Страница 5: ...are turned off Failure to comply may result in equipment failure or death or serious injury due to electric shock When conducting maintenance work on the antenna make sure to turn its main power off F...

Страница 6: ...ath or serious injury due to electric shock may result because voltage is outputted from the rectifier even when the radar is not operating Turn off the main power source before starting maintenance O...

Страница 7: ...enance Otherwise an electric shock or injury may be caused Turn off the main power if you need to be near the scanner unit for maintenance or inspection purposes Direct exposure to electromagnetic wav...

Страница 8: ...es from the rain or snow at the close range Detection of not only echoes from the rain or snow but also targets such as other ships or dangerous objects will become inhibited When using the RAIN funct...

Страница 9: ...al environment This equipment generates uses and can radiate radio frequency energy and if not installed and used in accordance with the instruction manual may cause harmful interference to radio comm...

Страница 10: ...parts are no longer charged Extra protection is ensured by wearing dry cotton gloves at this time Another important precaution to observe is to keep one hand in your pocket at a time instead of using...

Страница 11: ...4 Lay the patient on the back loosening the necktie clothes belts and so on 5 a Feel the patient s pulse b Check the heartbeat by bringing your ear close to the patient s heart c Check for respiration...

Страница 12: ...deep breath and blow into the nostril through the pipe with the other nostril and the mouth completely closed 6 The patient may stand up abruptly upon recovering consciousness Keep the patient lying c...

Страница 13: ...aider is trained in rescue breath and has the skill and will to do it he she should perform the combination of chest compressions and rescue breaths at the ratio of 30 2 If there is a fear of infecti...

Страница 14: ...response or gesture determine it as responding But if there is no response or gesture determine it as not responding 3 If responding a Give first aid treatment 4 If not responding a Ask for help loud...

Страница 15: ...ly 5 cm b Combination of 30 times chest compressions and 2 times rescue breaths 1 If the first aider is not trained in rescue breaths he she should perform only chest compressions 2 If the first aider...

Страница 16: ...or ill person with the adhesive side facing the chest If the pads are not securely attached to the chest the AED may not function Paste the pads exactly at the positions indicated on the pads If the...

Страница 17: ...ess the chest wall to a depth of approximately 5 cm Perform compressions at the rate of about 100 120 times per minute 13 Automatic electrocardiogram analysis a When 2 minutes have elapsed since you r...

Страница 18: ...s from GPS satellites HDG Heading Own ship s heading bearing The display ranges from 000 to 360 degrees as scanned clockwise HL Heading Line Ship s heading line HUP Head Up Own ship s heading line is...

Страница 19: ...e motion presentation A presentation in which own ship and any other target move depending on their individual movements TRAILS Function of displaying tracks of other ships True Vector A target s true...

Страница 20: ...IONS OF CONTROL PANEL SWITCHES AND FUNCTIONS OF SOFTWARE BUTTONS 2 1 NAMES AND FUNCTIONS OF CONTROL PANELSWITCHES 2 2 2 2 MENU LIST 2 5 2 3 NAMES AND FUNCTIONS OF ON SCEEN CONTROLS 2 11 3 BASIC OPERAT...

Страница 21: ...S 3 14 3 4 10 HIDE SHIP S HEADING LINE HL OFF 3 14 3 4 11 SEA STATE SEA STATE 3 15 3 5 GENERAL OPERATIONS 3 16 3 5 1 MOVE CROSS CURSOR MARK BY TRACKBALL 3 16 3 5 2 USE EBLS ELECTRONIC BEARING LINES EB...

Страница 22: ...FORMAT CARD 3 52 3 10 AIS FUNCTION 3 53 3 10 1 VESSEL NAME LIST 3 53 3 10 2 VESSEL INFORMATION 3 54 3 10 3 DISPLAY THE VESSEL NAMES ON THE SCREEN 3 54 3 10 4 AIS SETTING MENU 3 55 3 10 5 AIS SYMBOL 3...

Страница 23: ...1 10 2 SCANNER NKE 387 10 2 10 3 CONTROL UNIT NCM 994 10 3 10 4 INPUT SIGNAL 10 4 10 5 OUTPUT SIGNAL 10 5 10 6 STANDARD EQUIPMENT COMPOSITION 10 5 10 7 DISTANCE BETWEEN UNITS 10 5 APPENDIX HOW TO INS...

Страница 24: ......

Страница 25: ...PANEL SWITCHES AND FUNCTIONS OF SOFTWARE BUTTONS 3 BASIC OPERATION 4 MEASUREMENT OF RANGE AND BEARING 5 TRUE AND FALSE ECHOES ON DISPLAY 6 MAINTENANCE 7 TROUBLE SHOOTING AND ADJUSTMENT 8 AFTER SALES S...

Страница 26: ......

Страница 27: ...AND EQUIPMENT COMPOSITION SECTION 1 GENERAL AND EQUIPMENT COMPOSITION 1 1 Foreword 1 1 1 1 1 Function of This System 1 1 1 2 Features 1 2 1 3 Configuration 1 3 1 4 Exterior Drawings 1 4 1 5 General Sy...

Страница 28: ......

Страница 29: ...TSI EN 302 194 1 V1 1 2 2006 10 and ES TRIN 2019 and has a type approval e 01 024 1 1 1 Function of This System The main functions include x sensitivity adjustment x sea clutter and rain snow clutter...

Страница 30: ...ynamic range thus improving the target detection Easy Operation with GUI All the radar functions can be easily controlled by simply using the trackball and two switches to operate the buttons shown on...

Страница 31: ...9 kW X Radar Configuration and Ship s Mains RADAR MODEL SCANNER UNIT CONTROL UNIT SHIP S MAINS JMR 611 NKE 387 NCM 994 24 VDC Notes 1 An optional rectifier is necessary for using Ship s Mains 100 110...

Страница 32: ...S Fig 1 1 Exterior Drawing of Scanner Unit Type NKE 387 Fig 1 2 Exterior Drawing of Processing Unit Type NDC 1774 Fig 1 3 Exterior Drawing of Operating Unit Type NCE 5923 Fig 1 4 General System Diagra...

Страница 33: ...1 5 1 1 4 EXTERIOR DRAWINGS y Fig 1 1 Exterior Drawing of Scanner Unit Type NKE 387 Unit mm...

Страница 34: ...1 6 Fig 1 2 Exterior Drawing of Processing Unit Type NDC 1774 Unit mm...

Страница 35: ...1 7 1 1 4 EXTERIOR DRAWINGS y Fig 1 3 Exterior Drawing of Operating Unit Type NCE 5923 Unit mm...

Страница 36: ...Autopilot Time Trip NMEA output Cursor or own ship s data USB MOUSE Analog input ROT Rudder AIS Fig 1 4 General System Diagram of Radar Type JMR 611 Note Eliminating the interference on frequencies u...

Страница 37: ...EL SWITCHES AND FUNCTIONS OF SOFTWARE BUTTONS SECTION 2 NAMES AND FUNCTIONS OF CONTROL PANEL SWITCHES AND FUNCTIONS OF SOFTWARE BUTTONS 2 1 NAMES AND FUNCTIONS OF CONTROL PANEL 2 1 2 2 MENU LIST 2 5 2...

Страница 38: ......

Страница 39: ...r Mode ALARM Tune Indicator Center Position Select Bearing Mode Indicator Interference Rejecter Level SEA STATE Mode Video Noise Rejection Indicator TX Pulse Width Transmit Standby Indicator Auto Tuni...

Страница 40: ...Index Line Key 9 RAIN Rain Snow Clutter Suppression dial 10 DAY NIGHT Day Night Mode key 11 SEA Sea Clutter Suppression dial 12 HL OFF Heading Line Off key 13 TUNE AUTO Tune Control Automatic dial 14...

Страница 41: ...s the alarms OFF CENT Off Center key Use this key to shift the own ship s position GAIN Gain dial Turn the dial to adjust the reception gain of the radar Turn the dial clockwise to increase the gain P...

Страница 42: ...memory to a flash memory card captured data in internal memory in auto 2 capture mode EXP Echo Expansion key Use this key to expand the radar echo SEA STATE Sea State key Use this key to change sea s...

Страница 43: ...ils Green White BR_Blue Yellow Amber 3 Echo Back Ground Black Blue Dark_Grey 4 Data Back Ground Black Grey Dark_Grey BR_Blue 5 ROT Bar Green Pink White Yellow 6 Pilot Green Pink White Yellow 7 Rudder...

Страница 44: ...Profile 0 Previous 1 Own Ship Off Rectangle Pentagon 2 2nd Ship Off Rectangle Pentagon 3 3rd Ship 1 Profile Off Rectangle Pentagon 2 Dimension Beam Lemgth 3 Position a b 4 4th Ship 1 Profile Off Rect...

Страница 45: ...mension Beam Length 3 Position a b 3 10th Ship 1 Profile Off Rectangle Pentagon 2 Dimension Beam Length 3 Position a b 4 Ship Dimension 1 Own Ship Dimension Beam Length RADAR Antenna X Y GPS1 X Y GPS2...

Страница 46: ...revious 1 Edit User Map 0 Previous 1 Make with Cursor 0 Previous 1 Type Mark Line 2 Color White Cyan Blue Green Yellow Pink Red 2 Make with L L 0 Previous 1 Type Mark Line 2 Color White Cyan Blue Gree...

Страница 47: ...NEXT 0 Previous Off On 1 triangle Off On 2 Off On 3 anchor Off On 4 anchor prohibited Off On 5 dotted circle Off On 6 Wreck2 Off On 7 dot2 Off On 8 Next 8 NEXT 0 Previous 1 dot3 Off On 2 dot1 Off On...

Страница 48: ...0min 60min 0 1km 0 2km 0 3km 0 5km 1km 3km 5km 10km 2 Plot Color Off White Cyan Blue Green Yellow Pink Red 0 Previous 1 All Off On Individual 2 White Off On 3 Cyan Off On 4 Blue Off On 5 Green Off On...

Страница 49: ...NAMES AND FUNCTIONS OF ON SCREEN CONTROLS yy 2 2 3 NAMES AND FUNCTIONS OF ON SCREEN CONTROLS 2 1 3 4 5 6 7 8 9 10 11 12 13 14 15 16 17 18 19 20 21 22 23 31 24 25 26 27 28 29 Fig 2 3 On screen control...

Страница 50: ...ip s position is moved as follow whenever the button is clicked p p 6 LENGTH OF TRAILS The length of trails is switched as follow whenever the button is clicked OFF 2Scan 15sec 30sec 1min 2min 3min 4m...

Страница 51: ...EVEL To adjust the gain level click GAIN and adjust by JOG DIAL or TRACK BALL and press ENTER key Only when Service Menu Equipment Setup GSFT Soft Key On 21 RAIN CLUTTER SUPPRESSION LEVEL To adjust th...

Страница 52: ...mode is switched to LEVEL1 LEVEL2 LEVEL3 whenever the button is clicked 31 ECHO BORDER The mode is switched to show an outline around the radar echoes 32 AIS label If this button is held down vessel...

Страница 53: ...EBLS ELECTRONIC BEARING LINES EBL1 EBL2 16 3 5 3 USE VRMS VARIABLE RANGE MARKERS VRM1 VRM2 18 3 5 4 USE P LINES PARALLEL INDEX LINES P LINE 19 3 5 5 MOVE OWN SHIP S DISPLAY POSITION OFF CENT 20 3 5 6...

Страница 54: ......

Страница 55: ...on the operation panel If you put anything hot on it it may be deformed z Do not give any impact to the operation panel trackball or controls Otherwise any failure or damage may result Attention POWE...

Страница 56: ...is replaced preheat the equipment in the standby state for 20 to 30 minutes before setting it into the transmit state z If the preheating time is short the magnetron causes sparks resulting in its uns...

Страница 57: ...start transmission and the antenna will start rotating Standby at the lower left of the screen changes to Transmit Note The radar does not start transmission if you press TX key while Preheat is indic...

Страница 58: ...TX key starts observation 2 Press the STBY key and the TX key together The system will be turned off When conducting maintenance work make sure to turn off the power and unplug the power line of the...

Страница 59: ...or on the item with trackball and press ENTER key For example the procedures to change the brilliance of VRM is as follows Procedures 1 Press MENU key or put the cursor on Menu at the bottom left of t...

Страница 60: ...of 3 VRM Level4 will be highlighted 5 Press ENTER key Adjustment menu will be opened j p 6 Put the cursor on 2 Level2 Level2 will be highlighted g g 7 Press ENTER key The brilliance of VRM will be set...

Страница 61: ...ng condition Procedures 1 Press PANEL key In consideration of the ambient brightness adjust panel brilliance that is high enough to read the characters on the operation panel but does not glare The PA...

Страница 62: ...d and press ENTER key The brilliance levels menu will appear 3 Select the level to be set and press the ENTER key The selected brilliance level will be set Exit 1 Press MENU key The menu will be close...

Страница 63: ...ound color inside the bearing scale 4 DATA BACK GROUND Change the background color outside the bearing scale 5 ROT BAR Change the colors of ROT bar 6 PILOT Change the colors of the symbol of pilot 7 R...

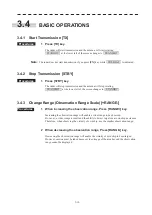
Страница 64: ...ft of the screen changes to STANDBY 3 4 3 Change Range Observation Range Scale RANGE Procedures 1 When increasing the observation range Press RANGE key Increasing the observation range will enable a w...

Страница 65: ...s displayed in the tune mode button at the lower left of the screen Fig2 3 2 When using the automatic tune mode Procedures 1 Continue pressing TUNE dial until the character on the upper of the tuning...

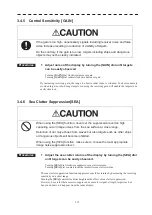
Страница 66: ...g the SEA function never set the suppression level too high canceling out all image noises from the sea surface at close range Detection of not only echoes from waves but also targets such as other sh...

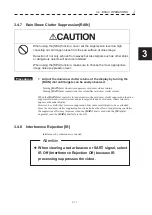
Страница 67: ...eturns Turning RAIN dial counterclockwise intensifies rain snow clutter returns When the RAIN dial control is turned clockwise the rain snow clutter suppression function suppresses rain snow clutter r...

Страница 68: ...tion level is selected the radar s ability of detecting small targets such as buoys and small boats lowers In general IR LOW should be selected 3 4 9 Hide Display Range Rings RANGE RINGS Procedures 1...

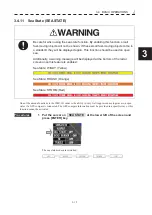
Страница 69: ...essage will be displayed at the bottom of the radar screen once this feature is enabled Sea State WINDY Yellow Sea State ROUGH Orange Sea State STORM Red One of the unique functions in the JMR 611 rad...

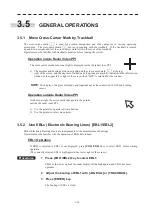
Страница 70: ...when GPS is selected for the window NOTE The display of degrees of latitude and longitude needs the connection of GPS and heading sensor Operation outside Radar Video PPI As shown at right the cursor...

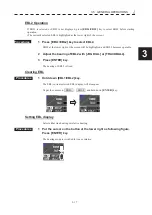
Страница 71: ...ill be highlighted and EBL2 becomes operable 2 Adjust the bearing of EBL2 with JOG DIAL or TRACKBALL 3 Press ENTER key The bearing of EBL2 is fixed Clearing EBL Procedures 1 Hold down EBL1 EBL2 key Th...

Страница 72: ...and VRM1 becomes operable 2 Adjust the range of VRM1 with JOG DIAL or TRACKBALL 3 Press ENTER key The range of VRM1 is fixed VRM2 Operation If VRM1 is selected or VRM2 is not displayed press VRM1 VRM2...

Страница 73: ...G DIAL or TRACKBALL 3 Press ENTER key The range of P LINE1 is fixed P LINE2 Operation If P LINE1 is selected or P LINE2 is not displayed press P LINE key to select P LINE2 before starting operation Th...

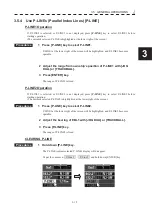
Страница 74: ...ata Procedures 1 Put the cursor on TRAILS and hold down more than 2seconds All the stored trails data will be erased Trails Motion Mode There are two types of trails relative motion trails and true mo...

Страница 75: ...f Trails Trails mode Procedures 1 Place the cursor over the position at the lower left as following figure Press ENTER key The motion mode of trails is switched to true or relative Land Ship Trails La...

Страница 76: ...kind of information is OWN SHIP If other information GPS DOCKING AIS WIND or OFF is selected put the cursor on the button Fig2 3 11 or 21 and press ENTER key There are shown 2 vectors one drawn from t...

Страница 77: ...ip put the cursor on 2 2nd ship and press ENTER key Set the items If RADAR antenna or GPS sensor is not installed on 2nd ship set only the dimension 7 Press MENU key Menu will be closed NOTE Correct s...

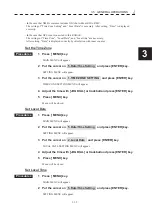
Страница 78: ...ll be displayed over all ship s mark 4 Press MENU key Menu will be closed 3 5 9 Time Setting Time is displayed in the information window at the upper right or left of the screen only when the kind of...

Страница 79: ...R key SETTING MENU will appear 3 Put the cursor on 1 TIME ZONE SETTING and press ENTER key TIME ZONE SETTING MENU will appear 4 Adjust the time with JOG DIAL or trackball and press ENTER key 5 Press M...

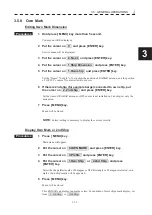
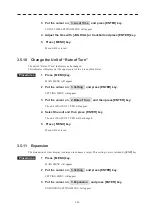
Страница 80: ...cursor on 3 Setting and press ENTER key SETTING MENU will appear 3 Put the cursor on 2 Rate of Turn and then press ENTER key The unit of RATE OF TURN will appear 4 Select the unit and then press ENTE...

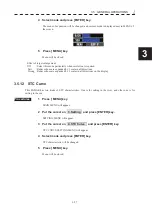
Страница 81: ...irections Strong Radar echoes are expanded by 2 scales in all directions on the display 3 5 12 STC Curve This RADAR has two kinds of STC characteristics One is for sailing in the river and other one i...

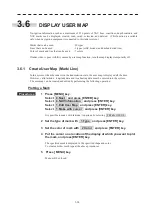
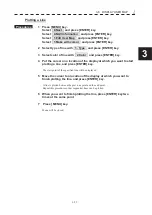
Страница 82: ...played all the time However valid latitude longitude data and true bearing data must be entered into the system The user map can be created and edited by performing the following operation Plotting a...

Страница 83: ...ess ENTER key 4 Put the cursor on a location of the display at which you want to start plotting a line and press ENTER key The start point of the specified line will be displayed 5 Move the cursor to...

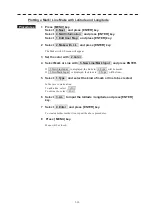
Страница 84: ...Mark or Line with 5 New Line Mark Input and press ENTER If 5 New Line Input is displayed the kinds in 1 Type will be marks If 5 New Mark Input is displayed the kinds in 1 Type will be lines 5 Select 1...

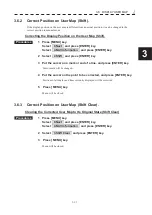
Страница 85: ...and press ENTER key 3 Put the cursor on a mark or end of a line and press ENTER key Cursor mark will be changed 4 Put the cursor on the point to be corrected and press ENTER key Positions of all marks...

Страница 86: ...ze smaller than usual Setting Display by Type Procedures 1 Press MENU key Select 8 Next and press ENTER key Select 4 NAV Information and press ENTER key Select 4 Mark Display Setting and press ENTER k...

Страница 87: ...and lines are not displayed even if all other settings are On On All color s marks and lines are displayed even if all other settings are Off Individual Setting by type is activated 4 Press MENU key...

Страница 88: ...lid only in the navigation data setting menu After closing the menu the manually entered position data is invalidated Manually Entering the Own Ship Heading Own Ship Heading Use this function when edi...

Страница 89: ...splayed geodetic system is identical to the one used with the navigation equipment If the two geodetic systems are different the positions of navigation information of the display will be shifted Ther...

Страница 90: ...New Zealand 23 GUAM 1963 Guam 24 HAYFORD 1910 Finland 25 HJORSEY 1955 Iceland 26 INDIAN India Nepal 27 IRELAND1965 Ireland 28 KERTAU 1948 West Malaysia 29 L C 5 ASTRO Cayman Brac Island 30 LIBERIA 19...

Страница 91: ...ed To delete another mark or line repeat procedures 2 and 3 4 Press MENU key Menu will be closed Moving a Mark or Line Move A mark or line is moved individually for the created user map Procedures 1 P...

Страница 92: ...Select 5 Insert Move Vertex and press ENTER key 2 Put the cursor to a side line into which a vertex will be inserted and press the ENTER key A vertex is inserted into the selected line and the cross c...

Страница 93: ...Insert Move Vertex and press ENTER key 2 Put the cursor on the mark or vertex of a line and press ENTER key When the mark or vertex of a line to be corrected is selected the cross cursor mark will ap...

Страница 94: ...nd press ENTER key Select 1 Edit User Map and press ENTER key Select 6 Delete Vertex and press ENTER key 2 Put the cursor on the mark or vertex of a line and press ENTER key The vertex of the selected...

Страница 95: ...of marks or lines to be deleted To select all types select All For example to delete red marks select 2 Select the color of the marks or lines to be deleted Select the color of marks or lines to be d...

Страница 96: ...you inserted a flash memory card or 3 Internal and press ENTER key 5 Select 2 Load Mode and select Add or Overwrite and press ENTER key Add and Overwrite of the Load Mode items are switched When Add...

Страница 97: ...ship position on the user map is entered in the manual mode Procedures 1 Insert a flash memory card into the card slot In the case of saving data to internal memory a card is not necessary 2 Press MEN...

Страница 98: ...elect 1 Select Card Slot and press ENTER key 4 Select the slot number which you inserted a flash memory card or 3 Internal and press ENTER key 5 Select 6 Erase and press ENTER key The Erase screen wil...

Страница 99: ...s ENTER key Select 5 File Operations and press ENTER key 3 Select 1 Select Card Slot and press ENTER key 4 Select the slot number which you inserted a flash memory card or 3 Internal and press ENTER k...

Страница 100: ...has two card slots and this setting is to select which slot is used for this function Procedures 1 Insert a flash memory card into the card slot Flash memory card is necessary For the insertion and r...

Страница 101: ...is saved in the folder Folder is created in each one hour Folder name YYYYMMDD_hhmm Data name YYYYMMDD_hhmmss YYYY year when folder or data is created MM month when folder or data created DD day when...

Страница 102: ...7 2 The captured data in internal memory can be saved from internal memory to a flash memory card whenever the key refer to Fig2 2 18 on the operational unit or button on the screen refer to Fig2 3 2...

Страница 103: ...tem overwrites or not AUTO File Erase Off The system stops screen capture when the capacity is full AUTO File Erase On The system overwrites data when the capacity is full Procedures 1 Press MENU key...

Страница 104: ...Setting menu x Buzzer Volume x EBL VRM Control CURS 3 8 1 User Setting Load User Setting The operating state saved in the system can be loaded by performing the operation below When the operating sta...

Страница 105: ...key Confirmation Window will appear 3 Select 1 Yes and press ENTER key The operating state data will be saved 3 8 3 User Setting Erase User Setting The operating state saved in the system can be delet...

Страница 106: ...other data for example the data saved with PC is not deleted by this function Procedures 1 Press MENU key Select 8 Next and press ENTER key Select 3 Format Card and press ENTER key 2 Select 1 Select...

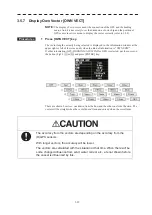
Страница 107: ...per left and right side of the screen can be selected from OFF GPS Docking AIS information Own Ship Data and Wind data as follow By pressing on the arrow button the information in window will be chang...

Страница 108: ...this vessel will be shown at the window By pressing on the arrow button the user can change the information 3 10 3 Display the Vessel Names on the Screen While pressing NAME LIST at the window the ve...

Страница 109: ...ymbol Display On AIS symbols are displayed on the screen Off AIS symbols are not displayed on the screen 3 Vector Change the length of AIS vectors as follow 4 Special AIS Symbols Signal Symbols On AIS...

Страница 110: ...The received Europe number is displayed If there is no valid value Missing is displayed 5 Ship Type The received ship type is displayed If there is no valid value Missing is displayed 6 Latitude Posit...

Страница 111: ...12 Blue Sign The received blue sign information is displayed If there is no valid value Missing is displayed 13 Alarms The received alarm is displayed ID Alarm ID Number Description Description text...

Страница 112: ...ng distance from own ship 1 Vessel Name The vessel name is displayed up to 20 letters If there is no valid value A blank is displayed 2 MMSI The MMSI number is displayed 3 SOG The received speed of gr...

Страница 113: ...password input screen is displayed Enter the password AIS 1 Vessel Name The vessel name is changed You can enter up to 20 letters 2 MMSI Number The MMSI number is changed 3 Call Sign The call sign is...

Страница 114: ...Side GPS Distance from GPS equipment setting position to starboard side 9 Reporting Rate The interval for reporting own ship information is changed 10 Blue Cones The information of hazardous cargo is...

Страница 115: ...10 5 AIS SYMBOL On the screen the following symbols can be found Description Symbol AIS information window AIS target without heading AIS target AIS target with blue sign AIS target with speed AIS tar...

Страница 116: ......

Страница 117: ...SECTION 4 MEASUREMENT OF RANGE AND BEARING SECTION 4 MEASUREMENT OF RANGE AND BEARING 4 1 MEASUREMENT BY TRACKBALL 4 1 4 2 MEASUREMENT BY RANGE RINGS 4 2 4 3 MEASUREMENT BY EBLS AND VRMS 4 3...

Страница 118: ......

Страница 119: ...hoes on the radar display 2 Move the CURSOR mark to a target by the trackball The CURSOR on the radar display indicates the bearing and range of the target The range is a distance from own ship s posi...

Страница 120: ...nge between the target and own ships can be determined by visually measuring the target s position that lies between two range rings In this case the distance interval of The Range Rings is 1km Figure...

Страница 121: ...he lower right of the radar display will be highlighted and the VRM1 will appear as a broken line circle on the PPI display 4 Move the broken line VRM1 to the target by using the JOG DIAL control The...

Страница 122: ...VRM1 EBL2 Step2 EBL Control by JOG DIAL Step4 VRM Control by JOG DIAL 45 0 EBL1 VRM2 3 km VRM1 Distance from own ship to the target EBL1 EBL2 VRM1 VRM2 Operation Setp1 Press Setp3 Press Note EBL and V...

Страница 123: ...CHOES ON DISPLAY SECTION 5 TRUE AND FALSE ECHOES ON DISPLAY 5 1 RADAR WAVE WITH THE HORIZON 5 1 5 2 STRENGTH OF REFLECTION FROM THE TARGET 5 3 5 3 SEA CLUTTERS 5 4 5 4 FALSE ECHOES 5 6 5 5 DISPLAY OF...

Страница 124: ......

Страница 125: ...ters relative to the bearings and ranges of the shore or islands using a chart and to monitor the position and movement of a heavy rain if it appears on the radar display Various types of radar displa...

Страница 126: ...of 660 m or more b If the height of a target is 10 m the radar range has to be approx 15 nm However the maximum radar range at which a target can be detected on the radar display depends upon the size...

Страница 127: ...intensity from a higher and larger target is not always higher in general In particular the echo from a coast line is affected by the geographic conditions of the coast If the coast has a very gentle...

Страница 128: ...e 5 1 Sea state and probability of target detection Probability to detect a target at a distance of 0 7 NM V Detection probability of 80 M Detection probability of 50 NV Detection probability of less...

Страница 129: ...ow clutter may decrease The amount of attenuation depends on the transmission frequency antenna beam width and the pulse length Figure 5 4 shows examples in which detection distance is reduced due to...

Страница 130: ...ays in the same directions which the operator should have in mind in radar operation II Side Lobe Effect A broken line circular arc may appear at the same range as the main lobe of the radar beam on t...

Страница 131: ...occurs on the sea surface due to a certain weather condition however the radar beam may propagate for an abnormally long distance at which a target may be detected by the radar For instance assuming t...

Страница 132: ...e Figure 5 8 Figure 5 8 If radar equipment causing an interference pattern and this radar are of the same model their transmitting repetition frequency is nearly the same As a result interference patt...

Страница 133: ...Clutter Control RAIN Minimum Most counterclockwise 3 TUNE control No tuning to weaken clutter echoes 4 Interference rejecter IR OFF Figure 5 8 Example of Display SART code Position of SART Position of...

Страница 134: ......

Страница 135: ...SECTION 6 MAINTENANCE SECTION 6 MAINTENANCE 6 1 Routine Maintenance 6 1 6 2 Maintenance on each Unit 6 2 Scanner Unit NKE 387 6 2 Display Unit Alpha screen 6 5...

Страница 136: ......

Страница 137: ...e to turn off the indicator if a rectifier is used Otherwise equipment failure or death or serious injury due to electric shock may result because voltage is outputted from the rectifier even when the...

Страница 138: ...may be caused Turn off the main power if you need to be near the scanner unit for maintenance or inspection purposes Direct exposure to electromagnetic waves at close range result in death or serious...

Страница 139: ...of the fitting bolts M8 is 1176 to 1470 N cm 120 to 150kgf cm which makes the inside water tight and protects the packing against permanent compressive strain The packing starts being produced from a...

Страница 140: ...in short intervals is more effective to prevent the gears from wear and tear and extend their service life but oil at least every six months Use Mobilux2 of Mobile Oil c Mounting legs Check the mounti...

Страница 141: ...th a dry cloth Also do not use gasoline or thinner to clean the screen Otherwise the screen surface may be damaged Dust accumulated on the screen will reduce clarity and darken the video For cleaning...

Страница 142: ......

Страница 143: ...SECTION 7 TROUBLE SHOOTING SECTION 7 TROUBLE SHOOTING 7 1 FAULT FINDING 7 3 7 2 TROUBLE SHOOTING 7 5 7 3 REPLACEMENT OF MAJOR PARTS 7 7...

Страница 144: ......

Страница 145: ...the indicator if a rectifier is used Otherwise equipment failure or death or serious injury due to electric shock may result because voltage is outputted from the rectifier even when the radar is not...

Страница 146: ...e main power if you need to be near the scanner unit for maintenance or inspection purposes Direct exposure to electromagnetic waves at close range result in death or serious injury Set the safety swi...

Страница 147: ...gger Scanner TRIGGER error TXRX HL Scanner HL antenna directional standard signal error TXRX Data Scanner No communication communication mismatched checksum error or collision TXRX Heater Scanner Magn...

Страница 148: ...pace Invalid Card Card Invalid card Read Failed Card Read failure Write Failed Card Write failure Erase Failed Card Erase failure Format Failed Card Unformatted card Copying Displayed image is capturi...

Страница 149: ...r Contact of Connector within Unit Reference This radar equipment is provided with standard spares which include two kinds of fuses Refer to table 7 4 Table 7 4 Spare Fuses for NCM 994 Name Type Code...

Страница 150: ...t CBD 1783 Scanner Motor drive circuit CCB 705 Scanner Break circuit CFA 252 Only resistance 10ohm 30W with cable Scanner Mag filter circuit CFR 234G Scanner BP circuit CHT 81 Scanner Control circuit...

Страница 151: ...harged Otherwise an electric shock may be caused Take off your wrist watch when bringing your hands close to the magnetron Otherwise your watch may be damaged because the magnetron is a strong magnet...

Страница 152: ...urs CBP 202 CBP 202 Allophone generation and rotation stop Fan motor in NDC 1774 40000 hours 109R0812H4D01 5BFAB00687 Shortening the service life of the circuit in control unit Backup battery in CDC 1...

Страница 153: ...cement connect the lead wire correctly Handling of Magnetron under Long Time Storage The magnetron that has been kept in storage for a long time may cause sparks and operate unstably when its operatio...

Страница 154: ......

Страница 155: ...SECTION 8 AFTER SALES SERVICE SECTION 8 AFTER SALES SERVICE When you Request for Repair 8 1 Recommended Maintenance 8 1 Radar Failure Check List 8 2...

Страница 156: ......

Страница 157: ...the product will be repaired with charges z Repair after the Warranty Period If any defective function of the product is recoverable by repair the repair of it will be made at your own charge upon yo...

Страница 158: ...15 may be optional answer is not necessary No Check Item Result 1 Power can be turned on The lamp on the operation panel is lit YES NO 2 A few minutes after powering on it will become standby status...

Страница 159: ...SECTION 9 DISPOSAL SECTION 9 DISPOSAL 9 1 DISPOSAL OF THE UNIT 9 1 9 2 DISPOSAL OF USED BATTERIES 9 2 9 3 DISPOSAL OF USED MAGNETRON 9 3...

Страница 160: ......

Страница 161: ...9 1 DISPOSAL OF THE UNIT y yyyy yyyy 9 1 9 DISPOSAL 9 1 DISPOSAL OF THE UNIT When disposing of this unit be sure to follow the local laws and regulations for the place of disposal...

Страница 162: ...Radar Process circuit CDC 1513 BT300 Panasonic Corporation Energy Company CR2032 z Do not store used lithium batteries Dispose of them in accordance with regulations of local government z When disposi...

Страница 163: ...y 9 3 9 9 3 DISPOSAL OF USED MAGNETRON Magnetron is used in the Scanner NKE 387 z When the magnetron is replaced with a new one return the used magnetron to our dealer or business office For detail co...

Страница 164: ......

Страница 165: ...ATIONS SECTION 10 SPECIFICATIONS 10 1 JMR 611 TYPE RADAR 1 10 2 SCANNER NKE 387 2 10 3 CONTROL UNIT NCM 994 3 10 4 INPUT SIGNAL 4 10 5 OUTPUT SIGNAL 5 10 6 STANDARD EQUIPMENT COMPOSITION 5 10 7 DISTAN...

Страница 166: ......

Страница 167: ...dication Relative Motion mode Head up North up 10 Ambient Condition According to IEC60945 Temperature Scanner 25 to 55 Storage Temperature 70 Other Unit except Scanner 15 to 55 Relative Humidity 93 at...

Страница 168: ...uency 9410 r30MHz 8 Transmitting Tube MAF1562R 9 Pulse width Repetition Frequency 0 1km 0 05PS 4000Hz 0 2km 0 05PS 4000Hz 0 3km 0 05PS 4000Hz 0 4km 0 05PS 4000Hz 0 5km 0 05PS 4000Hz 0 8km 0 05PS 4000H...

Страница 169: ...manual mode 12 FTC only manual mode 13 IR 3 levels 14 Bearing scale 360rscale graduate at intervals of 1r 15 Ship s heading marker Electric flash line suppressible while pushing key Ship s stern mark...

Страница 170: ...TOPILOT APB 2 signal for bearing HEADING THS HDT HDG HDM VHW 3 Depth DPT DBS DBK DBT 4 AIS ALR VDM INLAND AIS sentence 5 Rate of turn ROT 20mV degrees 30 0 30 90 0 90 300 0 300 6 Rudder RSA 20mV degre...

Страница 171: ...tor Analog RGB HD 15pin connector 1pcs DVI connector 1pcs 5 AIS ACK 6 LAN 100Mbps 100BACE TX Radar screen UDP IP Multi cast Sweep quadrant full screen block Radar control TCP IP Uni cast All the opera...

Страница 172: ......

Страница 173: ...E A CARD Fig 1 Block Diagram of JMR 611 Fig 2 Terminal Diagram of JMR 611 Fig 3 Primary Power Supply Block Diagram of JMR 611 Fig 4 Internal Connection Diagram of Scanner Unit NKE 387 Fig 5 Internal C...

Страница 174: ......

Страница 175: ...cards do not work Given the large number of Compact Flash card manufacturers it is not possible to confirm the compatibility of all available products The manufacturers of cards that have been confir...

Страница 176: ...essing unit cabinet and expose the card slot 2 Insert the card 3 Insert the card until the card slot s eject button protrudes and complete the installation of a card Eject a card from processor unit P...

Страница 177: ...APPENDIX Fig 1 Block Diagram of JMR 611...

Страница 178: ...GPS2RX E 12V GPS1TX GPS1TX GPS1RX GPS1RX HDG HDG AISTX AISTX AISRX AISRX DEPTH DEPTH RUDR RUDR ROT ROT A_PLT A_PLT CURS CURS NAVTX NAVTX DEPTH2 DEPTH2 RUDRE RUDR ROTE ROT DIM DIM EXTRGE EXTRG SYSALM S...

Страница 179: ...Board CQD 2353A Terminal Board Keyboard Unit NCE 5923 Radar Process Unit NDC 1774 12V TB102 IC1 3 3V 8V 12V 15V X1 X2 J1105 WS101 12V J1 J4 CCB 705 Motor Control 5V J1102 CMC 1474 Control Circuit J110...

Страница 180: ...3 7 62 2 Connection CMC 1474 6 4 5 2 1 3 T1 H 7LPRD0125 Reactor coil H 7LZRD0126 0 01 C40 CD8 R44 200 1 2 5 3 included CPA 276 Chassis installation ENCODER CHT 81 MOTOR CBP 202 SCANNER UNIT INTERCONNE...

Страница 181: ...APPENDIX Fig 5 Internal Connection Diagram of Control Unit NCM 994...

Страница 182: ......

Страница 183: ...vigation radar used on inland waterways Part 1 Technical characteristics and methods of measurement ETSI EN 302 194 V2 1 1 2017 02 Navigation radar used on inland waterways Harmonised Standard coverin...

Страница 184: ......

Страница 185: ...ing Department JRC declares that according to ES TRIN Annex 5 Section 1 Article 9 that JRC confirms and accepts that any modification made to equipment already approved will cause the type approval to...

Страница 186: ......

Страница 187: ......

Страница 188: ...R EQUIPMENT ISO 9001 ISO 14001 Certified SEP 2021 Edition 2 CODE No 7ZPRD1016 Not use the asbestos For further information contact URL Head office http www jrc co jp eng Marine Service Department 1 7...

Отзывы: